LOLLY
* 'present' me here... I started writing this post towards the beginning of the year, I last edited it in May and finally am posting it now. Why? Because it's helpful to look back on what I was trying to accomplish and my word of the year has profoundly helped me through 2021. I hope this encourages you to chose a word for the upcoming year and provides some inspiration.

Here I will share my focus for 2021, the struggle I have with presenting myself and my technique that is helping me to achieve the things I fear. In striving to accomplish tasks and putting myself out there to be able to share my passion and inspire others, there are also moments of doubt and it's easy to get lost in a fog of 'have tos' and the dreaded imposter syndrome. I can be my own worst enemy and small self-sabotaging behaviours take place almost daily but I'm working on it!
Each year I pick one little word, as a guide and reminder of my intentions for the year. Usually I post this at the start of the year but, with time being so strange during lockdown, it's taken me until now to gather all of my thoughts into this post. Last year my word was 'clear' and despite it not having much of a chance (with most of the year spent at home) it has served me well. In actual fact maybe the events of 2020 gave me more focus, allowed for clearing stuff out and prioritising what really matters.
So this year my intent is to maintain that same clearness of thought and build on what I've started. All the little changes I've made and the drive that I have, will result in good things and a stronger, more confident me.

I am SUPER excited about all the projects I have in the works, good things are happening and I am putting all my effort into being me. Doing what I love. Not taking on more than I can handle and connecting my abilities with what I enjoy. For the most part, in my career, that is teaching. I have always been a teacher, it's what I do well, and I am thankful I have been able to teach online with CraftyMonkies. Reaching people in a different way felt so strange at first but it's amazing how intimate it is and it's wonderful seeing people create and learn from home. It's so easy for all of us and the live classes allow for amazing interaction. If you're interested in learning more, check out the list of classes or see the available playbacks.
It fills my cup to encourage others and share my passion for quilting and stitching. It's not always easy for me to get that point across without coming off like I'm doing a hard sell. Do I want people to take a class with me, do I think it has value, will people learn and create beautiful projects, do I want to sell my patterns... yes, yes, yes, yes! Yet every time I mention my patterns or classes I feel like a bad salesperson or that I'm bothering people or I don't even know what. It doesn't feel good. But here's the thing, if you're not into it or you don't want it you won't be interested. For those that do, all I am doing is sharing information and you can buy a pattern and take a class if you like. So it shouldn't be this hard for me. The anxiety gets to a ridiculous point and I battle through it because I love designing and teaching so much that I can't give up.
So I've been trying to come up with ways to make it easier, to be able to talk about my projects and share video of myself without cringing.
First I have been listening to music. Music that pumps me up, puts a smile on my face and gets my mind right. Funnily my last pattern release was inspired by a Gwen Stefani song and this track has been on repeat
That line 'I'm recycling me' led to a bit of an epiphany. I'd always wanted to get back my confidence, to lose the anxiety and go back to the 'old me'. Of course that's not possible, there's no way, but I can recycle. Save some bits, take the good stuff that's going on currently and mush it all into something else. Still myself, with everything I've experienced and learnt, still original just changed.
Maybe that doesn't make sense... this post is completely train-of-thought and leads to how I came to chose my word.
Secondly (and this is where it gets even weirder) I have created an alter-ego. Stay with me! For those times when I just cannot seem to counter the doubts in my head, when I have to make a video or call or try and market myself... I become 'Lolly'. Before you click away or think I've lost it completely, this was an idea my husband had - conceived when we were chatting about my anxiety and self-doubt. He said why don't you pretend to be someone else, still myself but with the drive of someone who has presence and confidence. So who would I be? Dolly Parton, every time! No excuses, no hiding. Dolly is herself, I mean she's the on stage /public version of herself but doesn't she do it with such grace and honesty. Like Beyonce has her Sasha Fierce persona (explained so well in that clip), it is a great way for me to overcome nerves and get it done. So Lolly is my Sasha Fierce. It's like acting, which I did a lot of when I was younger, and while I'm not pretending to be someone else - it allows me to be clear in what I'm presenting; the strong, confident and capable version of myself. My word for 2021 is lucidity - I like that it works with my name too! Light and clear.

Stay tuned because I have an exciting project coming up relating to the word of the year! Here are links to my words from previous years if you'd like to read more:
2020 ~ Clear
And ALWAYS channel Moira Rose, such wisdom!
A year in the making : The fruits of plenty
It took a year...

How it started...

How it's going...
Done!
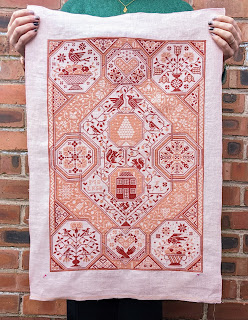
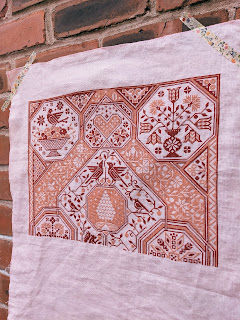
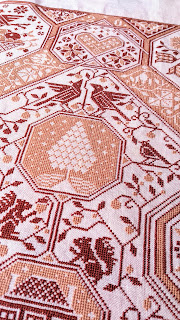
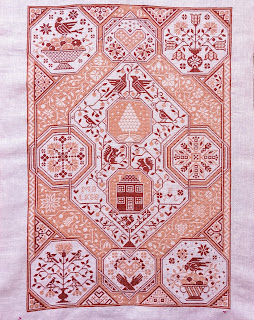
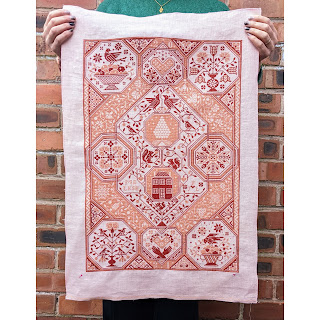
It's not often I complete something in a year, my work in progress pile can attest to that! This stitch-a-long is the third one I've completed from Modern Folk Embroidery, obviously I highly recommend his patterns and this was a joy to stitch. It was lovely receiving the next part of the pattern each month and I've really enjoying seeing all the other versions as they've been stitched on instagram #MFESAL2021, so many interesting colour combinations. The pattern is The Fruits of Plenty. Also see my previous stitchings, Love Thy Neighbour - better pictures in progress here and Kindness & Fortitude - shows how different patterns can look depending on your choices.
This was the final part for the month of December, it was a little sad putting in those last stitches because it meant it was over but I'm so pleased with the finish.
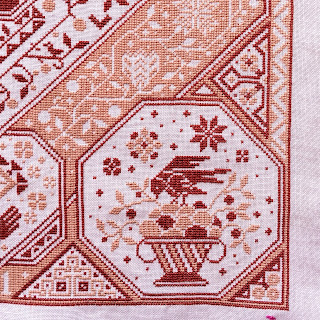
My favourite floss is Aurifloss and I chose to use a peach and a terracota -ish colour for my project. The colours are Peach #2215 and Pumpkin Spice #2395. I stitched 2 over 2 on 32 count Belfast Linen in the colour Linen Pink - a pretty pale pink that is a nice warm background for the floss.
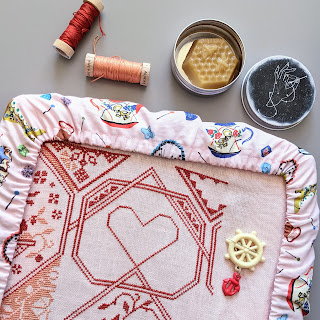
When I started stitching I used a Q-snap frame and a grime guard I made (details in this post) and while I do like working with a hoop or frame, I then discovered the sewing method and stitching in hand, from the lovely Kimberly and The Real Housewives of Cross Stitch. If you haven't tried it I would encourage you to watch their tutorial video, as it shows a couple of different options and plenty of tips. I believe this is how Jacob of Modern Folk Embroidery prefers to stitch too, so I'm in great company!
I do like using beeswax for conditioning the thread, it's not essential but it does smooth the floss and makes stitching (especially on linen) a little easier. I got the beeswax in the above picture from a local beekeeper, if you don't have a local source then there are some lovely sellers on Etsy, like Cobble and Hive.
In so many ways it is hard to believe a year has passed but then time has warped even more in the past couple of years, it feels like a lot of time has been lost. I recommend a stitch-a-long as a marker for time if you need one!! This was the half way point...
I now realise I don't have pictures of the back but trust me I got messier as I went along ;) I did start with good intentions and tried to keep the back as neat as possible but ultimately I don't really care what the back looks like and it can get frustrating. I would much prefer to stitch as I please and enjoy the process rather than care about the backside.
The pattern called for initials but rather than just add my own, I added my husband, myself and the first initials of our three children. I love it.


And just like that... 34613 crosses later, the pattern is complete.

This coming year I would like to get all my complete cross stitch projects framed and I very much look forward to having this beauty on display. Having said that before about previous pieces, I really need to make this happen!
window zippered pouches

Back with another Aurifil Artisan project! This month I was sent some gorgeous Free Spirit fabrics to play with, along with a spool of 50 weight thread. I received two cuts of the stunning Little Fluffy Clouds in Cloud, Daydreamer by Tula Pink and a deep purple solid (which I think might be Tula Pink Solids in Tanzanite?!). The Daydreamer collection has some really stunning prints, including one called Lucy!

The Little Fluffy Clouds print is a beautiful ombre, from yellow to green to blue - you get a better sense of it in this picture from the Free Spirit website (and there are two other colourways of this print available):

I ummed and ahed about what to make for some time. I was a bit stumped. For inspiration I turned to my bookmarks, all the web pages I have saved for later, to one day make projects from tutorials. What a great resource! Though it turns out some of them no longer exist and many weren't right for these fabrics... but I did hit on a winner.
quilt label X gold needles

An important part of the process is quilt labelling. Do you label your quilts?
Despite not yet having a finish, the idea for a label came to me and I jumped right in! There's no point in waiting to create, might as well stitch when the mood strikes. Here I show you my process for making this label, share some favourite tools and there's a chance to win a jar of Hemline Gold needles.
spring steps
I do love surprises... and happy mail... and quilt making (especially for a good cause)!
For this months Aurifil Artisan challenge we were sent five fat quarters of Kaffe Fassett fabric to use in a project.


I knew I was going to make a quilt. I don't use red prints very often and spent a while auditioning fabrics to go with the bundle. Initially I pulled pinks and oranges, other warm tones because that's my vibe. It all looked too samey though and the Kaffe prints didn't stand out enough. So then I pulled a whole rainbow of solid fabrics, mixing them up with the prints to see what worked well.
Ultimately I went with a pale grey for the background and deep yellow, bright purple, olive and cerulean - sorry I don't have the exact shades, these fabrics were left over from other projects and I've failed to have any system for keeping track of the names/brands of solids. If you have a good system please let me know!
Traditional blocks are always a favourite and, as I haven't used any of my special quilting rulers for a while, I looked through them and decided to make Courthouse Steps blocks.


The olive was a considered choice, as it's the colour for the centre of the blocks. Inspired by the blooms on the prints, I wanted the blocks to look like large flowers and the green would be the stems.
concrete garden quilt

I am over the moon with this finish! It's been a long time coming... it began it's life in 2016 when I created the central hexagon and my wonderful Bee A Brit Stingy friends made bee blocks. They each made a square and a triangle block. My brief as 'queen bee' was asking them to use the background fabric I sent, along with a mix of cheery fabrics and create geometric blocks for the squares and triangle blocks made up of triangles.

The starting point for all our bee blocks was a central panel in the shape of a hexagon. The hexagon was formed with six triangles cut from the background fabric. I hand pieced the flowers, which are from the Daisy Do pattern from the book Quilt Lovely by Jen Kingwell. Then machine appliqued them to the background.

This quilt is called Concrete Garden because of this central panel - the mix of prints with the monotone background reminds me of city living and a garden growing through concrete. Overall the quilt layout and blocks remind me of an allotment too, common in city suburbs.

clam points and leaves ~ epp

I am excited to be writing about this make because it's such a fun and useful way to use English paper piecing shapes/blocks. I've made a new project bag and decorated it with epp. There are so many tips and tricks I can share with you; epp curves, light fabrics on dark backgrounds, neat applique top stitching and the awkwardness of metal bits on zips - oh I'm covering it all today!
〰 stitchy / fabric stash 〰

I'm a busy bee over here, so many projects being planned and worked on. Of course when you craft, you need supplies! Happy mail in the form of fabric, cross stitch supplies and vintage trim. Over the past couple of months I have bought the things you'll see here, some have already been used and others are for upcoming makes that I will share soon. Shopping small and supporting independent businesses is important and I found some fun creative businesses to buy from. This post is really a way for me to keep a record of the things I've bought so I can return to it, to remind me of the details when I share my makes. If you do not need enabling then come back soon because I have a finished project to share... but keep reading to see some lovely things and get details of my machine quilting class 🧵
First up, look at these adorable individually wrapped needle minders - opening them was such a treat, like it was my birthday! I love this kind of personalisation and in her note she apologised for the puns but it made me chuckle.

glitta pouch + improv

I do enjoy making little projects, it's always good to have a nice quick finish between bigger projects. I have been joining in with Laura of Sweet Cinnamon Roses as she hosts her Pattern Parade of projects, all designed to be fun to sew and encourage your creativity!
So far for the pattern parade I have made the Glitta Pouch and an Improv block using her patterns, here's how mine turned out...

midnight sewing basket makeover

The other night I couldn't sleep and I did what any crafter might do, I starting pottering around my sewing space. On the windowsill sits a sewing basket. A perfectly nice, floral sewing basket. I think it was gifted to me but I don't actually remember. I really like the colours but it's a little twee for my taste and it doesn't really fit my vibe. So - I'm sure to some peoples utter horror - I found a way to make it more me.
Now if you've been here a while, you know I love stickers. I will put them on anything but fabric?! no.
What is the fabric alternative to stickers? Patches!
Here's how I did it and what I learned in the process...

vintage sewing set ~ scissor fob

A satisfying and useful little make, combining things I love and using up what I have - this scissor fob is keeping my scissors safe!

I have been so enjoying a lot of hand stitching time recently and my cross stitch obsession is growing. Counted cross stitch is so relaxing, I have to concentrate enough so that my mind is not engulfed in worries or to do lists (as it often is) and the patterns mean that even though you are repeating the same stitch over and over it doesn't get boring. Also you can create little projects like this one or work on much bigger pieces, so there's variety. The rabbit hole that is FlossTube (search flosstube on YouTube) led me to discover the website Tiny Modernist Cross Stitch and I fell in love with the Vintage Red Sewing Set pattern. I will stitch the pincushion at some point but as I kept loosing my scissors down the side of the sofa, I bought the pattern to make the scissor fob.

Stitched on an offcut of linen from my current big cross stitch project (Modern Folk Embroidery SAL), it was a quick stitch and I spent some time thinking about how to finish it off. I know a lot of people use the little glass seed beads beads but I don't have any and didn't want to buy anything new. I searched though my boxes of stuff and found these wooden beads from AGES ago - my mum has saved them from when I was a teenager (I was obsessed with the bead shop in Affleck's Palace and the bead shop in The Lanes in Brighton, where we spent holidays). She had given me a bag of beads and these wooden ones are such nice colours.
life is short you're capable

I made a thing! The original plan was for this to be a pincushion but I like it too much to stick pins in it, so it's a decorative little pillow. I like just having it around, a nice reminder and message to myself.
I designed this embroidery pattern as a companion to my You're Capable cushion/mini quilt pattern, which was inspired by Gwen Stefani lyrics and created to give empowerment.

It was a quick stitch, using couching with double strands and a single stand, and 3 strands for the back stitch with Aurifloss in # ???. It was complete chance that the dot of the fabric fit perfectly in the tail end of the Y but it does make me smile.
The fabric is Double Dots, Black & White by Cotton + Steel 2017. I fused Shape Flex SF101 to the back of the fabric before stitching. It is easily my favourite interfacing, it gives stability without stiffness and it fuses so nicely. I find myself using it often with different projects and it's perfect for this kind of thing.
I am lacking in trimmings stash and though I do love pom poms, I wanted to try something a bit different and used a THIN ribbon for edging. I had to carefully baste it in place because there was a risk of loosing it completely in the seam allowance, thankfully though it worked out and I love the extra pop of pink on the edges.

Then I added handmade tassels because why not add corner pizzazz too?!

Since I'm on a kick of using my hoarded stash fabrics, I couldn't resist using the fabulous telephone print on the back - ok, this officially makes it double sided!!
Telephones, Trinket by Melody Miller.

It's pretty and squishy and I will certainly be using ribbon this way again because it was fun to sew.
If you'd like to stitch this message, you'll find the embroidery template as part of the You're Capable pattern available in my shop!

kerchief girl ⋈ bow tie laptop case


The brief was to design a laptop case use bow tie blocks, a classic block that was calling out for some fussy cutting. I've had the kerchief girls prints in my stash for a while and this was the perfect project to finally cut into them for. I mixed in some scraps of low volume prints and pulled the library stamp print from JOT by Heather Givans for the lining fabric. I tried to pair the colours of kerchief girls with prints in my stash to coordinate the bow tie blocks. Not my normal colour palette but I only picked the kerchief girl colours I was drawn to and I wasn't in a yellow mood!

I used Essex Manchester Yarn Dyed in Metallic Onyx for the back and for some of the bow tie blocks, I love the texture of this fabric so much.
The quilting was done with Aurifil Forty3 thread in #2310, simple straight lines to showcase the blocks and I carried the lines onto the back for added texture.
My favourite part was the picking buttons for the closure. I have a wonderful tin of (mostly) mismatched buttons that I inherited from my Nan. I dove in and chose some contenders, it was a bit Goldilocks... some were too big, some were too small but there were no pairs that were just right!

have courage and be kind

Finishing a project is such a joy! But then so is starting a project... and working on a project, no wonder I am always making ;)
This finish is a special one for a few reasons. The cross stitch kit is from Stitchsperation, I love her kits and had already completed one which you can see here. She hand paints the fabric and not only is that really cool but it means you get a unique piece of fabric to stitch on. I chose 28ct evenweave and as a change I stitched this in hand rather than using a hoop.

Now I really like my Q-snap frames and won't be giving them up completely but I also really like stitching in hand and I'll probably just decide on a project by project basis what I feel like doing.
New to me, I also used the sewing method to stitch this design. Usually I stitch one cross at a time, I don't like the other way of making half stitches and going back on yourself. But the sewing method is a bit of a revelation and is quicker too (not that speed matters). I really enjoyed stitching this way, although on occasion I did do my usual one cross method (for travelling in a certain direction), I know you can turn the work around but I hate that - my brain literally can't cope and my counting goes off.
If you cross stitch and haven't tried the sewing method, give it a go! I watched this YouTube video tutorial on the Fat Quarter Shop FlossTube channel and seeing Priscilla, Chelsea and Kimberly each show how they stitch was so helpful. Kimberly's tip of loosening the frame to stitch this way really works and that's what I'm doing with another project I have on the go!

The Stitchsperation cross stitch kits comes with thread, though as I have a lot already I requested she didn't send any so I can use what I already have. This was stitched with Aurifloss #2692 using 3 strands of floss over two. I love how it turned out!

I framed it in an Ikea frame and hung it on the gallery wall we have in our dining room. Eventually I need to frame more of my completed projects and then hang them on the opposite wall. It would be nice to have the wall dedicated to stitchy things so I can look at them as I'm at my sewing machine (or eating dinner! - small house means multiple use dining room!).

In other news, I've been joining in with CraftyMonkies over on instagram for the #monkiemotivation photo challenge. I can't always do it everyday because, well life gets in the way but there are some really fun prompts to inspire you creatively and they are a great way to play and escape for a bit.
Yesterday they suggested making a colour palette using the website Coolors, it's so easy to use and I really enjoyed playing about with it. I actually have photographs that I've taken while we've been out walking, mostly of things with colours that inspire me and this would be a great way to pull a palette together from those pictures. There are inbuilt pictures too, so you can scroll through those to find colours you love if you're not into taking photographs.

I went with this photograph and use the colour picker to select colours that I liked and I think they make a nice palette!
This selfie was taken with my husband yesterday as we celebrated our 14th wedding anniversary! We had a quiet night in and ordered a takeaway (after earlier making pancakes with the kids!). A lockdown anniversary celebration.
Finally I just wanted to let you know that I have some upcoming classes with CraftyMonkies, my next class is Stitches & Thread - explore sewing machine stitches and expand your options using thread! I will show how to best set up your sewing machine for using different stitches, as well as types of thread and tips for preparing your fabric. Learn all about selecting needles, weights and varieties of thread for different uses. Whether purely to decorate small makes or items of clothing or for applique stitching or quilting, this class will inspire you to use and enjoy your machine to the max! Click the image below to book your place.

Excitingly you will now find videos of some of my live classes available in the CraftyMonkies online shop! If you're interested in learning how to do Big Stitch Hand Quilting & Tying a quilt or would like to watch me demonstrate making my Stitchy Pie needle case pattern, head HERE.
And I am thrilled to be taking a live class myself this weekend! I'm doing the Mindful Stitch Journal class with Gary Mills and can't wait to spend an afternoon relaxing, learning and sewing. If you'd like to join the class too visit CraftyMonkies.

Hope you're all having a good week, staying safe and enjoying working on your sewing projects!
Subscribe to:
Posts (Atom)