Wee Billow Bag


sew a scented sachet

Sew a scented sachet
You will need:
- sewing machine
- thread
- cotton fabric - see below for note about size
- organza, mesh or similar open weave fabric
- medium weight fusible interfacing (a tiny bit smaller than your piece of fabric)
- ribbon / twine for loop
- scissors
- pinking shears (optional)
- nice smellies to fill the sachet - suggestions detailed below.

Japanese rice bag


horseplay


geesey geesey >>


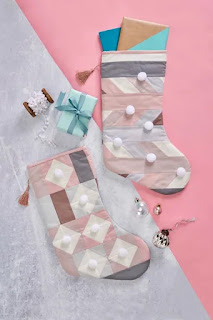
stockings + top trend
You don't need me to tell you that the year so far has been crazy! I'm ready to settle down for a cosy, quiet winter. I still have a few projects to sew and if you're anything like me, you might have a few projects to sew this season too!

The fun addition of pom poms and tassels add whimsy and hopefully these pretty stockings will grow with them, as they are not too kiddish and nicely neutral.
You can get the free pattern for the stockings HERE at gathered - with not much fabric you can create two different modern patchwork stockings! One uses a cool bias stripe effect and the other is made up of easy half square triangles and rectangles.
// slice //


sewing machine cover


Love Thy...

neighbour X work in progress X cross stitch X Aurifloss
My current cross stitch project for the year is coming along well, there's been a little bit of unpicking but that is most often the result of late night stitching. The pattern is Love Thy Neighbour by Modern Folk Embroidery and I started stitching it as part of Jacob's Summer Stitch A Long. Summer may be nearly over but I am in no rush to finish. The original pattern is stitched in one colour but like my last finished cross stitch I enjoy making it my own and mixing it up.
I'm enjoying stitching this motif by motif, choosing the colours as I go. I didn't pick a full colour palette before starting and have added in colours when needed. The overall vibe is happy colours, a mix of bright and pastels, and despite the rainbow layout of floss below, the colour pairings/groupings for each motif are intentionally not too matchy matchy. I really like a bolder, more mismatched style. I keep thinking 60/70s, a happy hippy Clothkits look.

the WHY = artistic fire
Today I'm sharing a couple of special projects, exciting news about how you can learn from me online and hopefully preempting a few concerns. The WHY matters. So I want to focus a little on why I do what I do, how sharing makes a difference and most importantly what I want to impart to you. Keep reading because it's not just pretty pictures, I would love to help you thrive and shine my spark for getting the most of out of your creativity.

Hand sewn projects are probably my favourite. I prefer to spend hours on the sofa, in the company of others, with the option of sewing outdoors or on the go (when possible). There is also something immensely satisfying about sitting at my machine and getting something sewn up fast too. My first project incorporates both, a happy mix of slow hand stitching and quick, easy machine sewing.


My next project involves more hand work, this time embroidery. I designed two patterns, to showcase different embroidery stitches and ways of creating text. Writing can look amazing when embroidered and using the right stitch for the way the letters are formed is crucial. At the same time a sense of naivety can also add to a piece, it depends on the look you want but I do think this is when 'handmade' shines. Every stitch that goes in the project is right there on display.
This seasonal pattern is a great sampler, each leaf is made with different stitches and the resulting textures are beautiful. I designed it with The Byrds song playing in my head (and as I stitched and even now!) to create a decorative hoop that could be displayed all year round.


Of course it is convenient having me right there, in real time, to be able to show you each stage of the project in detail. I can address any issues you may be having, repeat any parts and give you encouragement and advice on your makes.
There is a 'lot of ground' content covered in the classes...
*English Paper Piecing Pouch
- cutting
- basting
- piecing
- applique
- quilting
- sewing a zip
- making binding
- sewing binding (and curves)

*Embroidery Hoops
- preparing fabric
- using pattern
- hooping
- variety of embroidery stitches
- choosing stitches
- embroidering text
- finishing the hoop
- added embellishments / personalisation


wee boxy basket


dotti denim pouch


stay home stashing


Lola pouch ~ collaboration


