pretty and novel stash
26 November 2017
This week I got a squishy fabric parcel from Fabricworm and I had stuffed that envelope full of sale goodies!
I'm trying to shop smart and after assessing what I already have in my stash I knew I needed some more good blender prints and I'm lacking fun prints for fussy cutting so I was on the hunt for those too.
First I couldn't resist this sweet fortune teller print, which is lawn and so beautiful to the touch. The Aneela Hoey print was one I had seen someone use and fell in love with it and Blueberry Park is always fabulous as it plays so nicely with other fabrics.
left to right: Fortune Teller in Light Pink, Sleeping Porch by Heather Ross; Jenny's Plaid in Smoke, Stay Gold by Aneela Hoey; Flowerbed in Glacier, Blueberry Park by Karen Lewis and Trellis in Coal, Blueberry Park by Karen Lewis.
And I picked out some random prints that just drew me in with their cuteness! Like this playful cat border print and prints with hot pink in them:
Finally how great are these funky sewing themed prints?! I think these will make cute pouches and pincushions. Actually I'm sure that both these fabrics will find there way into lots of my projects, I can't resist those charming illustrations!
Notions in pink and Machines in blue, Thimbles and Threads by Robert Kaufman
I may have done a little black friday shopping too so there will be more to come! Did anyone else succumb to the sales?
Speaking of... quickly pop over to my Etsy shop because there is a discount on my patterns through Cyber Monday, click here for the sale! (no code required, discount has already been applied). A great excuse to pick up patterns and use up some of that fabric ;)
linking up to Sunday Stash with Molli Sparkles
Tilda Starburst and buttons
24 November 2017
I really enjoyed creating this quilt! I used a pretty bundle of the Tilda Harvest collection and the very clever Creative Grids Starburst ruler, designed by It's Sew Emma, to create this starry design for Sewing Quarter.
The blocks were simple to make and depending on how you cut the pieces there are lots of different angles and star variations to make. It's easy working from a collection of prints because they all go together so well and the Tilda colours really are beautiful! I wanted to showcase the prints and as I was laying out my design I thought it would be fun to show them off by using them as sashing between the blocks.
AGF Quilt Block Tour of Makers
22 November 2017
I was delighted to be invited to join the Art Gallery Fabrics Quilt Block Collection Blog Tour, hosted by the wonderful Sharon of Color Girl Quilts.
Art Gallery Fabrics have created a series of video tutorials, the Quilt Block Collection, that teaches you how to make a whole variety of quilt blocks using different techniques.
I chose a classic quilt block, Spiderweb and used the Arizona After fabric collection by April Rhodes. The way this block comes together is clever and there are just so many possibilities to create completely different looks!
To begin I separated the fabrics into light and dark, which was simple since the two colorways of the collection lend themselves to that perfectly. Then it was just a case of cutting strips and I took a grab and sew approach as I was making the blocks!
baby at play quilt
17 November 2017
Most of my friends have had babies and lots of quilts were made! So when I know someone that's having a baby, I love the opportunity to make a baby quilt as a gift. At work one of the cameramen told me his wife was expecting and I asked if they would like a quilt and what colours they would want it...
Grey, pink and yellow and I think it's a lovely combination!
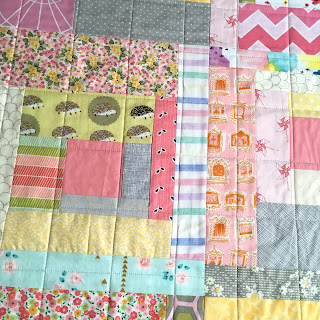
This was a nice stash buster and a good chance to use some of my favourite scraps in a pretty layout. I created six large log cabin blocks. Rather than use equal widths or measure the lengths, I sorted the fabrics into short/medium/long lengths and just trimmed them as necessary while piecing.
After piecing the blocks together the proportion of the quilt wasn't right and so I cut it down, creating rectangles top and bottom. I like the asymmetry it creates and am pleased with the finished quilt. It is bound with a geometric print because there are quite a lot of florals in the top and it gives it a modern look, plus it was the right colour palette!
2017 Finish-A-Long ~ Meet the Global Host Team ~ Karen
15 November 2017
Hi there! I'm Karen and blog at CapitolaQuilter . I've been participating since the beginning of Finish-A-Long and am honored to have joined in as one of the International Hosts this year. It's hard to believe we are already wrapping up 2017.
 |
| Pre-QCon Selfie 2017 |
Have you enjoyed reading the FAL Meet the Host monthly guest blogger posts? Well, now it's my turn to to be featured in the series! Here goes a picture filled post starting with most importantly, my beautiful family.
Family
 |
| Summer 2016 |
I am married to a wonderful guy and we have two grown boys. We are incredibly proud of the men they have become and adore the women they have chosen to spend their lives with. Enjoying time with our granddaughter and watching her reach milestones that we remember when our kids were young like it was yesterday and yet a lifetime ago is quite the mind game.
Look how cute and little they were!!! My oversized glasses and shoulder pads date our family portrait and the "Big Hair-Skinny Tie" picture was the perfect share for my first ever swap called I heart the 80's a Flickr group. I wish I still had that hand-dyed silk dress although in reality, we prefer jeans and a t-shirt. This summer marks our 35th anniversary.
 |
| Flashback Family Photos |
In 2002 we adopted two German Shorthair pointers. Always underfoot, Dottie's trick was to step on my foot pedal (until I upgraded my sewing machine with a start/stop button) and innocently walk in the way of photos. Chase perfected the skill of lying on a quilt if I glanced away - for a minute - while basting.
Sadly, we recently lost them both to sudden illness after long full lives and have no animals at the moment. Pets are considered family members to us and Hubby wants a puppy but I am not ready.
Capitola Quilter
Frequently mistaken for "Capitol, a Quilter" or "capital A quilter" , my blog name is easily misunderstood if you don't happen to be familiar with the small town on the coast of California USA where I live, Capitola. Spanning less than 2 square mile with a population of about 10K, it isn't a big city but is rich in history and a constant source of inspiration.
 |
| BeeSewcial "Reflections" Capitola Photoshoot |
Although our house is not one of the big beautiful oceanfront ones you see in the picturesque backdrops when I take my quilts on a photoshoot, we're still pretty lucky to be able to walk to the beach and enjoy mild weather.
 |
| Santa Cruz quilt photoshoot by Anne Sullivan |
The Early Years - Quilts from Patterns
Among the first quilts I made was a gift for my mother-in-law that included a picture of her seven grandkids. It is sweet with coordinating prints, fussy cornerstones, sashing and a border. Image transfer was high-tech at the time but peeling their faces off to iron down was totally creepy. Thank goodness Spoonflower came along!
 |
| 1998-1999 one of my first quilts |
My Scrappy Maximalist style had a kickstart when my friends brought fabric to a surprise Quilt-themed birthday party in my honor. The assortment received did NOT go together so I used black and white with uniform shapes to bring order and incorporated quote blocks. It is one of my most sentimental quilts and the beginning of my desire to create original works.
 |
| My Birthday Quilt-themed party Quilt |
Following patterns from books, I made these wedding quilts out of batiks, traditional and modern stash. I had the chance to meet Anita Grossman Solomon at Quilt Festival Houston 2014 and see her Old Italian Block quilt in the exhibit. I subtitled my blog SecondHandScraps because I eagerly accept leftovers from friends who know my reputation for scrappiness.
 |
| Old Italian Block 2012 and Split Nine-Patch 2011 |
In 2013 local quilt store SueDee's featured my quilts on display in a solo show. Using the MoStash and Friends+Fabric =AMSB bee blocks that I received and adding my own enlarged blocks, the Giant xPlus was a hit and is what I keep on our bed.
 |
| Opening Reception |
It didn't seem like an ambitious task when I set out to make each of my nieces, nephews and my own kids a 21st Birthday quilt. I stayed on track until the final three and thankfully all twelve are finally delivered. Among the tardy is this Full size quilt that rolled over from quarter to quarter on my FAL list frequently. I included a jumbo delectable mountain for the backing and two matching shams.
 |
| a rare "Guy" quilt |
Early on I only sewed for gifts and charity giving away all of my quilts. I didn't have a single one in my house! Since then I've kept a few - as evident by this adorable photo:
More than Quilts
Quilting came into my life as an adult but I grew up wearing handmade and learned to sew clothes in 4-H as a kid excelling in HomeEc in Jr. High and High School. Somewhere along the way I misplaced the confidence and skills and have had little success making myself garments. I've dabbled with clothes for my granddaughter since she's much easier to please and fit than I am.
Hart's Fabric, a family owned independent brick and mortar fabric store since 1969 (a rarity these days) is still the same place I go to shop. My improv seagull, poppy field and mountains design was chosen for their 2016 Row by Row Experience pattern.
Bags are quick and rewarding makes. I enjoy browsing thrift stores for handwork and feel compelled to rescue the abandoned treasures like the patchwork cat needlework used in The Wasted Swap tote (lower right).
Original Designs and Influences
Most of what I make now are original or modified designs rather than from patterns. Perspective was designed using Play Crafts tool Equal, made in a whirlwind 10 days and displayed at Hart's to show off the Loominous fabric line. An edgy improv butterfly seemed fitting use of the Sweet Rebellion fabric line for Ink & Arrow's blog hop.
Goats Askew pushed a lot of technical boundaries. I loved being one of the Score for Bias Strip Petals testers and part of Sherri Lynn Wood's gallery here even though it was not published in her book. I've taken two workshops with her and got to show and tell in person at the last one.
I didn't make an All-Solids quilt until 2014 which seems crazy since that is the majority of what I work in now. Capitola Crossing was directly inspired by an antique quilt, details blogged here. It was displayed at Amish: the Modern Muse, a juried exhibit representing three Modern Guilds in the FiberSpace section of the San Jose Museum of Quilt and Textiles.
 |
| Perspective, Dare to Fly, Goats Askew and Capitola Crossing |
My style has expanded to include Improvisation with Meaning in the Make since joining BeeSewcial. The Graphic and Minimalistic focus also comes from Quilt Design A Day, QDAD a Facebook group that I am admin for. Both encourage exploration and push me beyond boundaries more than I'd ever imagined.
The transformation of a design mock up to a finished quilt is a process I highly recommend trying. Here are four samples: Two challenges for our local show, "Resonate" for the AGF Heartland Tour Blog Hop, and Castle in The Sand a collaborative quilt with valued mentor Pam Rocco. As you can see I've deviated from he original design but have captured the essence which is more my goal.
Contributing blocks for QuiltCon First Place group bee winners: 2016 Debbie Jeske's Mod Mood and 2017 Stephanie Ruyle's Direction Optional was such an honor. Fortunately I had the opportunity to be there to see the quilts up close in person and help celebrate. Thanks to the QDAD Showcase and Quilt of the Month Special Exhibit, my own quilts hung in Savannah at QuiltCon East.
 |
| Left: Me & my Quilts, Right: BeeSewcial at QuiltCon |
 |
| QDADers being silly |
This year I'm going to enter my absoulutely stunning Reflections BeeSewcial quilt and hope, hope, hope it is accepted. Now that I've puzzled this one together I should have no trouble with the next two, right?
 |
| Reflections BeeSewcial Quilt |
Here are just a few of my favorite BeeSewcial blocks that I've made and a mosaic from 2015:
I was diligent about documenting blocks back in the Flickr days and am sentimentally fond of them despite how different in style they are.
 |
| 2012 Flickr Group Bee Blocks |
Quilting with friends is really special to me. Fortunately this happens on a regular basis with a small local group and annually with our guild. I've also managed to crash a couple of sister guild retreats too! My wish is to have a larger Multi-Chapter or Regional sewing meet up, a casual no frills opportunity to hang out with nearby peeps that I "know" from social media someday.
 |
| Local Friends, Sew and Stroll |
I'm also lucky to meet up with my sis who lives far away at quilty events like QuiltCon, Quilt Festival and Empty Spools. For the 90's themed party at Glamp Stitchalot we had fun dressing up and although my closet may still have authentic garments from the era, I repurposed a plaid blazer into a skirt.
 |
| Sewing Sisters |
We'll be together at another QuiltCon in February - say "hi" if you see us. She'll be the one perfecting her skills in back to back workshops and I'll be the one striking up a conversation with a perfect stranger, embarrassing myself with fangirl selfies and sporting a blue volunteer t-shirt.
Looking Back and Moving Forward
Being part of our MQG guild chapter South Bay Area MQG from the beginning, serving as VP and chairing committees has made a huge impact. Learning from one another and being part of something bigger holds a special place in my heart.
 |
| QuiltCon Charity blocks 2013 |
I never would have guessed the first tutorial as a brand new blogger, Polaroids Chain Pieced would generate the highest traffic to date and show up on tons of Pinterest boards. A special shout out to my blog followers!
This summer I had the pleasure of teaching my first workshop, a technique and design rather than project based class. Students did great playing with parts and possibilities and their enthusiasm made for a fun time. I hope to have more opportunities in the future and am developing a spin off class that I'm excited about.
Last but not least, My Workspace
Once upon a time, I had an organized sewing space in a small L-shaped room of our house as a legit place to create. Yardage stored on comic boards in bookshelves and FQ-ish bundles kept in an antique cabinet with scrap tubs lining the perimeter of the ceiling on a shelf. Some weekends I would rarely step away and loose all track of time. It was all inclusive but a little lonely and cramped.
To be more centrally located I temporarily put up a portable design wall, sewing and cutting table in the living room only I have never moved back. My old room is now a glorified closet, piled high with projects in buckets and bags waiting to be put back where they belong - or better yet, finished.
 |
| Sewing in the Living Room |
When I get in the productive zone, I just push aside what's in my way or brush it to the floor and keep going. I may be sewing fewer scrappy quilts these days but I am certainly not making less scraps!
Thanks for taking the time to learn more about me and the creative frenzy that has been my journey so far. I wish you all the best of luck with your FAL goals and hope you continue to carve out a quilty path that brings you joy.
Happy Stitching, Karen aka CapitolaQuilter
💠 double dresden wreath pattern 💠
11 November 2017
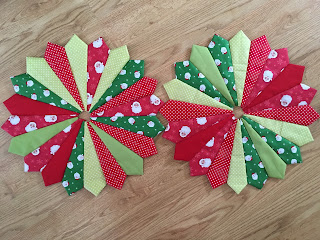
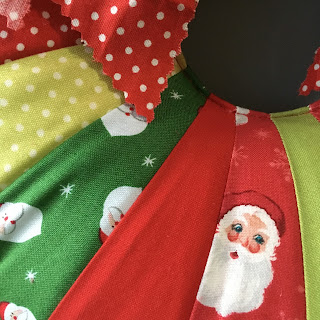
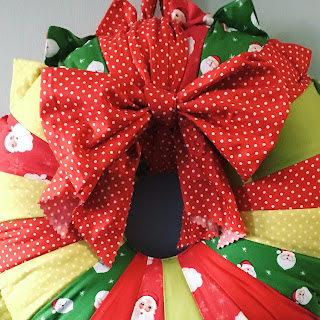
Today I'm sharing a tutorial to make this fun Double Dresden Wreath! It is a quick sew and a perfect way to brighten up your home. Obviously this one has a Christmas theme but you could make it for any season/occasion using appropriate fabrics. I demonstrated my design on the Sewing Quarter, you can see the video at the end of this post and lots of people messaged in with fabulous suggestions for fabrics they would use to make the wreath!
I used the Creative Grids 18° Dresden Plate Ruler to make this, I highly recommend Creative Grids but you can use another dresden plate template or ruler if you already have one in your possession. The segments I cut are 8" but you could make them bigger or smaller to create different sized wreaths.
You will need:
Fabric for the dresdens, you can use two or more prints or make it scrappy!
Toy filling (approx. 325g)
Pins
Pinking Shears
- Use your Dresden Plate Ruler to cut 40 pieces - 20 for each dresden. *Please note if you are using a different template check how many segments are required to make a full dresden plate and adjust this amount if necessary.
- With right sides together (RST) sew across the wider edge of the segment, backstitch at the beginning and end. It is quicker to chain piece all the segments at once.
- Clip the corner close to the stitches at the folded edge and turn right side out. Use a fine crochet hook or similar to push out the point. Try to make the seam on the reverse central and the points at the side should be horizontal.
- Sew the segments together but stop at least 1/4" away from the bottom. Continue to sew the segments together to make a full dresden plate. You can sew them in quarters or thirds and then piece them together to make it easier to manage.
- Repeat to make two dresden plates.
- From the reverse, fold back the seam of the inner circle by at least 1/4". By leaving the seams unsewn it should fold back easily to create a circle. Press and repeat for the other dresden plate.
- Place the dresden WRONG sides together. Match the outer points and pin in place - don't be afraid of stretching them slightly and just get them matching as neatly as possible, particularly at the inner points.
- Match up the inner circle, keeping the seams tucked inside and pin.
- Using a matching thread top stitch around the inner circle. Stop and pivot as necessary.
- Now stitch a circle around the outer edges, ignoring the points, and leave a gap for stuffing. The gap needs to be large enough for you to reach in and stuff the furthest part of the wreath. This will catch the seams of the points and create the shape of the wreath. Try not to sew a straight line across the base of the triangles but rather make a slight curve to keep a circular shape. Back stitch at the beginning and end.
- Stuff the wreath with toy filling. Use your hands and make it as compact as possible. Don't worry if it starts looking odd (and it will!), just keep packing it in and making a circle.
- Stitch the gap closed. I managed to do this easily on my machine, just make sure the stuffing is pushed out of the way. You could also hand sew it closed.
- To make the sash and bow use 2 strips of 8" x WOF, sew together along one short edge.
- Use pinking shears to trim along each of the long edges. Tie around the wreath to form a bow, you will have long tails which you can trim to your desired length. Fold the tails RST lengthwise and cut at an angle up towards the fold with pinking shears.
- Use a small piece of fabric to make a loop, attach to the back of the bow sash.
Hang your Double Dresden wreath and enjoy! I would love to see your version! Please tag me @charmaboutyou and add the hashtag #doubledresdenwreath on social media so I can see. I would appreciate you linking back to this tutorial too, thanks! Happy making!
(please excuse the fact there are different fabrics used in the pictures in this tutorial, one was the finished make and one was for my demo!)
linking to finish it up friday at crazy mom quilts
Subscribe to:
Posts (Atom)


