
I am going to show you how to hand piece patchwork, this is my favourite method for making my 1930's Farmers Wife blocks. It is great for small pieces of patchwork, perfect for 'on the go' sewing or relaxing on the sofa sewing!
Please read through the whole tutorial before you begin and if you already do hand piecing then leave a comment with any extra tips you have, I enjoy hearing them! This isn't a tutorial for a particular block, I am just showing part of a block I made in order to demonstrate how to hand piece and how to build your patchwork.
To begin hand piecing you will need templates or a printed version of your block. For the 1930's Farmer's Wife quilt I print out the diagrams from the CD. I am fortunate to have a LightPad, which I use to trace the lines on the diagram onto fabric (in the same way you would trace an embroidery pattern). You could use cardboard, freezer paper or acrylic templates to draw around.
My five top tools for hand piecing are:
1. 1" x 6" ruler - perfect for tracing and drawing smaller shapes
3. black Frixion pen (and I was excited to discover recently you can get refills!)
4. a long thin needle
5. a quality fine cotton thread, I use Aurifil 50wt.

I prefer to use the water erasable pen most of the time but if it doesn't show up on a blue or dark fabric then I use the frixion. As you are drawing on the back of the fabric the black always works well even on very dark fabric but I can't bring myself to use it on white!

Once you have drawn your shapes onto the fabric you need to cut them out leaving at least 1/4" around each side. I often use scissors for this step but for the 1930's Farmer's Wife I have the From Marti Mitchell templates, which allows me to rotary cut. I like using them for triangles, that's why you might notice the corners have been cut off the triangles in this tutorial.
Preparing the pieces for sewing is probably the most time consuming bit and my least favourite part, so I try to get two or three blocks ready for sewing and keep them in small zip lock bags.
Preparing the pieces for sewing is probably the most time consuming bit and my least favourite part, so I try to get two or three blocks ready for sewing and keep them in small zip lock bags.
So you have your shapes cut out and you want to start piecing them together now. I recommend referring back to the pattern at this point to ensure you have the right placement of your pieces and check the order in which you need to sew them together.
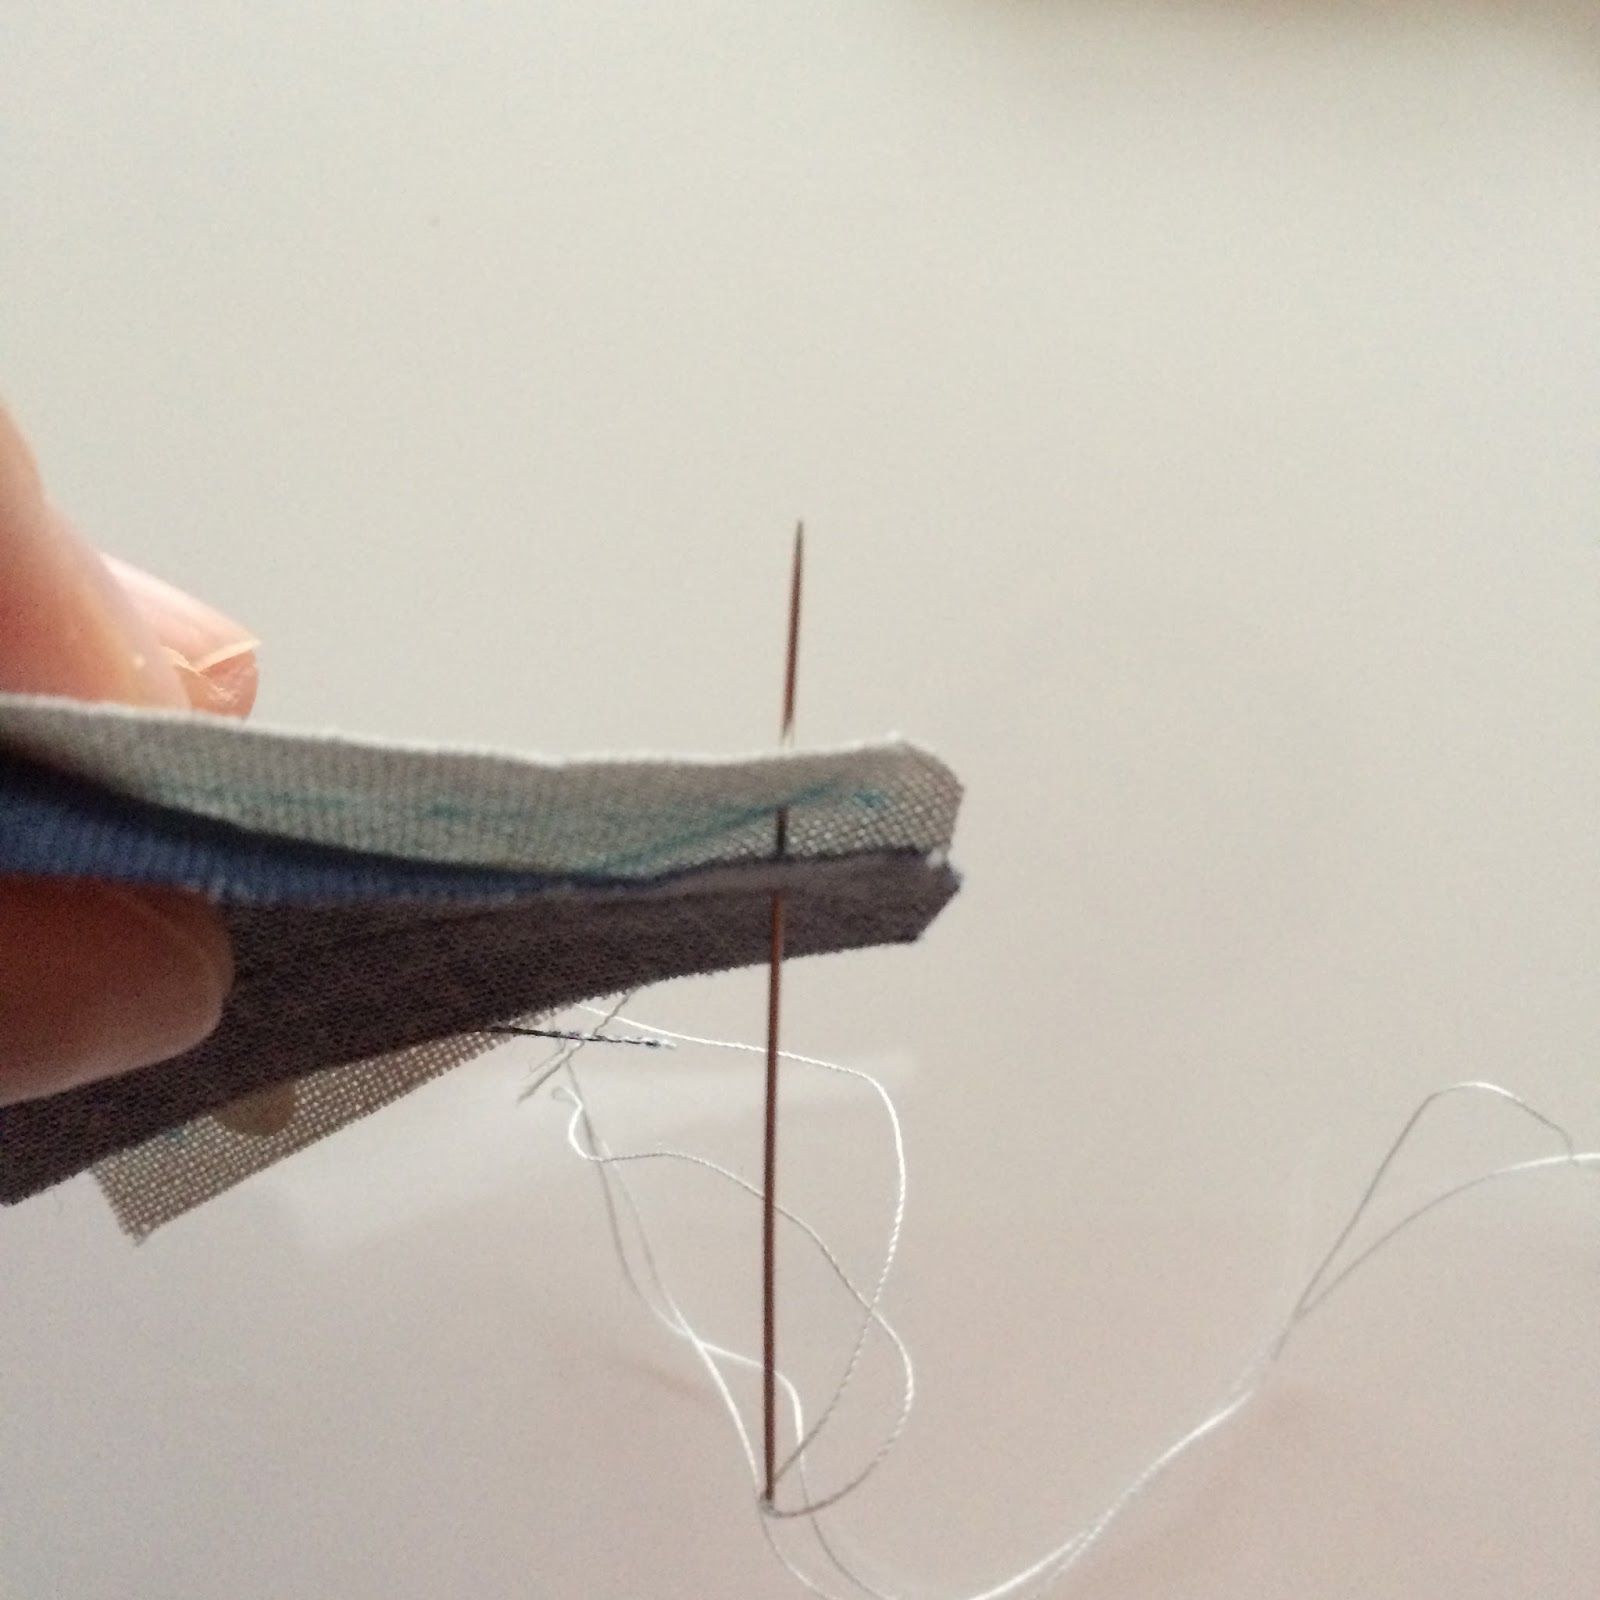
Take the first two pieces and place them right sides together, make sure you focus on which line needs sewing - it is really easy to sew along the wrong line (I have done that more times that I would admit!). You might find it helpful to use a clip or pin to indicate which side you are sewing.
Take the first two pieces and place them right sides together, make sure you focus on which line needs sewing - it is really easy to sew along the wrong line (I have done that more times that I would admit!). You might find it helpful to use a clip or pin to indicate which side you are sewing.


Thread your needle and tie a knot at the end of the thread. Put your needle through the corner on the line and come out at the corner of the other piece. At first this might seem tricky, if you find it hard then just do one side at a time, push the first fabric further down your needle and the wiggle the needle around to come out in the right place on the other piece of fabric. You want to be as precise as possible to make sure you are starting at the end of each line (in the corners).

Make a small stitch and once you pull that through do a little backstitch to secure it. Then begin a simple running stitch, you can do one stitch at a time, load a couple of stitches on your needle, or more than a couple if you feel comfortable.


Every few stitches (about every 1-1.5") you should do a backstitch. This helps secure your work. Having had to do some unpicking I can tell you that it does work so it's good to remember and will make your quilts stronger.
As I sew I look at the front and the back of the line of stitching, it's important to keep checking you are straight and on the lines so everything matches up.


Once you reach the end, backstitch and then tie a knot.

So that's one piece done, now you need to add another piece. Here I have joined two half square triangle blocks.
Treat it just the same way, sewing one piece to the other. When joining corners that already have a seam, try to get your needle in the middle, right in the corner, so your points will match nicely.


I repeated those steps and now I have two sections that need joining...

Before I begin stitching I use wonder clips to hold the final corner and the middle seam (I work right to left so keep that in mind if you work left to right!). This means they will stay in place and line up when I reach them.

I begin sewing in the corner (on the right in the picture above) and stitch all the way to the middle - backstitching occasionally if needed. Once I reach the middle I make sure my seams are moved out of the way and then do a backstitch. You do not sew through the seams, you need to keep them out of the way!

To get past the seams I either sew diagonally through the centre of the seams or pass through the seams on one side. Basically you want to start stitching on the other side of the seams without sewing them down.

You want to come out at the corner of your next line:

Then do another backstitch and continue sewing:

When you reach the end be sure that your corners line up so the needle is passing through the corner on each side. Finish with a backstitch and knot.

Keep sewing your blocks together until you are done! I do not press my seams as I go along, mostly because you need to move them as you are sewing, I just give them a good press once I finish each block. If you are joining sections together to make a larger block you could press each section before you put them together to make it less fiddly. I let each block dictate which way to press and try to reduce the bulk as much as possible, whether that means pressing some seams open or make spinning seams - see Cassandra's helpful tutorial here.

EDIT: click here for more tips on block construction for hand piecing!
I hope you find this tutorial useful and are encouraged to try hand piecing. I will try my best to answer any questions if you leave a comment below and you are welcome to share any tips or advice too. Happy hand sewing!
My thanks to Helen for all her great advice and for helping me start hand piecing :)
19 comments
Post a Comment
Do you hand quilt much?
I've belonged to a hand-piecing bee since 2000. Hand piecing is great for curves and Y-seams. Most of us use pencil, either regular lead or white, for marking the sewing lines. I find that a hard lead mechanical pencil gives me the best accuracy. In our bee we don't use knots ever - we backstitch a few stitches and leave a 1/4" thread tail. We do backstitch occasionally in long seams and at seam intersections, as you suggest. We don't press our bee blocks; we leave all the seams floating and let the recipient press to her liking. My current hand-piecing project, many years in work and pieced by many hands, is pictured here:
http://thecolorfulfabriholic.blogspot.com/2016/01/wips-and-ufos.html
I love hand piecing (as you know)! I do almost the same as you but use a fine mechanical pencil to mark my lines (or a Sewline ceramic marker for dark-backed fabrics). I also start with a knot but prefer to keep them away from the start of the line as I think it makes it easier when joining pieces together, particularly where you have eight or twelve pieces meeting. Instead, I start a stitch length away from the start and then come back up through the intersection and then go back down the 'knot' hole. I also make my next stitch a back stitch. I also back stitch immediately before and after an intersection as I think it helps secure that intersection, and I pass the needle horizontally through the (usually) uppermost seam and then go down right next to the intersection. I tend to finger press as I go and then, like you, press (with an iron) once the block is done - not always, but usually. I use the first block as a bit of a test on how to press the seams (unless I've made a test block) and then follow that for the rest. Oh, and I'm a pinner, but then I'm a pinner whether I'm hand or machine piecing!
Thanks for the tutorial, it's always nice to see how others do it!
Ditto to what Archie the wonder dog said- draw a line with a regular lead pencil ( no fancy markers back when I learnt!) pin at start, end and in the middle, start along the line and return to the beginning point, and back stitch at the end. Thanks for all your detailed photos! Do you have three hands?? 😃
I have had surgeries to fuse the joints in my thumbs and forefingers due to arthritis, so I am rather clumsy with a needle. But a couple of things that help me manage are to use my handmade deerskin thimble (use your preference) and to cut off a couple fingers from a latex rubber glove to slip onto my thumb and finger to help me hang onto the needle and pull it through more easily. Did this before the surgeries also, as I have a tendency to getting sweaty hands and letting the needle slip.
One more thing. I have a tendency to hold the needle still and move the fabric up and down and onto the needle with my other hand. Am I the only one who sews this way?
No, Brenda, you are not alone. I move the fabric and leave the needle still too. I like those pincushions that you wear on your finger.(http://oodlesofpincushions.com/finger.html ) Spool of thread (http://checkerdist.com/products/3N1SS) and scissors hanging from my neck. I hand sew in the car so I really don't want to chase all my stuff down the sides of the car seat. I also use a metal thimble, the kind with the sides built up a little so the tip is a bowl and holds the needle better. (hope that makes sense)
Thank you for the tutorial. It's always helpful to see how others do things. You've reminded me how much I like a bit of hand stitching.
Teresa x
Great job as always! You need any Thimblepads? They are great! Let me know and I will send you a pack
I like the idea of the spool of thread hanging round your neck, I might use that at other times when there's no table to put my thread on. Thank you.
I love the tip to use the light box to trace the templates onto my fabric, I am just starting the Farmer's Wife quilt.
Thanks so much for this tutorial! I have wanted to try both hand quilting and the Farmer's Wife blocks!
I've always wanted to make a quilt completely by hand. I'm excited to see how you could
Complete the process
I've always wanted to make a quilt completely by hand. I'm excited to see how you could
Complete the process
Thank you for the tutorial. It's well done and the instructions are clear.
Beautiful tutorial! I LOVE piecing by hand. You've explained it so well!
My mom is a die-hard hand piecer, and also does all the quilting by hand. She has made many beautiful quilts this way and I will treasure mine forever. She taught me how to hand piece the quilt top and I found it to be a lot of fun and relaxing (I love feeling the fabric going through my fingers as I go!) But hand piecing takes a long long time to finish, so after making two quilts by hand, I resorted to using the machine. The machine helps me get quilts done a lot faster, but it comes with a price: accuracy. Whenever I use the machine, I am reminded of why my mom insists on hand sewing, and looking at your blog reminds me of what I am missing out on, and now I want to do my next quilt by hand again, although the quilting part will be on machine cuz I just can't get the hang of hand quilting. One thing I am questioning is how to iron the corner seams in a hand pieced quilt top before you sandwich it. In a corner seam, there doesn't seem to be a right way to iron it, and I'm not sure how to go about it without creating too much bulk in those spots. Would love to know how you guys do it. Also, when starting out on the stitching, my mom taught me to start the needle one stitch away from the corner (and start with a backstitch) as there seemed to be a disadvantage having the knot right on the corner seam - don't know if that really matters, but would like some input on that. And one more question: how do you deal with the raised eyebrows when your quilter friends think you're weird for hand piecing? Sometimes I hesitate to hand piece just because of that reason. A lady in the quilt store once told me and my mom "you guys are a dying breed" and it felt rather discouraging the way she said it. Thank you for the inspiration!
I am a machine piecer but I love hand quilting and I’m very interested in trying to hand piece. In all of the tutorials I’ve read it talks about back stitching, but I guess my silly question is... what does that mean, when it comes to hand work? I’m trying to imagine how to translate how I backstitch I’m my machine into how I would backstitch with a needle and my imagination is falling short. I must be overthinking this? Do you have advice on this most basic step? Thank you!!!
This post is years old, but in case anyone is reading this currently, I thought I would give my two cents. Thank you for this tutorial, by the way; very informative. I would caution against using a Frixion pen. I have had two occasions where the Frixion pen bleached my fabric on two different garments I made. Unfortunately, it was not noticed until after the pieces were finished. I have often wondered if my detergent reacted with the Frixion ink. Anyway, I also work in a local Quilt shop and we have stopped selling Frixion pens for this reason. We had also heard negative feedback from customers and friends of the shop, so it was a no brainer to stop selling them. Just thought I would share this in case anyone reads the comments!