tutorial
Showing posts with label tutorial. Show all posts
Japanese rice bag

This adorable Japanese rice bag was another #justjudecollaborates make, this time it was the turn of lovely Stuart Hillard and his handy bag tutorial! I have made drawstring bags before but nothing like this style or shape of bag so I was really excited to learn how to make it. I'm not always brilliant with making 3D items, thankfully Stuart has a YouTube tutorial that shows every step to making this bag, so easy to follow!

And this is why I should always blog when I actually make the project not months later... I can't actually remember what inspired me to use these blocks I made for the bag. I actually think it might have been something Stuart said in the video! Anyway, that's what I decided! I had this Crosscut panel from 2016, which I was saving to make into something or to use in a larger quilt.
It was calling to me for this project, the colours and fabrics are so lovely and I thought that Debbie (who designed the Crosscut block tutorial) would likely appreciate me cutting it up and using it.

I'm glad I did because it works perfectly! Each side of the bag is so different and it's really fun to look at.

For the straps I used beautiful Manchester Metallic Yarn Dyed in Bronze, it is so pretty and the glimmer is just so happy making! I added some gold geometric beads for even more dazzle. It's not an obvious option but I like the contrast with the softer low volume fabrics around most of the bag.


The tabs are Tiny Tile, Black and White collection 2017 by Alexia Marcelle Abegg - I really loved those fabric collections. I kept a bit of the selvedge on one of the tabs, I like that it adds a little pink.

The bag is currently hanging on a hook next to my sewing desk and holds some of my machine accessories... including my foot pedal! I have switched to using the start/stop button on machine almost completely, I only use the pedal sometimes when I'm quilting. I like keeping the pedal close by though and I love seeing this bag all the time. My daughter covets it so I must make her one of her own. This really was a fun sew and it's a great size, you can fit a good amount in there!

Definitely check out Stuart's tutorial, it's one of those patterns you can use again and again creating different looks and playing about with. Enjoy making!
stockings + top trend
You don't need me to tell you that the year so far has been crazy! I'm ready to settle down for a cosy, quiet winter. I still have a few projects to sew and if you're anything like me, you might have a few projects to sew this season too!

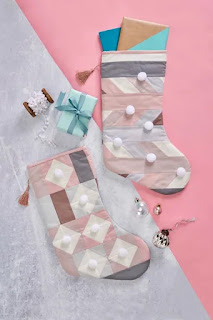
Last year I created a tutorial for these simple patchwork stockings. A calm colour palette was called for by my girls (who are the users of these stockings!) but you could make them festive with Christmas prints or whatever colours fit your home.
The fun addition of pom poms and tassels add whimsy and hopefully these pretty stockings will grow with them, as they are not too kiddish and nicely neutral.
You can get the free pattern for the stockings HERE at gathered - with not much fabric you can create two different modern patchwork stockings! One uses a cool bias stripe effect and the other is made up of easy half square triangles and rectangles.
◌ Washi Double Dresden Wreath ◌

It feels wonderful to have a new version of the Double Dresden Wreath, made using the free tutorial I created a couple of years ago. The original was demonstrated on Sewing Quarter, the samples that hung in the studio stayed there, and I am so happy to now have one for our house. I made this wreath for my December project as an Aurifil Artisan, our challenge was to create a holiday themed project. Perfect for brightening any door or bare looking wall space, the wreath pattern is a merry make!

My original plan was slightly different but this was one of those projects that naturally evolved and turned out even better than I hoped. The double sided wreath comes together quickly and I took a bit of extra time to stitch some hand embroidery as the added texture gives a fun touch. It's not at all necessary but you notice the extra detail up close.
The fabrics I chose are ones I've kept for something special, the green print is Christmas Wish by Lizzie Mackay for Dashwood Studio and the white print is Washi, Tinsel by Rashida Coleman-Hale. Originally I was going to make the wreath using the many blue Christmas prints I have but somehow it wasn't working and they didn't look good together. When I hit on this white and green combo, with pops of red it made me think of mints and was a winner!

You can use any dresden template or ruler with this pattern to create the dresden plates, I used the Creative Grids 18° Dresden Plate Ruler. Having an acrylic template makes it so simple and much quicker, as you can easily layer and cut the fabric with a rotary cutter. I stitched the plates using 50wt Aurifil - my go to for piecing - it definitely helps with accuracy and reduces the bulk in the seam when turning those points. Dresdens look like they are complicated or tricky but they are surprisingly easy and there are so many options for creating blocks with them. My favourite sewing is often traditional blocks made with modern fabric as it creates a different look.
Pineapple Crush Quilt ~ Aura Blog Party 🌺

Mister Domestic invited me to his Aura Blog Party and I was like, "woaaaah.", and then saw the fabric and I was like, "woaaaah." and then it came to me that this would make the perfect pineapple quilt, "woaaahh..."

So this is my ode to Mr Crush Turtle, with turtles swimming through the denim water and geometric coral reef! A tropical blend of modern and traditional, this quilt is simultaneously structured and choatic. The clean lines of the pineapple blocks and the way I've placed the colours makes for a striking layout yet the prints themselves are scattered throughout in a random way.

I'm going to share some tips about making pineapple quilt blocks, why I used NO pins when piecing and (over)share the process of making my Pineapple Crush quilt!
⚞ DIY boho fabric hoop ⚟

Whimsical, calming and a cinch to create! I'm going to show you how to make a fun 'no sew' fabric wall hanging, using only an embroidery hoop and strips of fabric.
You will need:
An embroidery hoop
Strips of fabric in various lengths
Optional: nail polish / paint
For this project I used a 10cm" hoop, which makes for a cute mini decoration but you could use any size - the bigger the hoop, the more scraps you can bust! I recommend using narrow strips but if you were making a mahoosive one you might want to use wider strips to make it quickly.
1. Divide the fabric strips by length, so you have piles of long and short strips.

2. Take the long lengths of fabric and tie to the hoop using lark's head knots. Starting at the bottom of the hoop, take your longest strip and fold in half length ways. Feed the folded end through the hoop and pass the ends of the strip through the loop created by the fold, creating a knot. Pull to tighten.
3. Continue tying strips, pushing them close together until you've covered the lower portion of the hoop. I created a sort of gradient, using the longest strips at the very bottom and getting smaller as I worked up the curve of the hoop.

4. Once you've covered about 1/4 of the hoop with longer strips you can move on to the shorter strips. Feed one end of a short strip through the hoop and tie with an overhand knot / single knot. If your strips are long enough you could tie a double knot but since it's a decorative hanging I wasn't concerned about the knots coming undone.
5. Continue tying short strips, keeping all the knots on the same side (i.e. the front or back of the hoop). Trim the ends of the strips after knotting to keep them even. You can completely cover the hoop or leave a section uncovered as I have.


6. The hoop becomes double sided and can be hung either way, with the knots at the back or the front depending which look you prefer! As an optional extra, if you have left part of the hoop visible, you can paint it or decorate it. I used my current favourite nail polish colour as it complimented the fabric well. It has a nice washed look and a lovely sheen! You could use washi tape wrapped around the hoop too. It would be easy to personalise and write someones name or a message... so many options!

I hope you enjoyed this tutorial - it would be a fun project to do with kids over the summer holidays or just for you to relax and enjoy a quick, simple make. It makes a very pretty, tactile hanging and I know I will be making more, there's a bag of fabric strings waiting!!
hanging basket tote bag

One of the joys of appliqué is creating anything you want from fabric shapes. I drew some simple flowers, petals and leave templates to make up this hanging basket design. The initial idea was a bowl of flowers, a modern take on the traditional basket quilt block design. It evolved into two pattern shapes, the bowl and the basket. The Kaffe Fassett prints were also perfect for some fussy cutting - in the same style as Bari J's beautiful fabric collage style - so it became a mix of appliqué shapes and collage. I like the organic look that creates.

I used Bondweb to position the flowers - as I was making up the design I attached the handles first to give me an idea of placement but would recommend sewing them on later as it was a faff to keep them out of the way!

I did sketch style stitching with black thread, using the free motion foot and just echoing inside the shapes. Black isn't often my colour of choice as it's so harsh but that's what makes it work so well here. I think of it as doodling and the thread is my pen.
If you haven't tried this technique it really is a lot of fun and it's a great way to get used to using your free motion foot. Also it is really easy to cover any mistakes by going over the stitches, I usually go round the shapes at least twice. You can watch the video below to see my Sewing Quarter demo and get more tips as I create a bowl of flowers.

The straps on the tote are a little different because they aren't completely sewn down. The ends are attached with a square of stitching and a large zig zag, then I tucked the straps in while sewing the lining to the bag and turning the bag through. I them pinned them in place and did three lines of top stitching around the top of the bag for decoration and to hold the straps in place.

This means on a warm summer's day I could tuck a cardigan or shawl in through those straps ready for evening (dreaming of those warm days already!). Or extra space for all the kids jackets I end up carrying.

I have to say I'm quite fond of the minimal back side too! I'm planning more totes with straps like this because I really like the look.

Click play to watch the demo and let me know if you have a go at this technique!
linking up to finish it up friday at crazy mom quilts
AGF Quilt Block Tour of Makers

I was delighted to be invited to join the Art Gallery Fabrics Quilt Block Collection Blog Tour, hosted by the wonderful Sharon of Color Girl Quilts.
Art Gallery Fabrics have created a series of video tutorials, the Quilt Block Collection, that teaches you how to make a whole variety of quilt blocks using different techniques.
I chose a classic quilt block, Spiderweb and used the Arizona After fabric collection by April Rhodes. The way this block comes together is clever and there are just so many possibilities to create completely different looks!

To begin I separated the fabrics into light and dark, which was simple since the two colorways of the collection lend themselves to that perfectly. Then it was just a case of cutting strips and I took a grab and sew approach as I was making the blocks!
cord keeper tutorial 🔌

Perfect for keeping cords and earphones from tangling. Throw the cord keeper in your bag and the cords are safely stored away and easy to find! I use both sizes, one for cables and one for headphones, and it's excellent to have them neat and organised when I'm travelling. It makes a great gift too!
YOU WILL NEED:
Circle templates - cut from cardboard - for the large size radius = 2.5" and for the small size radius = 2"
7in x 10in of the following: outer fabric, lining fabric and wadding
3/4in x 24in strip of fabric*
Fusible Bias Tape Maker 9mm width*
Fusible web for tape maker 5mm width*
Fabric glue pen
2 sew on snap fasteners
bias binding - cut strips 1¼" and it's better to make more than the circumference of the circle to make finishing easier.
*Ric Rac or ribbon would be a good alternative to making bias tape!
FINISHED SIZE
Large: approx. 5" Small: approx. 4"
FABRICS USED
Grid in Blue, Print Shop by Alexia Abegg for Cotton + Steel; Netorious in Cloud, Cotton + Steel Basics by Cotton + Steel; Sprinkle in Black Cat, Cotton + Steel Basics by Cotton + Steel.
Fabric supplied by Fat Quarter Shop.
TUTORIAL STEPS
Seam allowances are ¼", unless otherwise noted.


2. Use the circle templates to cut a large and small circle from the quilted panel.
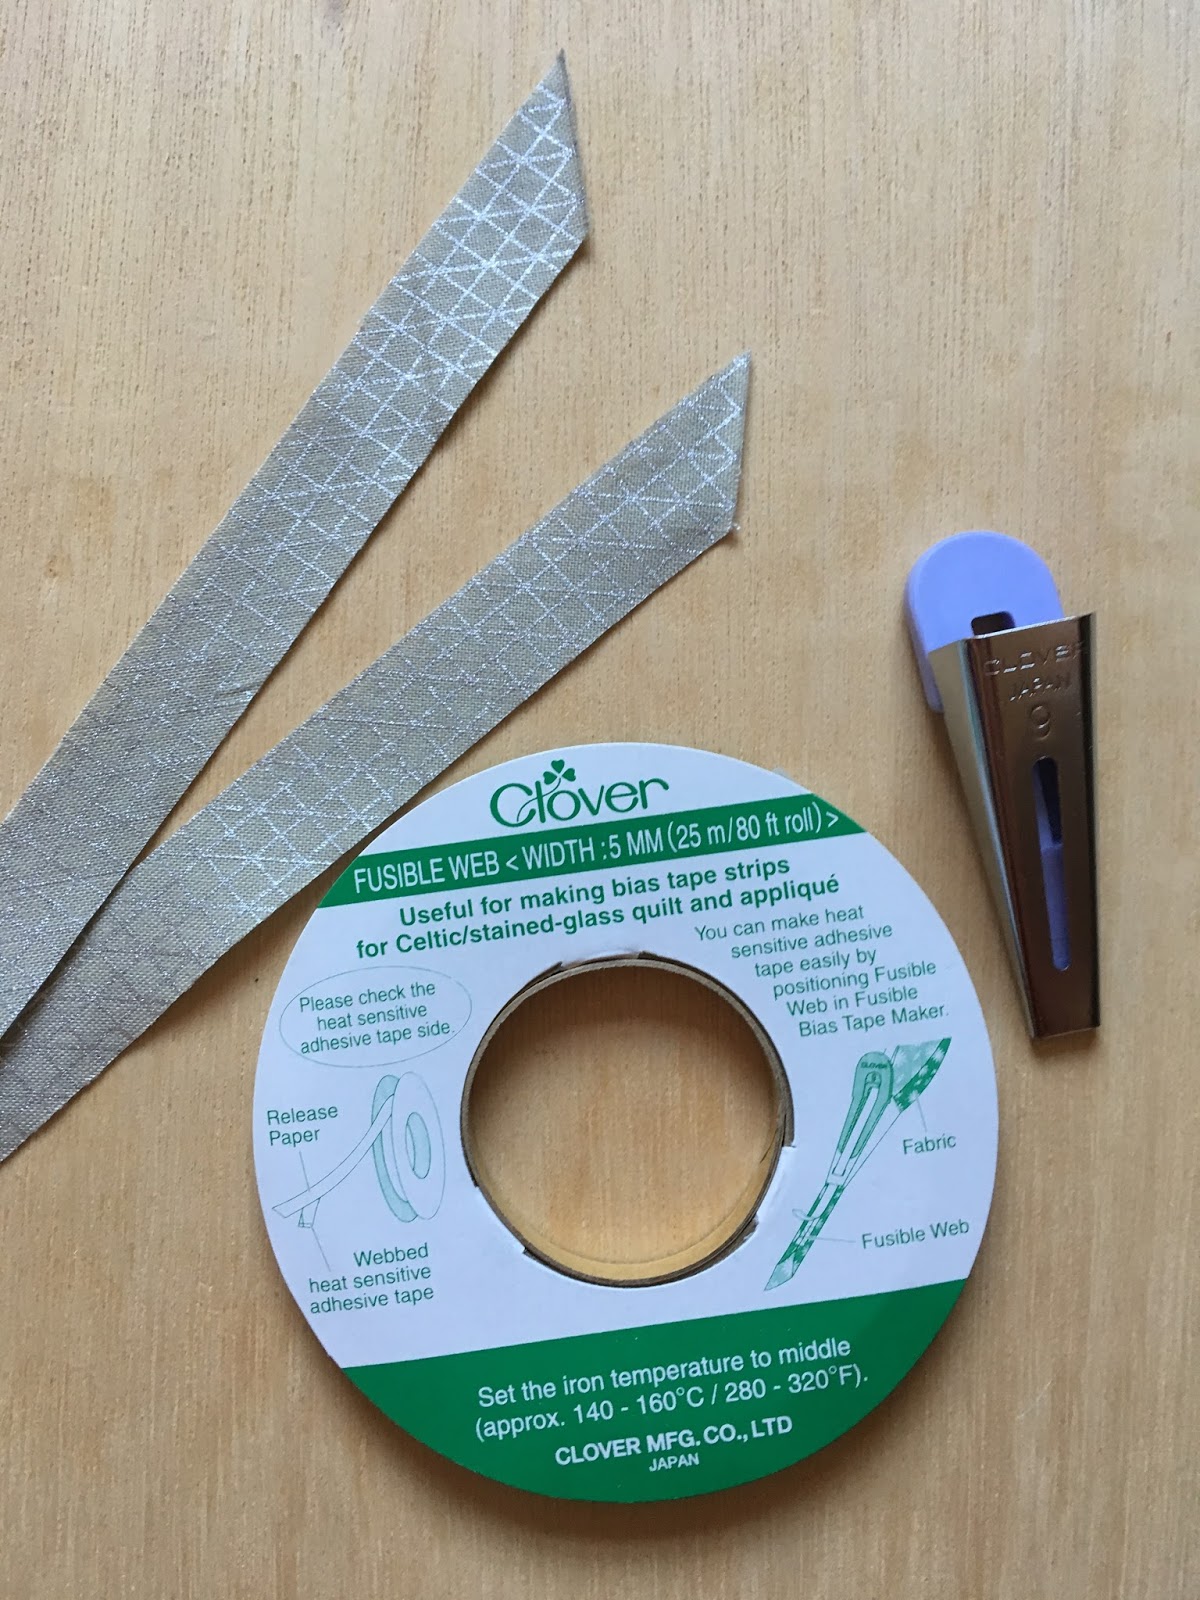
3. Make a fusible binding strip using the fabric strip, the bias tape maker and fusible web.

4. Peel off the paper backing, fold the binding in half width-wise and press to fuse and create narrow strips.

5. Fold the circles in half, each half can now be decorated by appliqueing the strip.

6. Make a loop, wiggly line or any design you like with the strips and use a fabric glue pen to hold in place.


8. Attach binding to the front, fold over and hand sew to the lining. You can trim the seam allowance slightly to make it easier to bind.


No more tangled mess, enjoy your organised cables and headphones!
I would love to see your versions of these! Tag me on social media @charmaboutyou
This post is part of the Finish-A-Long tutorial week, make sure you check out the others:
- Sept 27: Lucy, Charm About You, Cord Keeper
And there's still time to link up your quarter 3 finishes! Click here to link up
This pattern was originally published in Love Patchwork & Quilting, Issue 46.
linking up to:
can I get a whoop whoop at Confessions of a Fabric Addict
and finish it up friday at crazy mom quilts
slow and quick projects
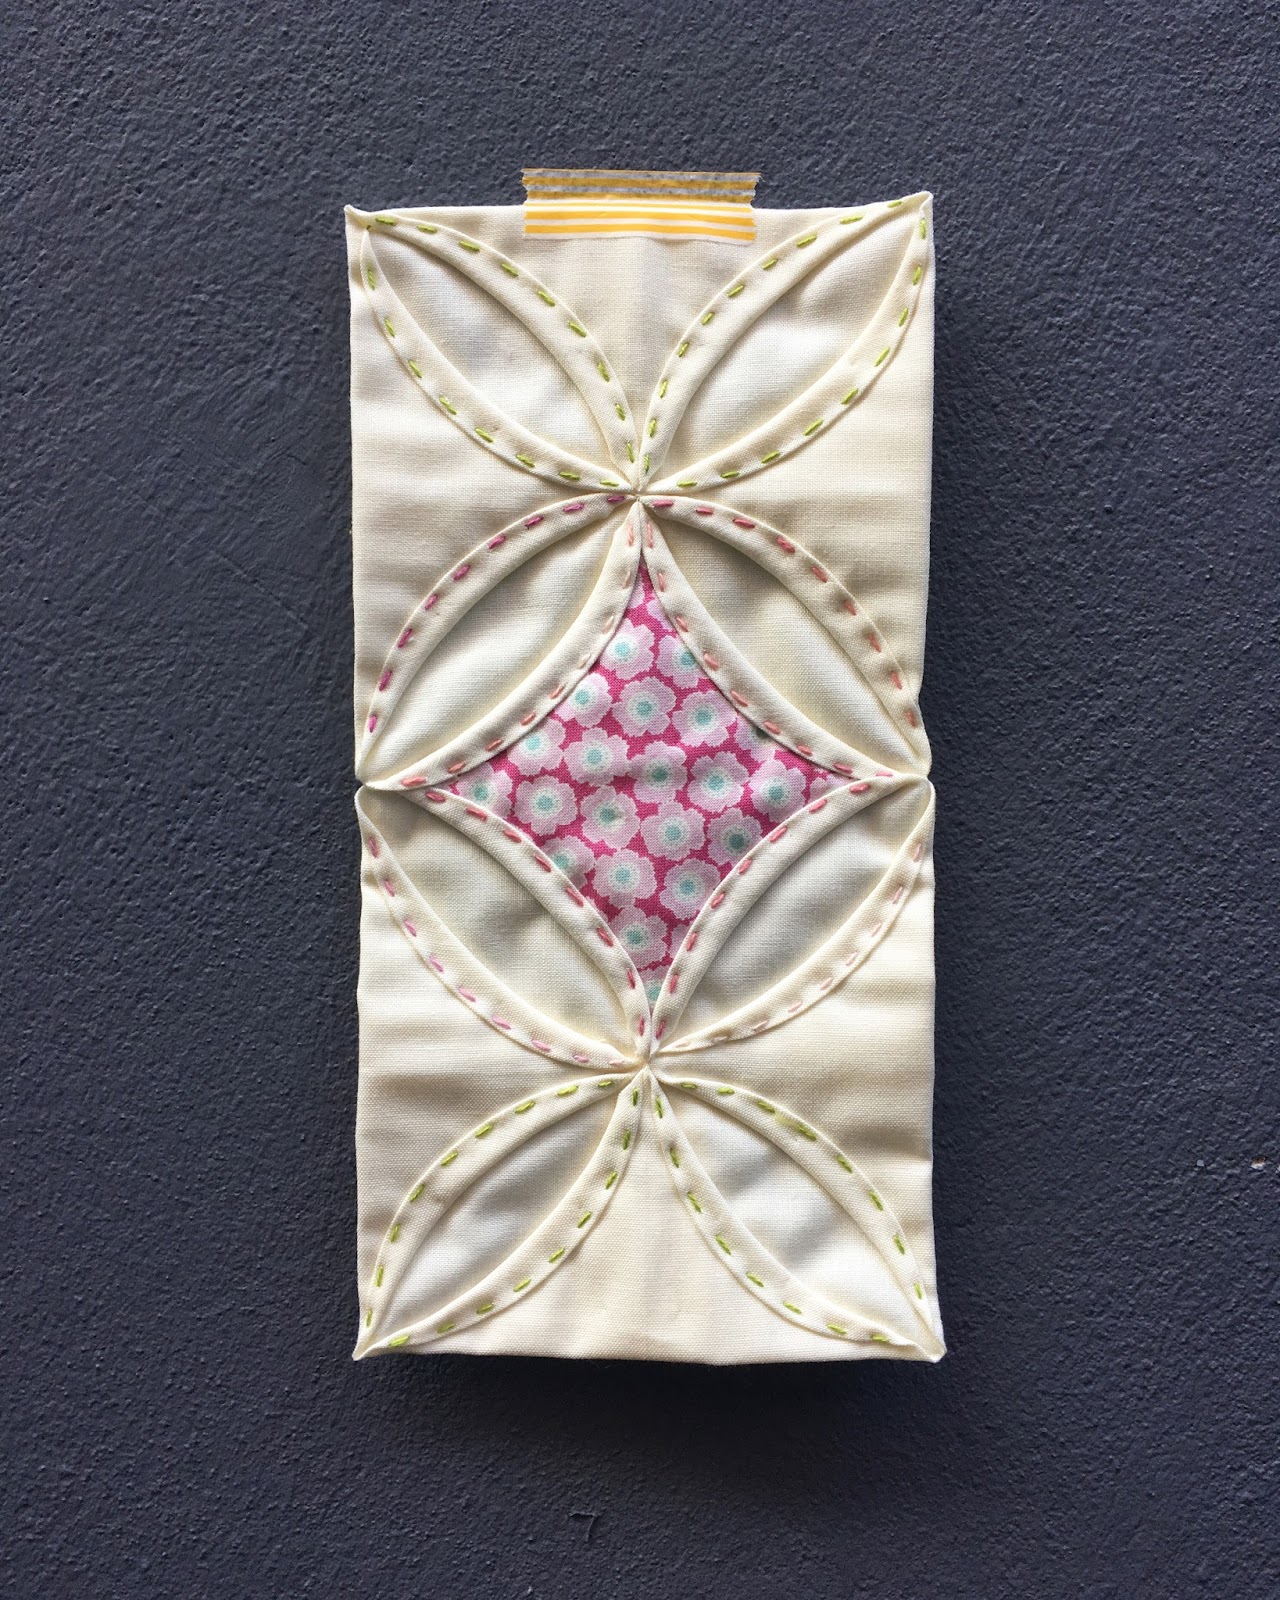
Cathedral windows are lovely to make, different from traditional piecing and so satisfying! I made this little sample for Sewing Quarter and demonstrated yesterday how to hand sew the blocks.
I chose to hand stitch the folds with some perle thread, which is quicker than appliqué (although I did demo that too) and gives a lovely effect - the Valdani variegated thread is particularly pretty.
To watch the repeat of the show, click here.
On the same show I also made this Peonies block from 100 Any-Size Flower Blocks by Rita Weiss and Linda Causee. Fast and easy to put together.
quilt round-up

This is a round-up of quilts I have made for Sewing Quarter - including a couple that I failed to blog about and made some time ago. It's nice to have a document here of the quilts I have finished. The quilt above was made using a jelly roll of Kaffe Fassett fabric and some solid white squares. I had made Bright Hopes blocks before but never a whole quilt of them, I think it makes a beautiful random pattern and I would like to make another quilt using this block, it's a great stash buster too!
I also made this random curves quilt using a Tula Pink layer cake. This was a fun and simple quilt to sew.

Laying out the blocks took me a while because they are so many different patterns you can create. Curves are possibly my favourite thing to sew. If you haven't tried it you should! I learnt how to sew without pins using this video, though I prefer to use my quarter inch foot. I know people have different methods so it might be worth taking a class or just experimenting to see what way you prefer.

Earlier this month I made this sweet baby Stunning Stars quilt using a pattern from Annie's Quick & Easy Quilts. It was an unusually bright day in Manchester so the colours look a bit washed out here. I enjoyed adding a scrappy solid binding to this one:


Today was Christmas at Sewing Quarter (because it's four month away!!) and so I used adorable Makower prints to make this simple baby quilt with cute fussy cutting.

The pattern is in Modern Baby Quilts by Fons & Porter. Thanks to Producer Paul for the arty shot below!

We are due to have some hot weather in the UK this weekend and I'm looking forward to some family time outdoors. I hope you all have a lovely weekend and if you're making on Saturday night come and join me on instagram from around 6pm GMT for the Saturday Night Craft Along!
Subscribe to:
Posts (Atom)