gift
Showing posts with label gift. Show all posts
⚞ DIY boho fabric hoop ⚟

Whimsical, calming and a cinch to create! I'm going to show you how to make a fun 'no sew' fabric wall hanging, using only an embroidery hoop and strips of fabric.
You will need:
An embroidery hoop
Strips of fabric in various lengths
Optional: nail polish / paint
For this project I used a 10cm" hoop, which makes for a cute mini decoration but you could use any size - the bigger the hoop, the more scraps you can bust! I recommend using narrow strips but if you were making a mahoosive one you might want to use wider strips to make it quickly.
1. Divide the fabric strips by length, so you have piles of long and short strips.

2. Take the long lengths of fabric and tie to the hoop using lark's head knots. Starting at the bottom of the hoop, take your longest strip and fold in half length ways. Feed the folded end through the hoop and pass the ends of the strip through the loop created by the fold, creating a knot. Pull to tighten.
3. Continue tying strips, pushing them close together until you've covered the lower portion of the hoop. I created a sort of gradient, using the longest strips at the very bottom and getting smaller as I worked up the curve of the hoop.

4. Once you've covered about 1/4 of the hoop with longer strips you can move on to the shorter strips. Feed one end of a short strip through the hoop and tie with an overhand knot / single knot. If your strips are long enough you could tie a double knot but since it's a decorative hanging I wasn't concerned about the knots coming undone.
5. Continue tying short strips, keeping all the knots on the same side (i.e. the front or back of the hoop). Trim the ends of the strips after knotting to keep them even. You can completely cover the hoop or leave a section uncovered as I have.


6. The hoop becomes double sided and can be hung either way, with the knots at the back or the front depending which look you prefer! As an optional extra, if you have left part of the hoop visible, you can paint it or decorate it. I used my current favourite nail polish colour as it complimented the fabric well. It has a nice washed look and a lovely sheen! You could use washi tape wrapped around the hoop too. It would be easy to personalise and write someones name or a message... so many options!

I hope you enjoyed this tutorial - it would be a fun project to do with kids over the summer holidays or just for you to relax and enjoy a quick, simple make. It makes a very pretty, tactile hanging and I know I will be making more, there's a bag of fabric strings waiting!!
cord keeper tutorial 🔌

Perfect for keeping cords and earphones from tangling. Throw the cord keeper in your bag and the cords are safely stored away and easy to find! I use both sizes, one for cables and one for headphones, and it's excellent to have them neat and organised when I'm travelling. It makes a great gift too!
YOU WILL NEED:
Circle templates - cut from cardboard - for the large size radius = 2.5" and for the small size radius = 2"
7in x 10in of the following: outer fabric, lining fabric and wadding
3/4in x 24in strip of fabric*
Fusible Bias Tape Maker 9mm width*
Fusible web for tape maker 5mm width*
Fabric glue pen
2 sew on snap fasteners
bias binding - cut strips 1¼" and it's better to make more than the circumference of the circle to make finishing easier.
*Ric Rac or ribbon would be a good alternative to making bias tape!
FINISHED SIZE
Large: approx. 5" Small: approx. 4"
FABRICS USED
Grid in Blue, Print Shop by Alexia Abegg for Cotton + Steel; Netorious in Cloud, Cotton + Steel Basics by Cotton + Steel; Sprinkle in Black Cat, Cotton + Steel Basics by Cotton + Steel.
Fabric supplied by Fat Quarter Shop.
TUTORIAL STEPS
Seam allowances are ¼", unless otherwise noted.


2. Use the circle templates to cut a large and small circle from the quilted panel.
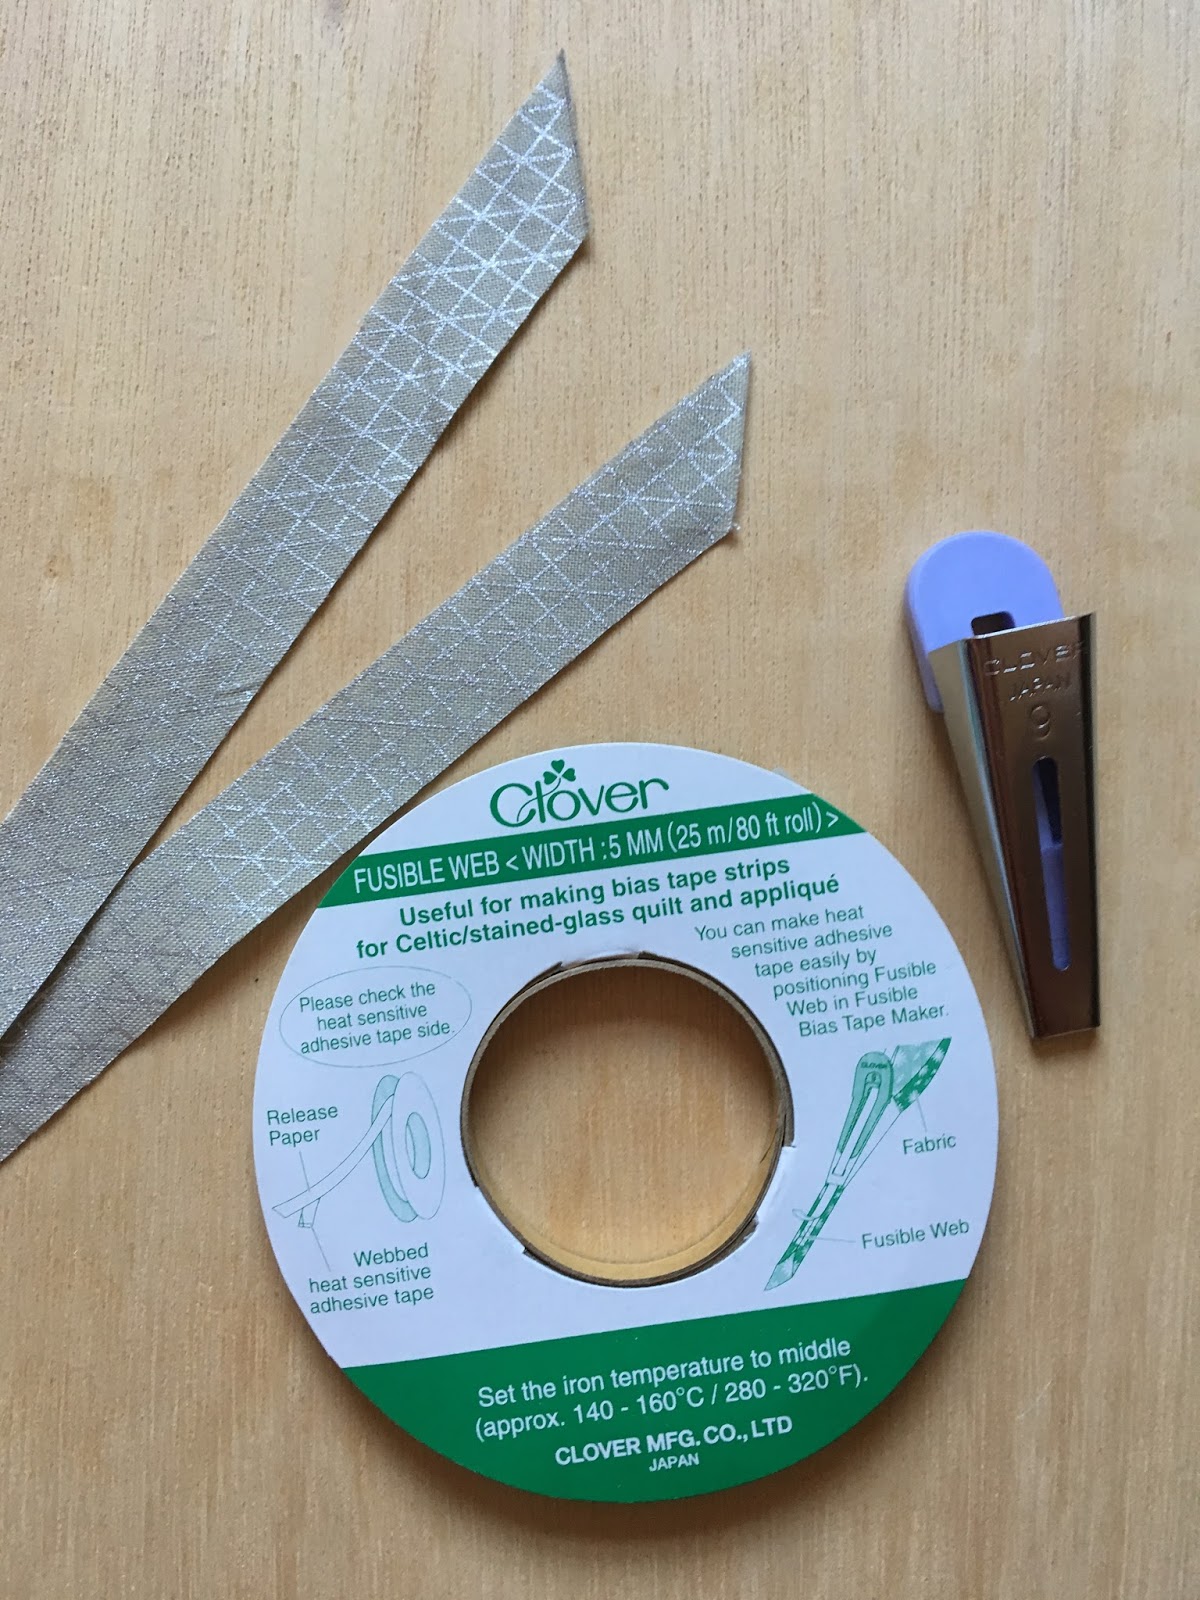
3. Make a fusible binding strip using the fabric strip, the bias tape maker and fusible web.

4. Peel off the paper backing, fold the binding in half width-wise and press to fuse and create narrow strips.

5. Fold the circles in half, each half can now be decorated by appliqueing the strip.

6. Make a loop, wiggly line or any design you like with the strips and use a fabric glue pen to hold in place.


8. Attach binding to the front, fold over and hand sew to the lining. You can trim the seam allowance slightly to make it easier to bind.


No more tangled mess, enjoy your organised cables and headphones!
I would love to see your versions of these! Tag me on social media @charmaboutyou
This post is part of the Finish-A-Long tutorial week, make sure you check out the others:
- Sept 27: Lucy, Charm About You, Cord Keeper
And there's still time to link up your quarter 3 finishes! Click here to link up
This pattern was originally published in Love Patchwork & Quilting, Issue 46.
linking up to:
can I get a whoop whoop at Confessions of a Fabric Addict
and finish it up friday at crazy mom quilts
the mug club

It is hard to resist a good sew along, especially one with fabulously fun patterns, a Christmas theme and lots of prizes!! That's #themugclubSAL, a chance to create adorable mugs and get a head start on festive decor - I'm thinking I might make a cute table runner. And if you joined in the #UglySweaterBlock sew along last year, they would look adorable mixed together!
Kerry @kidgiddy and Sue @mossandlotus have both designed 6 different mugs - Kerry has a bonus mug in her set and Sue has bonus pieces that can allow you to make a teapot, sugar bowl and a cookie jar too! You can find Kerry's shop here and Sue's shop here. 🎄
I wanted a vintage look to my mug and decided to use this cool retro style print, Peach Deco Motosu Moon Flower Stripe by boris_thumbkin from Spoonflower.

Doesn't it work so well with the metallic background too - Luster by Brigitte Heitland for Zen Chic - festive and fun. I think I would fill it with hot chocolate... now I'm really looking forward to winter.

Follow Kerry @kidgiddy and Sue @mossandlotus to see all their fabulous work and get inspired!
sew simple card holder tutorial
I can not even describe to you the hideous state of my husband's old, beat up wallet!! A new one was well over due. He likes a simple folded card holder and it occurred to me that I could make one. Initially dubious, he is really pleased with the result!
* October 2017, edited to add - my husband just said this is one of his most favourite possessions and he's still using it every day!
Possible the easiest sew, with only three cuts, I thought I would share the measurements and a quick tutorial so you can make one too. It would be a perfect present for anyone that likes a minimalist style, needs a place to keep bank cards or business cards and it would also be a great way to give gift cards.

The sew simple card holder wallet is made of Kraft-tex. An alternative would be to use a good quality felt, it needs to be a material that won't fray.
I recently bought some Kraft-tex, I was curious about what it felt like and what it could be used for. It is described as "rugged paper that looks, feels, and wears like leather, but sews, cuts, and washes just like fabric... Durable fiber-based texture softens and crinkles with handling and washing". It is a great vegan alternative to leather. It feels like thick paper but slightly more flexible. It does fold and crinkle but it's also firm. It has so many possibilities for adding into sewing projects! I washed mine before using it because I didn't want it to look like card and it did make it look more wrinkled like leather.
I recently bought some Kraft-tex, I was curious about what it felt like and what it could be used for. It is described as "rugged paper that looks, feels, and wears like leather, but sews, cuts, and washes just like fabric... Durable fiber-based texture softens and crinkles with handling and washing". It is a great vegan alternative to leather. It feels like thick paper but slightly more flexible. It does fold and crinkle but it's also firm. It has so many possibilities for adding into sewing projects! I washed mine before using it because I didn't want it to look like card and it did make it look more wrinkled like leather.

I have ordered some in a paler colour because I really want to stamp on it, wouldn't it be fun to give someone a personalised card holder?! Kraft-tex isn't expensive and a quick search online will bring up lots of stockists.
Sew Simple Card Holder Tutorial:
Please note that I made a couple of different card holders. Trust the instructions rather than the scale or any measurements seen in the photos!
You can fit 3 or 4 cards in each pocket (though my husband has stuffed it with more!).
Use coordinating thread or make it pop with a contrasting colour.

1. Cut the following pieces:
(1) 8" x 3"
(2) 3" x 3¼"
Now you can chose to get a bit fancy or keep it super simple.
Add a hole to help push the cards out or skip this and jump to Step 4.


2. Line your ruler up at 1½ along the 3" side of the smaller pieces to find the centre, then mark dots 3/4" from the top and 2½" from the top to give a guide for the length of the oval hole. Use the end of a teaspoon to mark the curves of the oval and a ruler for the straight edges.
3. Use a craft knift or small scissors to cut out the hole on both of the smaller pieces.

4. Again this step is optional but I think it adds a nice decorative touch and keeps the card holder simple but professional. Stitch 1/4" from the edge on the 3" side and then top stitch, so you have a double row of stitching. Make sure you back stitch at the beginning and end when sewing to secure the stitches.

5. Position the smaller pieces on top of the large one matching up the corners, make sure the stitched edges are towards the centre and use clips to hold in place.

6. Stitch 1/4" from the edge on the 3" side and then top stitch, so you have a double row of stitching all the way round. As you are sewing, back stitch across the 4 sections where the pockets open. I backstitch 1/4" to just to the meet the first row of stitching on the smaller pieces.

7. Score down the centre, fold and your card holder is done!


You could chose to add embellishments, stamp or write on it! I actually wrote some positive words on the inside of the pockets to bring my husband luck. Make it your own and enjoy using or gifting your card holder!

If you make one I would love to see! Please share in the comments below or tag me @charmaboutyou on instagram and use #sewsimplecardholder

linking up:
teacher's gifts ~ snappy coin purses + ornaments
It's a bit panic stations over here, madly sewing presents for people. I have a couple of other gifts to finish but I actually managed to complete all the teacher's gifts just in the nick of time - it's the last day of term tomorrow!

These cute little coin purses are a great way to use up scraps. I had a lot of fun diving through my big scrap bag, mixing and matching prints.
I added my favourite Kam snaps - I got a selection of different colours and handy snap pliers from a set on Ebay - for those of you in the UK a quick google has just shown they also have them on Amazon, there is a dedicated online shop Kam Snaps UK and Plush Addict stocks the snaps.

I love the way the little purse opens; perfect for holding coins, business cards, maybe a little emergency kit (plasters, safety pin etc).

The tutorial is the snappy coin purse by Rashida Coleman-Hale and I definitely recommend it, even after making 10! There is a bit of hand sewing to finish them off and it was a nice evening sofa job.

Each of the kids made ornaments for their teachers too. Just glitter felt, cut out circles and some shapes, confetti and pens! I punched a hole and added some baker's twine.

They wrote their names and the year on the back of the felt. I think it's a nice gift and I hope the teachers do too!
denim + Pam Kitty apron 🌹

Today I finished this cute apron, a commission for a lady that loves gardening. I was given a couple of pairs of jeans to use and I decided to combine it with some gorgeous Pam Kitty Garden fabric.

I appliquéd her name to the front of the pocket using a simple zig zag stitch. Since the apron is going to be used in the garden it seemed a good idea to line the pocket with the same waterproof canvas I used for my Geeky Flying Geese Bag. To line both sides, I constructed the main panel of the apron like patchwork, I put the canvas in the centre and surrounded it with denim.

The apron is backed in the same fabric as the appliqué letters. I sewed the right sides together leaving a gap, turned it through and stitched around the outside, as well as stitching around the pocket so the lining wouldn't be baggy!

Originally I was going to use denim for the straps but it would have been a little too 'utility' and decided instead to use the same as the binding fabric.

It's nice to have that seam showing from the original jeans and I stitched vertical lines on the pocket to create three separate sections in the pocket (before sewing the lining on!).

I hope the recipient likes it! I certainly enjoyed making it.

This is a check off my FAL list ✔
Now I've got a zillion things to sew before Christmas and very little time to do it so I better get back to sewing!
I hope everyone's week is off to a good start. Anyone else panic sewing?!
Keeping Koozie
Possibly my favourite thing, next to sewing, is a lovely cup of coffee. Drinking coffee is genuinely what gets me through each day! Rushing around and playing with the kids often means there's a couple of cold cups of coffee left lying around. The Fat Quarter Shop have come up with a cute little Coffee Koozie pattern to help keep your hands cool while you're drinking and my bright version might help remind me it's there!

The pattern uses 2.5" squares and is a great way to use your Moda Candy.

It would make a sweet gift and they are so quick to do thanks to the clever pattern - you could easily personalise them too, which would be handy for work!
You can watch the Fat Quarter Shop YouTube tutorial video here and get the pattern here. I really recommend watching the YouTube channel, Kimberly is so sweet and always has great advice. There's lots of fun free patterns and tutorials, so much inspiration!
This was a check off my FAL list (#8 secret one Katy!).
girly pincushion and planning

Getting to grips with my FAL list and I finished up this sweet pincushion, it really took no time and I love it's chunky feel. I like a deep pincushion and this is a great size. It's from the book Quilting on the Go by Jessica Alexandrakis and I think I will make more because it's a fun little gift to give.


I let my four year old Joan pick the fabrics (can you tell?!) and it's a smiley little pincushion as a result.

Here's one from Jessica's book and I love that you could make this look really modern or give it a vintage vibe. It would also be a fun way to show off a favourite button.
I've been cracking on with my WIPS too and I finally got round to making the March block for the Classic Meets Modern QAL:

I crazy love doing DP blocks and I always use this method without pins. So much quicker and always a good result when I use my quarter inch foot too.
I've also prepared some lovely scrappy binding in preparation for my le challenge project. This months theme is charity.

Lastly I would be so grateful if you would vote for my Bees of a Feather quilt in the hand quilted category of the Blogger's Quilt Festival - you can vote for it here


So much to sew, catch you later!
Linking up:

Subscribe to:
Posts (Atom)