CHARM ABOUT YOU

‧ made by Lucy Brennan ‧

  • shop
  • blog
  • classes
  • tutorials
  • quilts
  • stitchings
  • about
zipper pouch
Showing posts with label zipper pouch. Show all posts

window zippered pouches

23 November 2021

Back with another Aurifil Artisan project! This month I was sent some gorgeous Free Spirit fabrics to play with, along with a spool of 50 weight thread. I received two cuts of the stunning Little Fluffy Clouds in Cloud, Daydreamer by Tula Pink and a deep purple solid (which I think might be Tula Pink Solids in Tanzanite?!). The Daydreamer collection has some really stunning prints, including one called Lucy! 


The Little Fluffy Clouds print is a beautiful ombre, from yellow to green to blue - you get a better sense of it in this picture from the Free Spirit website (and there are two other colourways of this print available): 


I ummed and ahed about what to make for some time. I was a bit stumped. For inspiration I turned to my bookmarks, all the web pages I have saved for later, to one day make projects from tutorials. What a great resource! Though it turns out some of them no longer exist and many weren't right for these fabrics... but I did hit on a winner. 
| read more ... |

clam points and leaves ~ epp

27 March 2021


I am excited to be writing about this make because it's such a fun and useful way to use English paper piecing shapes/blocks. I've made a new project bag and decorated it with epp. There are so many tips and tricks I can share with you; epp curves, light fabrics on dark backgrounds, neat applique top stitching and the awkwardness of metal bits on zips - oh I'm covering it all today!
| read more ... |

glitta pouch + improv

23 March 2021


I do enjoy making little projects, it's always good to have a nice quick finish between bigger projects. I have been joining in with Laura of Sweet Cinnamon Roses as she hosts her Pattern Parade of projects, all designed to be fun to sew and encourage your creativity!
So far for the pattern parade I have made the Glitta Pouch and an Improv block using her patterns, here's how mine turned out...

| read more ... |

the WHY = artistic fire

21 August 2020

Today I'm sharing a couple of special projects, exciting news about how you can learn from me online and hopefully preempting a few concerns. The WHY matters. So I want to focus a little on why I do what I do, how sharing makes a difference and most importantly what I want to impart to you. Keep reading because it's not just pretty pictures, I would love to help you thrive and shine my spark for getting the most of out of your creativity. 

epp hexies stitched together from the back, embroidery scissors

Hand sewn projects are probably my favourite. I prefer to spend hours on the sofa, in the company of others, with the option of sewing outdoors or on the go (when possible). There is also something immensely satisfying about sitting at my machine and getting something sewn up fast too. My first project incorporates both, a happy mix of slow hand stitching and quick, easy machine sewing.

zipper pouches with curved edges epp and applique

Two new zipper pouches, made using my A Piece of Me Pouch pattern. It's super easy to adapt the pattern to different sizes and these cute versions are perfect for carrying in a handbag or holding supplies.

close up of epp hexies and quilting

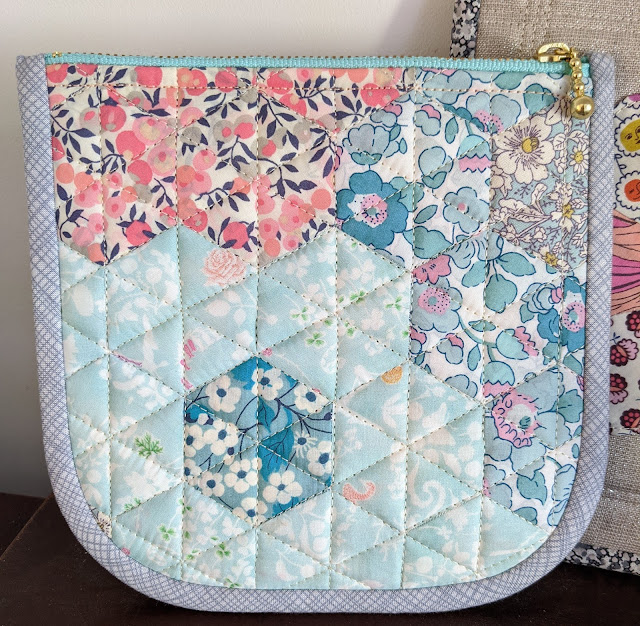
The hexie pouch was made with Liberty tana lawn, starting with traditional English Paper Piecing (epp) hexagon flowers and adding in more hexagons as required. The random placement and geometric quilting make it modern. That's my favourite mix, modern + traditional.

The applique version takes on different shapes, with an epp dresden flower and centre circle. This is so fun to stitch, getting rounded curves can be a struggle but it's all in the preparation. I have a couple of ways I like to baste curved shapes and have found, through trial and error, tricks for sewing them together.

Liberty tana lawn fabric, flower print with different faces, curved dresden plate epp

EPP can be used in different ways and I thought it was nice to show that you can just sew a little and make it a feature. Applique is the most versatile form of patchwork in my opinion, you can do about anything with it! I was going to hand applique this flower but I was on a time crunch and instead decided to top stitch using my machine. This works perfectly for epp because your seams are folded over during basting so there's no raw edges. I use my walking foot and have found the best setting for top stitching on my machine, so it's neat every time.

close up of applique dresden plate flower on quilted background

As this pouch is all mine I decided to use my much loved Liberty prints - some I only have a scrap of but this makes it all the more special. The mix is maybe a little bold but each one makes me smile. I teamed it with a hot pink zip for even more pizzazz! The background is Essex Linen Metallic in Oyster - so much more beautiful and sparkly in real life. The binding here is probably my absolute favourite Liberty print, Pepper in colourway M. It's like a marble or tiny camo print with flecks of almost pinky/purple and lovely greys. It curves and frames the pouch so beautifully.

Liberty fabric epp dresden plate flower applique on zipper pouch with binded curved edges and pink zipper

If you've followed me for a while you will have seen me create a few versions of this pouch and there's some stunning ones made by others over on instagram, take a look #apieceofmepouch

This pattern has the easiest way to sew a zip, it works whether you need to cut the zip down or if you have the perfect size. No need to worry about zip ends and it's perfectly neat on the inside too! Note to self, must get more metal zips, they look fabulous.

close up view of zippers and binding on zipper pouches

Liberty epp hexie zipper pouch in pastel floral prints


My next project involves more hand work, this time embroidery. I designed two patterns, to showcase different embroidery stitches and ways of creating text. Writing can look amazing when embroidered and using the right stitch for the way the letters are formed is crucial. At the same time a sense of naivety can also add to a piece, it depends on the look you want but I do think this is when 'handmade' shines. Every stitch that goes in the project is right there on display. 

This seasonal pattern is a great sampler, each leaf is made with different stitches and the resulting textures are beautiful.  I designed it with The Byrds song playing in my head (and as I stitched and even now!) to create a decorative hoop that could be displayed all year round. 

embroidery hoop with four embroidered leaves representing each season and stitched text To everything there is a season

A few of the stitches are quite dense and detailed but the whole look is simple and modern. It didn't take too long to create and I really enjoyed choosing the colours and stitches to use for each part of the pattern.

chain stitch embroidered oak leaf and satin stitch maple leaf in progress

Some of you may remember me demonstrating chain stitch before, it's one of my favourite stitches to use and makes a great filler for the oak leaf because it adds such movement. There are some hidden details to this piece, that can just be seen in the photographs, such as a line of back stitch around the oak leaf in a lighter green shade. In real life this gives it a nice glow and elevates it from being flat colour.

embroidered leaves and text

There is a mix of threads, Aurifloss and Perle cotton. I also used a variety of thread strands with the floss to allow for either more texture or finer detail. It feels so different and my techniques change depending on the number of strands used. I change needles too, usually I prefer working with two or three strands and a fairly fine embroidery needle.


embroidery hoop with text Happy and rainbow french knots

My Happy hoop is just that! A happy mix of chunky text and sweet little french knots in a rainbow of colours. There are lots of ways to make additions to this pattern too - I'm thinking Happy Days, Happy Graduation, Anniversary... a perfect gift for a happy day. And I would be happy to have you join me stitching these projects...

embroidery hoop with text Happy and rainbow french knots


Both of these projects are featured in my upcoming classes with CraftyMonkies via Zoom. I am super excited to get back to teaching because I have been missing it! And online classes mean that if you've ever wanted to take a class with me you now can, wherever you live!

These classes allow for in-depth learning, so that you can get results not just information. Follow the making journey from start to finish, with all my extra tips and tricks for every step. By the end you will have practised and absorbed all the skills to create the projects. You can ask questions along the way and engage with me so you really gain a greater understanding of the methods demonstrated. 

Of course it is convenient having me right there, in real time, to be able to show you each stage of the project in detail. I can address any issues you may be having, repeat any parts and give you encouragement and advice on your makes.

And if you've never used Zoom before it is super simple, there are plenty of guides online showing you how to use it. CraftyMonkies have developed a brilliant system so you can really see everything up close and participate in the class. For those of you that feel unsure or the thought of being on camera terrifies you, don't worry you do not even have to turn your camera on - you can join the class and watch! It's less like a conference call and more like watching a live video. Though of course I would be happy to see you / chat with you throughout, I totally understand that for some people that causes anxiety. Everyone really is welcome and this platform makes it so easy. It's just like watching me on telly ;) only better!

Join me if you want to tighten up your skills, even if you are a beginner or if you're just thrilled at the prospect of having three hours of fun making, learning and boosting your artistry. And you get the patterns included to keep! The classes are project based to give you the skills necessary for that particular make but they are also designed to provide knowledge for application in your own creative exploration going forward. The purpose is to give you expertise and fuel your artistic fire to make unique and beautiful projects!

There is a 'lot of ground' content covered in the classes...

*English Paper Piecing Pouch

  • cutting
  • basting
  • piecing
  • applique
  • quilting
  • sewing a zip
  • making binding
  • sewing binding (and curves)

A Piece of Me Pouch - charm about you - two zipper pouches with epp panels and applique

*Embroidery Hoops

  • preparing fabric
  • using pattern
  • hooping
  • variety of embroidery stitches
  • choosing stitches
  • embroidering text
  • finishing the hoop
  • added embellishments / personalisation

decorative embroidery hoop hanging on wall with kids ceramic decoration

It's a whole lot more than the techniques though. In every class my aim is to share as much as possible, to really inspire and give you the confidence to be able to use what you've learnt and harness your own creativity. Genuinely nothing fills me up more than a student telling me how much they've enjoyed a class. When I teach a technique or method that inspires you, share something that sets off a light bulb moment or help you create a project you are proud of - that is my why. 

▚ I [attended] your brilliant class for this pouch Lucy and the resulting pouch I was so happy with and still use and love - Happy Days! Highly recommended! ~ Gill ▞


Join me for one (or both!) of the classes, English Paper Piecing and Embroidery Hoop: Seasonal Theme. 10% of profits from the class go to my chosen charity, Children in Need.

Click the link to book your place: https://www.craftymonkies.com/online-workshops-sewing-quilting

Thank you, as always, for reading and commenting with such kindness and enthusiasm. Your support encourages me as I continue being able to teach on this new route.


| read more ... |

a piece of this & that

29 October 2019

My newest A Piece of Me Pouch is a combination of this and that; a culmination of bits I have gathered, an unfinished project and a couple of new things I wanted to try. This is larger than the version in my pattern - it's very easy to make in any size you choose! - and I'll show you how I created a loop for carrying or hanging.

Always on the look out for interesting fabrics, I found this fabulous buttery soft Punched Faux Leather and as soon as I saw it, thought it would be great for stitching on. It has a tiny bit of stretch so rather than trying to battle with it on the bias, I made cross stitches into plus stitches. Of course it was stitched the same way, it just took a little focus to make them + + + + +


The floral pattern is part of a design in Anna Maria's Needlework Notebook which looks modern and pretty. It was tempting to add more stitches but at the same time it's nice to see the punched fabric and not have that texture lost.

To make the stitches stand out I used all six strands of Aurifloss. The bright colours work really well and the thread has a nice sheen so it doesn't look dull against the pewter. The combination of the soft faux leather and the stitches make it very strokable!  
| read more ... |

⌘ A Piece of Me Pouch pattern ⌘

04 July 2017


At the beginning of the year I made these curved bottom padded zip pouches (born out of forgetting to measure twice and cut once while making my Everything in It's Place Bag). Not wanting this gorgeous fabric and my quilting to go to waste, I decided to use as much of the panel as I could and I ended up with two zip bags that I love! I tried a different way of attaching the zips (the lace one isn't so neat, I wouldn't suggest it for this) and I have finally written up a pattern so you can make your own.

The A Piece of Me pouch idea came to be after finding it makes such a difference for me to use things that make me smile and that mean something. I had the idea of embroidering this lyric onto a pouch, in remembrance of a friend. When I see the words, I sing the song and have great memories. 

I encourage you to do the same, whether it be for yourself or for a gift; make it personal in some way, positive and meaningful 💖 

I taught the A Piece of Me pouch at the Simply Sew'In retreat and the class all made gorgeous versions! Click here to read more and see details.


Adding the zip is really straightforward, there are tips in the pattern to keep it neat and the bias binding is a perfect finish. 


The embroidery is optional and the pouch is brilliant either way! You can do some simple quilting or go to town with free motion quilting, you can make a patchwork piece for the outer panel or keep it plain. A Piece of Me pouch comes together quickly and it's up to you to add the details! The finished size of the pouch is approximately 10.5" x 7".


Click the link below or visit my Etsy shop to purchase the A Piece of Me pouch pattern. The PDF pattern is instantly downloadable after you complete your purchase.

Buy Now

Thank you all so much for your support and encouragement! Add #apieceofmepouch if you share on social media, I would love to see what you make!


| read more ... |

stamping on fabric ~ polaroid pouch

12 May 2017


You may have seen these polaroid blocks if you're following me on instagram, well I made a couple more and turned them into a zip pouch! What follows is a mini tutorial of how to stamp text on fabric and also a little explanation of those words.


The fabric used for fussy cutting is Menagerie, Indian Summer by Sarah Watson. One of my favourite prints. I picked out a few animals to fussy cut and the sketched design of the print works really well for the polaroids. I used Paint Dot, Paper Bandana by Alexia Abegg for the background. Such pretty dots and the colours are just perfect.

I have 'written' on polaroid blocks before (I don't like that empty space) - embroidered text - but I just didn't have time for that. I needed something quick and so turned to stamping. The same method I used to stamp my initials on the bottom of my Everything In It's Place Bag.


It requires a rubber stamp alphabet, the kind you can get from stationery or craft shops. Each letter is an individual stamp - clear stamps with an acrylic block are definitely the easiest to use because you can really see where you are placing the letters. 

To use them you simple peel the letters you need from the plastic backing and 'stick' them to the acrylic block to spell the word you want to stamp. I used a Memento Dew Drop Ink Pad, a really nice sized ink pad for the small letters.

Then to make the letters waterproof and also more even I went over them with a fine Pigma Micron pen. The 02 was the perfect line width for my letters. Finally it's important to heat set the ink with a dry iron.

*I managed to spill water on 'strength' (hence the smudging) while ironing the piecing before using the micron pen so do that sooner rather than later!


So why did I stamp those words?
I like surrounding myself with things that make me smile, positive images and words. I have a book Animal Wisdom by Jessica Dawn Palmer, which is all about the myths, folk stories and traditions that surround the animals. I looked up the bear, owl, fox and racoon, then chose the words that most appealed to me. The ones I feel are important, mean something and I want to always be part of me. It will just give me a reminder and boost when I see those words.


I would like to be a more adaptable person, I struggle with change a lot and it has led to anxiety.
Physical strength is important to me but also inner strength and mama bear strength.


Honesty and instinct come fairly naturally but I sometimes silence my instincts and that leads me to not be honest with myself. Doing my #100daysofsilentsewing project is really helping me to focus more on my instinct and the silence is so calming.

I chose a lining fabric I love, a Suzuko Koseki print:


And I picked a two tone zip, it's hard to capture the colour of the zip but the coral / yellow is so fun! It ties in well with the whole vibe I was going for.


I quilted round the polaroid blocks with navy 28wt Aurifil, simple straight lines that work as a frame.

Now I have to go and find something else to stamp!


linking up to finish it up friday at crazy mom quilts

| read more ... |

make do and make new

02 January 2017

Sometimes a mistake can bring about good things! While making a bag for my sewing supplies, I cut one of the quilted panels wrong. I was so mad at myself because it was one of my favourite prints. The accident happened though and there was no fixing it. After a dig through my stash I found more fabrics I could happily use for my bag. And the panel I cut wrong has now become two cute zip pouches. 


The sides were already quilted panels so I couldn't do the usual 'turn through the lining' way of making. For the larger one I added the zip, then top stitched the zip tape (from the lining side) to hide the unfinished seam. On the smaller one I did a double row of stitching to secure the zip and just lazily trimmed the seam with pinking shears. 


It was nice to use some fun zips too! The smaller pouch measures 6" x 6 ¾" and the larger one is 10 ½" x 6 ¾".


Zips bought from Simply Because Crafts on Ebay
Fabric -
outer: Hexagon/spring/small by ivieclothco
lining: Square Grid - Mint by kimsa
binding: Essex Yarn Dyed Metallic in Storm

This is my first finish of 2017 and I hope this year will have many! I will be back with my word for the year tomorrow.

Happy New Year! Wishing you all a creative and wonderful 2017!

p.s. free printable calendar seen in the top picture is from Simple As That

| read more ... |

Peek A Pouch 🎊

18 November 2016

This week I finished a fun make, perfect for a quick gift or to hold small treasures! It would be handy for keeping a few make up bits in too because it's made of laminated fabric and vinyl. 

The free pattern is Peek A Pouch by Laura Zuckerkuss, which she let me pattern test for her. Laura provides excellent step by step instructions and tips for working with these fabrics. The tutorial really makes it so easy!


I happened to have scraps of this gorgeous Loulouthi laminated fabric by Anna Maria Horner, that someone (so sorry I have forgotten who?!) sent me - possibly in a swap or giveaway. I literally had the perfect amount for this project, I had to be careful when cutting! I also didn't want to lose the lovely pink and yellow flowers completely because they are my favourite part of the print, so I put them on the back. 


I also the found I had the perfect zip, which matches beautifully! I like these pull ring zips, I got mine from Simply Because Crafts on eBay in the UK or I know Sunny Day Supply stock them in the US.

The neon kraft confetti also makes me so happy! 


You can see more of Laura's clever patterns on Craftsy! Thanks for letting me test Laura :)


I am full of cold at the moment and feeling a bit sorry for myself. Hopefully I can have a quiet weekend of hibernation and get some sewing done! Tonight I am finishing the quilting on my rose star quilt - I feel a little sad that it's nearly done because it's been such a long work in progress, at the same time I can't wait to take those basting stitches out and get it bound. I will be posting pics on instagram over the weekend, as well as hosting the Saturday Night Craft Along from 6pm, so make sure you come and follow me over there!

What are your weekend plans? Does anyone else feel like hibernating?!


linking up:
at The Quilt Journal this week

and finish it up friday at crazy mom quilts


| read more ... |
Next page
Subscribe to: Posts (Atom)

Hello!
I'm Lucy from Manchester, UK.
A modern / traditional quilter and stitcher with miscellaneous style.
Here you can enjoy my finished quilts and stitching projects.
Get tips, patterns and free tutorials and support my shop.
Find out about my upcoming quilting and sewing classes.

FOLLOW ALONG

Never miss a post!
New blog posts sent direct to you:

Monthly newsletter
'FROM THE SEWING DESK':

SUPPORT THIS BLOG

SUPPORT THIS BLOG


AFFILIATES

Fat Quarter Shop Cross Stitch
Fat Quarter Shop Daily Flash Sale

Archives

  •  2023 (1)
    •  August (1)
      • Simplicity and mending (with tips for iron on patc...
  •  2022 (18)
    •  December (2)
    •  October (1)
    •  July (2)
    •  June (4)
    •  May (1)
    •  April (2)
    •  March (2)
    •  February (3)
    •  January (1)
  •  2021 (22)
    •  December (2)
    •  November (1)
    •  May (1)
    •  April (1)
    •  March (6)
    •  February (3)
    •  January (8)
  •  2020 (32)
    •  December (6)
    •  November (1)
    •  September (1)
    •  August (3)
    •  July (3)
    •  June (1)
    •  April (5)
    •  March (2)
    •  February (3)
    •  January (7)
  •  2019 (36)
    •  December (5)
    •  November (2)
    •  October (2)
    •  September (2)
    •  August (5)
    •  July (3)
    •  June (1)
    •  April (1)
    •  March (4)
    •  February (4)
    •  January (7)
  •  2018 (74)
    •  December (9)
    •  November (6)
    •  October (3)
    •  September (4)
    •  August (5)
    •  July (4)
    •  June (3)
    •  May (8)
    •  April (7)
    •  March (8)
    •  February (8)
    •  January (9)
  •  2017 (90)
    •  December (6)
    •  November (8)
    •  October (8)
    •  September (15)
    •  August (8)
    •  July (7)
    •  June (7)
    •  May (5)
    •  April (6)
    •  March (6)
    •  February (3)
    •  January (11)
  •  2016 (132)
    •  December (5)
    •  November (11)
    •  October (9)
    •  September (10)
    •  August (13)
    •  July (10)
    •  June (13)
    •  May (12)
    •  April (12)
    •  March (14)
    •  February (7)
    •  January (16)
  •  2015 (130)
    •  December (6)
    •  November (9)
    •  October (13)
    •  September (10)
    •  August (13)
    •  July (13)
    •  June (9)
    •  May (13)
    •  April (15)
    •  March (10)
    •  February (10)
    •  January (9)
  •  2014 (166)
    •  December (13)
    •  November (9)
    •  October (8)
    •  September (14)
    •  August (12)
    •  July (16)
    •  June (17)
    •  May (14)
    •  April (17)
    •  March (15)
    •  February (14)
    •  January (17)
  •  2013 (203)
    •  December (13)
    •  November (17)
    •  October (18)
    •  September (11)
    •  August (20)
    •  July (17)
    •  June (20)
    •  May (17)
    •  April (17)
    •  March (18)
    •  February (15)
    •  January (20)
  •  2012 (188)
    •  December (17)
    •  November (19)
    •  October (14)
    •  September (19)
    •  August (21)
    •  July (15)
    •  June (3)
    •  May (13)
    •  April (16)
    •  March (13)
    •  February (19)
    •  January (19)
  •  2011 (70)
    •  December (15)
    •  November (11)
    •  October (24)
    •  September (18)
    •  August (2)

Hold Up

© Lucy Brennan, Charm About You 2011-2022. Unauthorized use and/or duplication of this material without express and written permission from this blog’s author and owner is strictly prohibited. Excerpts and links may be used, provided that full and clear credit is given to Charm About You with appropriate and specific direction to the original content. It's just bad manners not to.

Creative Commons Licence

Charm About You is licensed under a Creative Commons Attribution-NonCommercial-NoDerivatives 4.0 International License.

PRIVACY POLICY


© CHARM ABOUT YOU •