zip pouch
Showing posts with label zip pouch. Show all posts
★ patterns ★
I thought I would share some updates, I have expanded my shop and am working hard to create new patterns. It would be great if you could take a look and maybe give some ♡ to the listings if you can!

First up is the lovely tangible paper patterns, which I have listed in my Etsy shop. They are all printed on quality paper locally and carefully hand packaged by moi.
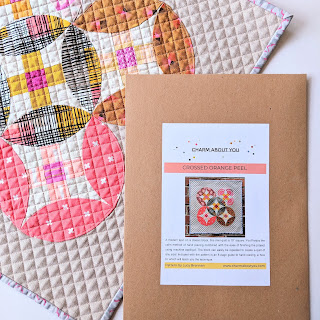

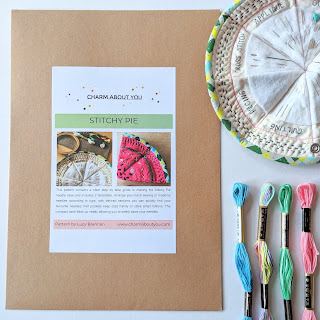


For the patterns with templates, these have been printed separately to allow you to easily make copies and keep the original in tact if you so wish.

It's been something I have wanted to do for some time, I know that PDF patterns are so easy to buy and download but not everyone likes buying patterns that way. This is for the people who like physical copies and they would also make great gifts for someone wanting to learn a new skill; hand piecing, an easy zip pouch or the cute Stitchy Pie needle case! All of my patterns allow you to sell handmade products on a small scale so they are perfect for those of you that do handmade fairs too.

If you would like some happy mail through the post, click here for paper patterns.
As I grow my pattern shop and add new designs (coming soon!) I hope to encourage more people to try something new and if I can inspire anyone to do some hand sewing I will be happy! If you frequent Etsy I would be so grateful if you would head over and like my shop or patterns - it will help me know which ones are favourites as well as keeping you informed when I do have updates.
There could well be some actual makes heading to my Etsy shop too, I have really been enjoying making tassel charms. Thank you to those of you that bought them at Stitch Gathering recently! The one I made for my sewing case is often admired and they are a really cute addition to any bag or to hang in your sewing space. Hopefully they'll start making an appearance this weekend so keep an eye on the Available now in the shop!

⌘ A Piece of Me Pouch pattern ⌘

At the beginning of the year I made these curved bottom padded zip pouches (born out of forgetting to measure twice and cut once while making my Everything in It's Place Bag). Not wanting this gorgeous fabric and my quilting to go to waste, I decided to use as much of the panel as I could and I ended up with two zip bags that I love! I tried a different way of attaching the zips (the lace one isn't so neat, I wouldn't suggest it for this) and I have finally written up a pattern so you can make your own.
The A Piece of Me pouch idea came to be after finding it makes such a difference for me to use things that make me smile and that mean something. I had the idea of embroidering this lyric onto a pouch, in remembrance of a friend. When I see the words, I sing the song and have great memories.
I encourage you to do the same, whether it be for yourself or for a gift; make it personal in some way, positive and meaningful 💖

I taught the A Piece of Me pouch at the Simply Sew'In retreat and the class all made gorgeous versions! Click here to read more and see details.

Adding the zip is really straightforward, there are tips in the pattern to keep it neat and the bias binding is a perfect finish.

The embroidery is optional and the pouch is brilliant either way! You can do some simple quilting or go to town with free motion quilting, you can make a patchwork piece for the outer panel or keep it plain. A Piece of Me pouch comes together quickly and it's up to you to add the details! The finished size of the pouch is approximately 10.5" x 7".

Click the link below or visit my Etsy shop to purchase the A Piece of Me pouch pattern. The PDF pattern is instantly downloadable after you complete your purchase.
Buy Now
Thank you all so much for your support and encouragement! Add #apieceofmepouch if you share on social media, I would love to see what you make!
stamping on fabric ~ polaroid pouch

You may have seen these polaroid blocks if you're following me on instagram, well I made a couple more and turned them into a zip pouch! What follows is a mini tutorial of how to stamp text on fabric and also a little explanation of those words.


The fabric used for fussy cutting is Menagerie, Indian Summer by Sarah Watson. One of my favourite prints. I picked out a few animals to fussy cut and the sketched design of the print works really well for the polaroids. I used Paint Dot, Paper Bandana by Alexia Abegg for the background. Such pretty dots and the colours are just perfect.
I have 'written' on polaroid blocks before (I don't like that empty space) - embroidered text - but I just didn't have time for that. I needed something quick and so turned to stamping. The same method I used to stamp my initials on the bottom of my Everything In It's Place Bag.

It requires a rubber stamp alphabet, the kind you can get from stationery or craft shops. Each letter is an individual stamp - clear stamps with an acrylic block are definitely the easiest to use because you can really see where you are placing the letters.
To use them you simple peel the letters you need from the plastic backing and 'stick' them to the acrylic block to spell the word you want to stamp. I used a Memento Dew Drop Ink Pad, a really nice sized ink pad for the small letters.
Then to make the letters waterproof and also more even I went over them with a fine Pigma Micron pen. The 02 was the perfect line width for my letters. Finally it's important to heat set the ink with a dry iron.
*I managed to spill water on 'strength' (hence the smudging) while ironing the piecing before using the micron pen so do that sooner rather than later!

So why did I stamp those words?
I like surrounding myself with things that make me smile, positive images and words. I have a book Animal Wisdom by Jessica Dawn Palmer, which is all about the myths, folk stories and traditions that surround the animals. I looked up the bear, owl, fox and racoon, then chose the words that most appealed to me. The ones I feel are important, mean something and I want to always be part of me. It will just give me a reminder and boost when I see those words.

I would like to be a more adaptable person, I struggle with change a lot and it has led to anxiety.
Physical strength is important to me but also inner strength and mama bear strength.

Honesty and instinct come fairly naturally but I sometimes silence my instincts and that leads me to not be honest with myself. Doing my #100daysofsilentsewing project is really helping me to focus more on my instinct and the silence is so calming.
I chose a lining fabric I love, a Suzuko Koseki print:

And I picked a two tone zip, it's hard to capture the colour of the zip but the coral / yellow is so fun! It ties in well with the whole vibe I was going for.

I quilted round the polaroid blocks with navy 28wt Aurifil, simple straight lines that work as a frame.
Now I have to go and find something else to stamp!
linking up to finish it up friday at crazy mom quilts
Shake it! ~ Glitter It All Pouch

Glitter and shine and confetti! Fabric and vinyl and zip! That's what Laura's new pattern is made of. The Glitter It All Pouch is so good. One of those makes where you smile through the whole process. It is so fun and the clear instructions make it simple and quick to put together.
It just so happened that my friend Jayne had kindly given a LOAD of craft supplies to me for the kids (and totally helped my sanity over the summer!). Amongst the goodies was this cool letter confetti:

I mixed in some fine holographic glitter for extra sparkle and I had the perfect print to go with it, probably now unavailable as it is a couple of years old, Practice your Handwriting in Manilla Apple, School Days by American Jane.

I probably went a little overboard with the glitter, it would be more transparent has I used less but then I did shake it up to take these photos, the glitter freely moves around. I can't stop shaking it!
These would be such great gifts for kids, teens or any one that likes sparkle! You can get so many different types of glitter and confetti - you can find stars, hearts, flowers, smiley faces, Christmas, Easter, numbers, unicorns... the list goes on (and that was just a quick Google for metallic confetti!).
You don't even to have to buy confetti or glitter, remember the joy of emptying a hole punch? If you have any shiny card or even just different colours (it doesn't have to sparkle!), you could hole punch to your hearts content and use those shapes. Get creative and play!

You can download Laura's free Glitter It All Pouch pattern from Craftsy now!

thank you teachers!
School has very nearly finished for the summer and that means time to say thank you to the teachers for all their hard work.
I made some simple and pretty See It All Pouches using Laura's tutorial:

The bottom two pouches in the picture above are gold sparkle PVC rather than the clear I usually use. It's a really great thickness, I bought it as an experiment (it's sold as tablecloth) but I absolutely love it. It's nice and sturdy but easy to work with and it feels smooth.

Click here for the gold, they also sell silver - for some reason it's more expensive though. FYI I bought the smallest amount and I have enough for loads of pouches!!

Click here for the gold, they also sell silver - for some reason it's more expensive though. FYI I bought the smallest amount and I have enough for loads of pouches!!

I got a nice set of Heyland & Whittle hand made, natural soaps so I could divide them up as little treats!

I individually wrapped the soaps and added cards the kids had made for each of their teachers, wrapped them all up and they were happily received this afternoon!

Today is tinged with sadness because it was the last day Lois and I were at home together alone, before the other kids finish school. We played outside in the glorious sunshine, then retreated inside for lunch and a chilled out afternoon with lots of cuddles.
It feels bittersweet - though I am so lucky and grateful for all the time I have had with each of my kids before they start school - it is the end of an era for me.
I'm plotting lots of fun activities with the kids over the next few weeks, we have a nice holiday to look forward to and it really feels like summer with the scorching heat today!! It's all lovely.
I think I will have a big cry once they are in bed and then distract myself with some sewing therapy ;)
☑ This can be ticked off my fal list
two favourite pouch patterns
I've been sewing a lot of small makes recently and I want to share two brilliant pouch patterns that are easy to sew, useful and great as gifts!

First is the Lola Zipper Pouch by Svetlana Sotak. I have made these before and it's such a clever design with well written instructions. I picked a fun Riley Blake glasses print for one and did a double sided version with Gramercy by Leah Duncan and a bird print (no idea what it is sorry!). I used metallic canvas by Cotton + Steel for the bottom and the gorgeous Petite Plus, Black and White by Cotton + Steel for the binding on both.
These makes were sent out to friends as happy mail this week!

The next pouch pattern is a new one by Laura, from an Instagram mini tutorial she did for the See It All Pouch. So fun and quick to make! These could get seriously addictive!!

Sewing with vinyl can be tricky but I had no problems making these. If you find your vinyl sticks to your machine foot then try using a piece of tissue paper between the plate and the vinyl and/or the vinyl and the foot, it tears out easily.
Another tip is if you have creases in the vinyl, very carefully hold your iron over the crease (not on it) and give it a burst of steam.

I like that you can see everything in these pouches. The tops are a little floppy compared to the vinyl so next time I think I will add some interfacing between the fabric. Check out #sewitallpouch to see all the gorgeous versions of this pattern.
It's also fun playing with zip colours and I love how these pop!

And in personal news, I'm so thrilled to finally have my braces off!! You can see my big grin in my new profile picture :)
Tomorrow is my Nan's 98th birthday and me and the kids are going out for lunch with her and my Dad, should be another good day!happy big pouch
Welcome to my contribution to the Happy Little Pouch Hop!

If you're new here, please stay and have a look around my blog, I'm busy sew-nesting as I'm expecting a baby in January so I have been trying to get lots done before then. It's always fun to get to know other crafters too so please comment away!
My make is not so 'little' - it's actually the biggest pouch I've made so far. I needed something to keep my templates in and once I saw the fabulous Vintage Sewing Machine and Notions paper pieced pattern by Charise Creates I knew I had to make it.

The zip pouch measures about 10.5" x 11" so a great size to keep large notions! I love the idea of using paper pieced blocks for pouches like this. They add stability and there are so many fun and different patterns available.

Most of the fabrics I used were from my scraps, although the black glittery text fabric is a Kokka print and the draped fabric is this sewing machine stitches print by aldea from Spoonflower.

I'm still fairly new to paper piecing and there were some frustrating moments where I made mistakes but for the most part I am really happy with how it turned out and it was so fun working out what fabrics to use.

This gorgeous vintage notions fabric I used on the other side was sent to me by the lovely Rachael some time ago and I was saving it for something special - it works so well and I just love it.

I also love the crazy green and orange zip combination. Makes me smile.
Be sure to go and visit my fellow happy little pouch hop blogger Courtney at Mon Petit Lyons today, who has a great tutorial for making a zip pouch with a handle! Don't forget to add your pouch makes (made during the Hop) to the Flickr group for a chance to win prizes from these great sponsors:


Linking up:


Sailor Mouth Swap **contains foul language**
**Warning this post contains some swearing (cursing if you will) and a "finger" - if you find these things offensive please don't bother reading this post. I considered blanking them out but it sort of defeats the point. You have been warned!**
I've just found out my partner, the lovely Krista, has received her Sailor Mouth Swap goodies so I can go ahead and show you what I made for her...


On the other side I used strips of Liberty and then embroidered a reminder to 'keep things organised' ;)

The main swap was this embroidered Johnny Cash hoop:


This took a long time to sew and I wish I'd had more time to add more detail but at the same time I didn't want to over work it. To make the embroidery I found the image I wanted to use then used picassa to play with it so I could get a good outline (I think I changed it to neon). I then traced over the image to outline the main shapes:


It's mostly sewn using backstitch but there's also some satin stitch, French knots and other stitches in there:


Subscribe to:
Posts (Atom)