floral
Showing posts with label floral. Show all posts
hanging basket tote bag

One of the joys of appliqué is creating anything you want from fabric shapes. I drew some simple flowers, petals and leave templates to make up this hanging basket design. The initial idea was a bowl of flowers, a modern take on the traditional basket quilt block design. It evolved into two pattern shapes, the bowl and the basket. The Kaffe Fassett prints were also perfect for some fussy cutting - in the same style as Bari J's beautiful fabric collage style - so it became a mix of appliqué shapes and collage. I like the organic look that creates.

I used Bondweb to position the flowers - as I was making up the design I attached the handles first to give me an idea of placement but would recommend sewing them on later as it was a faff to keep them out of the way!

I did sketch style stitching with black thread, using the free motion foot and just echoing inside the shapes. Black isn't often my colour of choice as it's so harsh but that's what makes it work so well here. I think of it as doodling and the thread is my pen.
If you haven't tried this technique it really is a lot of fun and it's a great way to get used to using your free motion foot. Also it is really easy to cover any mistakes by going over the stitches, I usually go round the shapes at least twice. You can watch the video below to see my Sewing Quarter demo and get more tips as I create a bowl of flowers.

The straps on the tote are a little different because they aren't completely sewn down. The ends are attached with a square of stitching and a large zig zag, then I tucked the straps in while sewing the lining to the bag and turning the bag through. I them pinned them in place and did three lines of top stitching around the top of the bag for decoration and to hold the straps in place.

This means on a warm summer's day I could tuck a cardigan or shawl in through those straps ready for evening (dreaming of those warm days already!). Or extra space for all the kids jackets I end up carrying.

I have to say I'm quite fond of the minimal back side too! I'm planning more totes with straps like this because I really like the look.

Click play to watch the demo and let me know if you have a go at this technique!
linking up to finish it up friday at crazy mom quilts
Tilda Autumn 2016 Ranges Blog Hop 🌹 & Giveaway!
**Giveaway now closed**

Welcome to my stop on the Tilda Autumn 2016 Ranges Blog Hop! I am excited to show you the projects I made with the new limited collection 'Cabbage Rose & Memory Lane' by Tilda, available to buy now at Stitch Craft Create.
There is an adorable vintage feel to the collection, with bright florals, sweet rabbits and ditsy flowers in gorgeous colourways.

Beautiful flowers always make me smile! I chose the 'Lucille' prints in Ginger and Linen to make a Wild Flower Pincushion. It pretties up a sewing space and shows how wonderfully the autumn ranges play together!

My girls got so excited when they saw the 'Rabbit and Roses' prints so it was only right that I used the fabric to make something for them. I chose to make two hour baskets, cute and functional - large enough to hold lots of children's books!

I paired the rabbits with tiny ditsy flowers, the ranges have a really good mix of patterns so you can play with scale to nice effect - perfect for quilting!


Practical and useful things are so fun to make, so I just went for it with the next few items:

I made a Tiny Treasures Tray with my favourite print 'Libby', I layered two strips of sparkle vinyl and added cute Kam snaps for the tabs.

Then another make for my girls, adorable hair bows using the tutorial by She Can Quilt. Very quick, easy and a fun way to use up fabric scraps! I attached little alligator clips at the back and they stay put really well without being sewn down.

Finally a little something for myself! I have already made one of these thread catcher baskets, with the tutorial by The Sewing Chick, and it's so useful next to me while I'm hand sewing that I've made another one to go by my sewing machine.

Be sure to look at the full Tilda Autumn 2016 Ranges, there are also coordinating buttons, charm packs, adorable quilt labels, fabric tape, ribbons and more in the Tilda collection at Stitch Craft Create.
Check out all the stops on the Blog Hop:
1st August – Stitch Craft Create
2nd August – Stitch Craft Create
3rd August – Vicky Myers Creations
4th August – Strawberry Patch Ramblings
5th August – Charm About You
2nd August – Stitch Craft Create
3rd August – Vicky Myers Creations
4th August – Strawberry Patch Ramblings
5th August – Charm About You
8th August – Crafting Not Cleaning
9th August – Popular Patchwork
10th August – Dinki Dots
11th August – Little Black Duck
12th August – Tea and a Sewing Machine
9th August – Popular Patchwork
10th August – Dinki Dots
11th August – Little Black Duck
12th August – Tea and a Sewing Machine
Giveaway
I am giving away the Wild Flower Pincushion (follow me on instagram, there will be a fun 'making of' video later today!) and my remaining scraps of pretty Tilda fabric...

**Giveaway now closed**
⟡ Open internationally, a winner will be chosen on Wednesday 17th August 2016.
⟡ Please make sure you leave your email in the comments so I have a way to contact you if you win! No reply blogger, no chance.
Good Luck!
☑ The baskets and the hair bows can both be ticked off my fal list
Palisades Quilt & FREE Pattern from Fat Quarter Shop!

Fat Quarter Shop has a fabulous new pattern 'Palisades' with a video tutorial, which is so fun! You can click here to get the pattern and find out more.
It is another of those very clever patterns that looks tricky but the method and instructions are so clear that it comes together quickly and easily!
It is another of those very clever patterns that looks tricky but the method and instructions are so clear that it comes together quickly and easily!
For my version I used the beautiful Chalk & Paint by Sew Caroline for Art Gallery Fabrics. I love the colours and mix of prints, so modern and fresh. The text print is really inspiring too, with words like 'create', 'believe' and 'dream'.


The pattern comes together so easily. I used my 1/4" foot and all the points are perfect! I didn't even trim the blocks, choosing instead just to trim the dog ears with scissors as I was sewing the blocks together. I hope the quilt police don't come after me!
I had a bit of a nightmare when it came to quilting, the plan was some straight line quilting to mimic the angles of the triangles but I have lost my hera marker, my favourite marking tool. I couldn't bring myself to use a pen because of the lighter colours on the quilt and ultimately it was the excuse I needed to change tack because really I prefer hand quilting. As I was basting the quilt though, it occurred to me I might as well tie the quilt - I was on my hands and knees on the floor anyway.
Hand tying a quilt as been on my 'to sew' list for a long time, ever since I used the technique to back a crochet blanket. You can read about the methods I used in that blog post.

It has made for such a soft and squishy quilt and I absolutely love it!
Once I finished tying I realised I wanted a little something in the centre and so I added some hand quilting. I tried to mimic the shape of the florals in the Sprayed Blooms print.


I also chose that print for the backing and it's stunning!!

Thank you to Fat Quarter Shop and Art Gallery Fabrics!

Head over and get the free pattern HERE and to see other Blogger's gorgeous versions of the Palisades Quilt click these links:
Tina from Emily Ann's Kloset
Amy from Diary of a Quilter
Erica from Kitchen Table Quilting
Melissa from Happy Quilting
Melanie from Mostly Crafty
Amanda from Jedi Craft Girl
Afton from Quilting Mod
Brooke from Silly Mama Quilts
Megan from Quilt Story
Heather from Quilt Story
Rachael from The Floral Suitcase
Amy from Diary of a Quilter
Erica from Kitchen Table Quilting
Melissa from Happy Quilting
Melanie from Mostly Crafty
Amanda from Jedi Craft Girl
Afton from Quilting Mod
Brooke from Silly Mama Quilts
Megan from Quilt Story
Heather from Quilt Story
Rachael from The Floral Suitcase

☑ This can be ticked off my fal list
there are no words cushion
This is a very special make for me. One that represents loss, love, remembrance, friendship, community and compassion.
Last year when my friend Nat tragically lost her youngest son, I put a call out on social media asking for low volume nine patch blocks to make into a quilt. Quilters generously made and sent beautiful blocks from around the world and I was able to make three quilts for Nat and her family. You can read about the 'there are no words' quilts here.
The lovely Sharon Holland contributed a block to the quilt and also sent an extra one, which she said I could use in the quilt if needed or save it to create my own make. I'm actually crying as I remember how it felt to read all the thoughtful cards and notes that were sent, not only to Nat but also to me. The sadness is a fraction of what Nat experienced and continues to experience and that was what compelled me to do the work of providing tangible quilts, to show her and her family the love, comfort and sympathy we all wanted to give.
I decided to keep the block and, although it has taken me some time to come to use it, I will treasure this cushion and all it represents. The life of a precious little boy.

I had some vintage sheet fat quarters that I have had stashed for a long time, after a swap organised by Mary Emmens. I wanted to add something to represent joy, as a celebration of little baby MiH's short life. Also Nat is a big advocate of upcycling and caring for the planet so I thought she would like me using vintage.
I decided to add more texture by creating half circle scallops to trim the edges of the block, for my easy tutorial on how to make them click here.
They feel lovely, the soft vintage fabric was perfect and the florals mix really well with the modern prints.

The border and binding fabrics are from Gossamer by Sharon Holland - the same range she originally used to make the nine patch. I had been saving these prints and using some here felt perfect.
The back is a pretty Yuwa print and I made a covered zip back using this clever and simple tutorial by Adrianne at On The Windy Side.


I am keeping this cushion away from the kids and visitors and the cat. It's mine and will live in our bedroom.

I made my own cushion inner using some stuffing and an old pillowcase. Very simple and easy to do. It has made the cushion very plump and some use will help get it into a better shape!

I used a pale blue perle thread to quilt the nine patch block. I quilted 1/4" away from the seams to make a hashtag pattern, a reminder of #therearenowordsquilt.

I think about little baby MiH and his mum often. I hold them both in my thoughts.
Thank you again to everyone that contributed to making the quilts, to all of you for the kind notes you sent. Thank you Sharon for making it possible for me to create my own cushion, as a remembrance and celebration.
And to my friend Nat, through the grief and pain you have such strength. I see you and the amazing job you do as a mother. I am always here for you and look forward to our always random chats through the crazy and fun times ahead.
The cushion was on my FAL list and is my last finish before quarter 3 starts. There's still a lot of quilts on that list left for me to finish, there will have to be roll overs!
linking up to TGIFF at Celtic Thistle Stitches this week and finish it up friday at crazy mom quilts


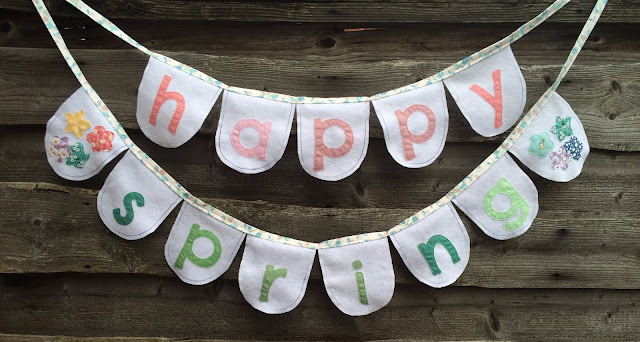
the sweetest bunting tutorial
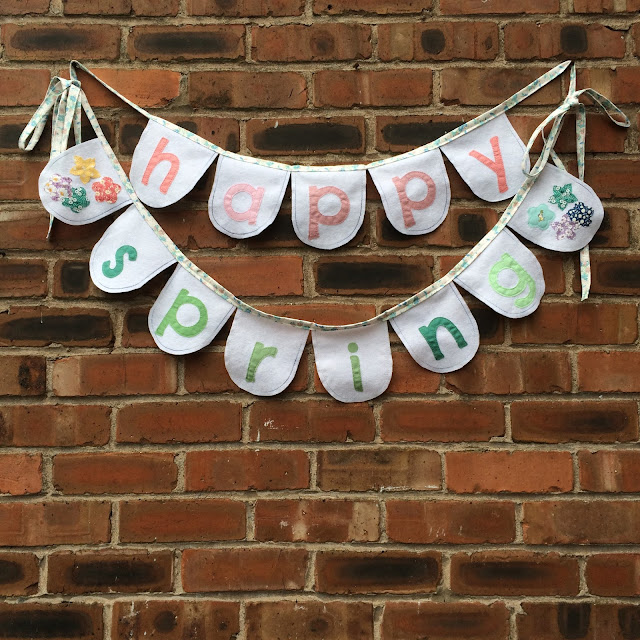
Spring has sprung and with Easter fast approaching it's nice to have some pretty decorative bunting to celebrate the season! I created this bunting for the Brother Crafts Challenge. The pattern is completely adaptable, having two rows means you can switch it up and easily change the words and patterns to whatever you fancy.
The tutorial below provides a link to the templates and instructions on how to sew the bunting, with tips and tricks to make it simple and fun!

Templates, click here to download
(13) 6 x 7.5" pieces of felt (or fabric, see bottom of post for how to!)
(2) approx. 90" lengths of double fold binding or ribbon
Fabric scraps for the letters and flowers
Fusible web
a pen
cotton thread
sewing machine
Begin by printing off the templates. Cut out the bunting shape template. Use the template to cut out 13 shapes from the felt.
Now you could either freehand letters or you can use PicMonkey - this is a fast and easy way to make appliqué letters! Don't be scared, it really is simple to create a great template for your letters.
Go to http://www.picmonkey.com/, on the homepage click the 'Design' button, I've circled it in the image below:

On the left click the 'Tt' button and then the 'Add Text' at the top. I chose Chelsea Market but you could use any font - be sure to pick one that is simple to cut out, so not too fussy. It is also easier to appliqué bold lettering so don't chose anything too skinny!
Type a letter into the text box and then adjust the size to make it bigger.
Type a letter into the text box and then adjust the size to make it bigger.

The most important thing to remember is to invert the letter - do this by clicking ↔
Once you are happy with the size, hold the fusible web up to the screen (paper side facing out) and trace round the letter.
Delete the letter and replace with the next letter of your bunting word, repeat so you have traced all the letters onto fusible web.
h
a
p x3
y
s
r
i
n
g
Roughly cut round each letter and fuse the letters onto your fabric.

Cut the letters out. For the inner parts of letters (i.e. the 'hole' in p, a and g) fold the fabric and make a cut in the middle of the circle, this makes it much easier to cut a neat circle. I recommend using smaller scissors for those bits!
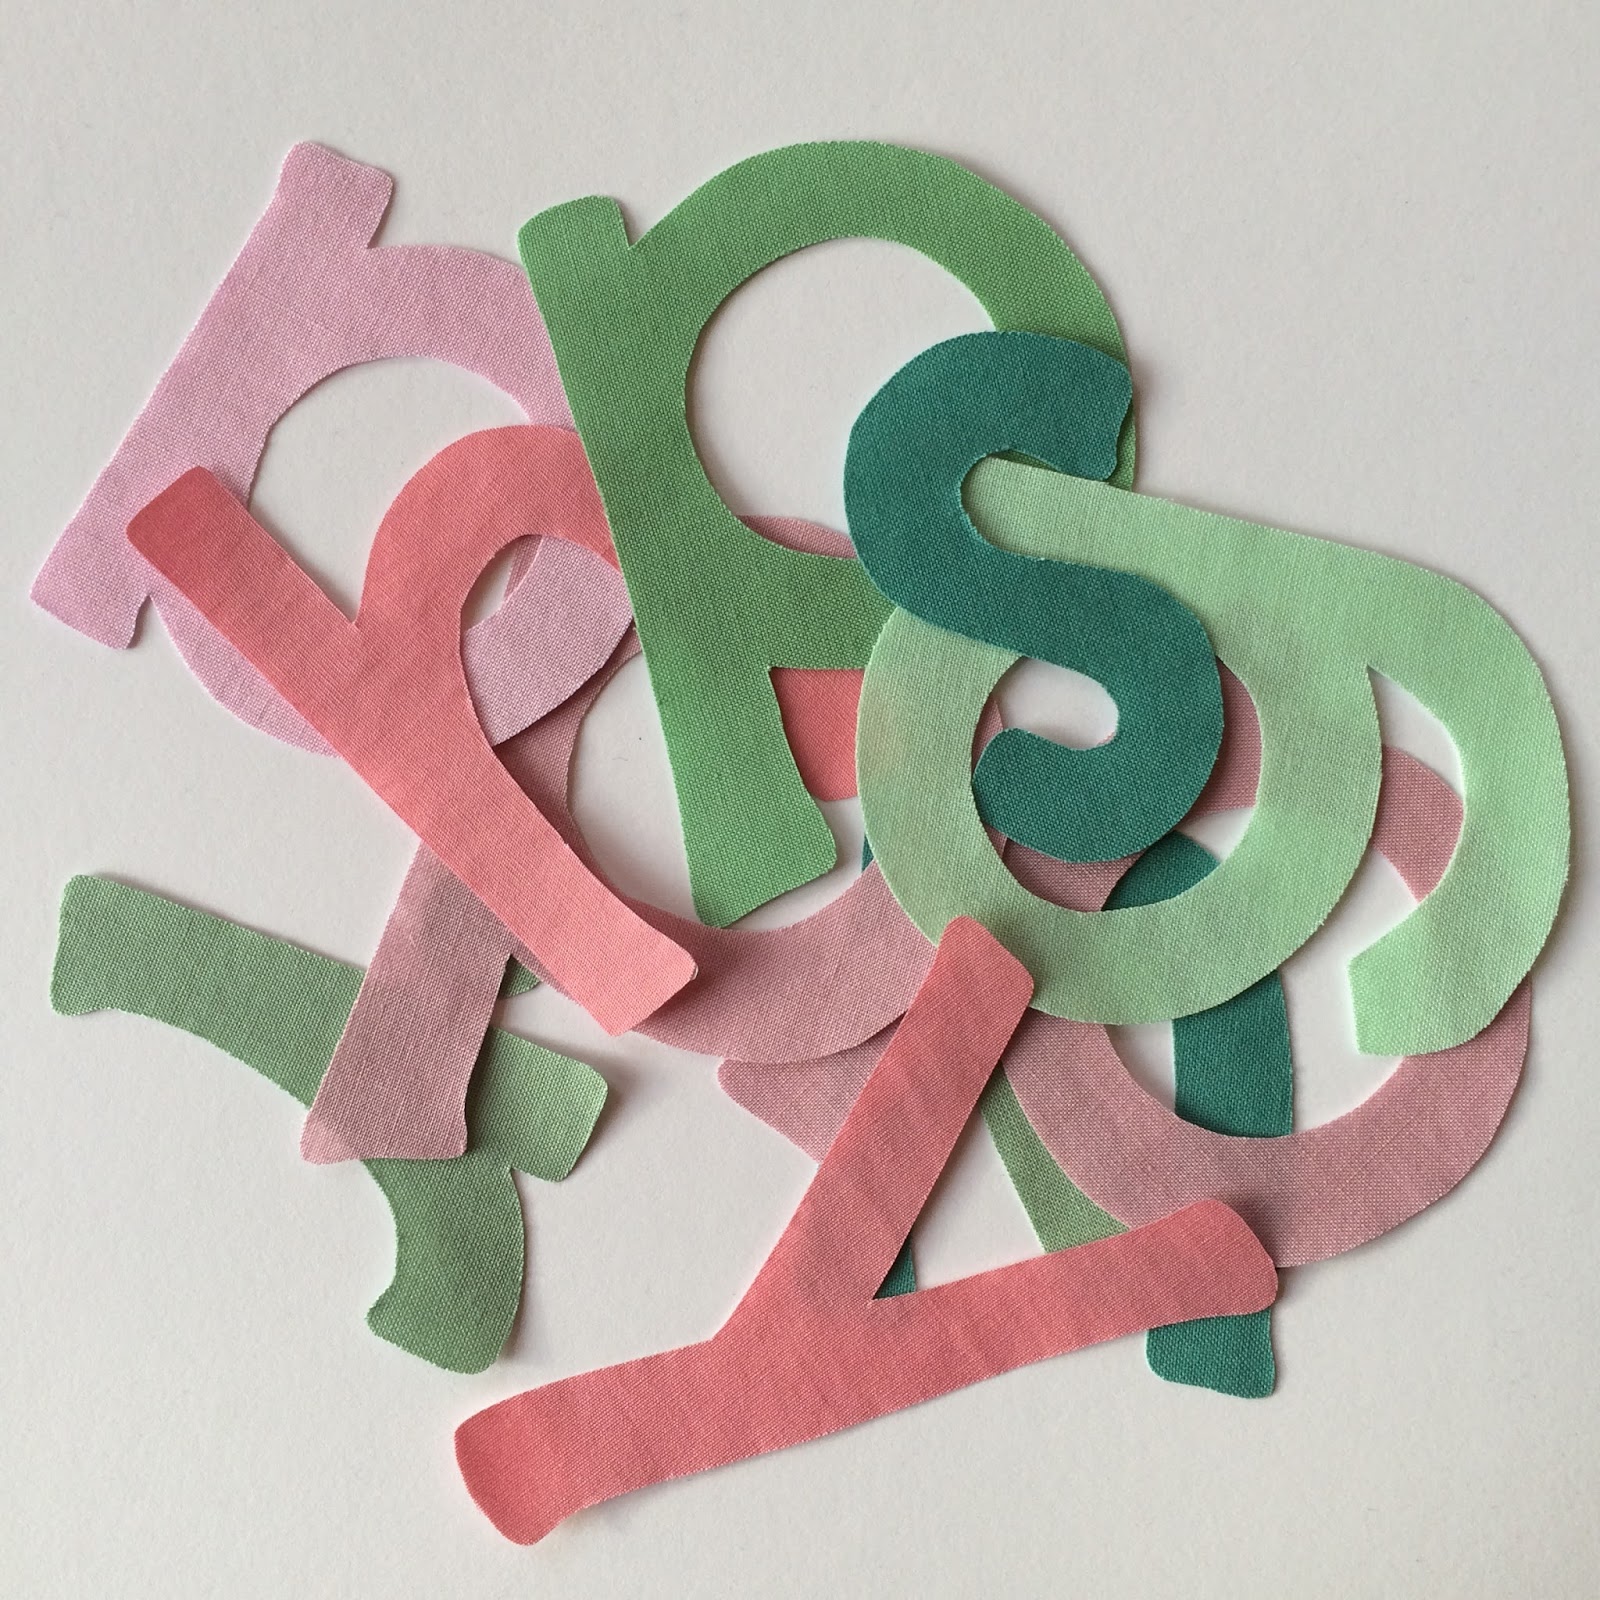
Fuse the letters to the felt, you need to be very careful - use a tea towel or cloth over the top, dampen with a little spray of water and then press (follow fusible web manufacturers directions). If you find it won't stick try dampening the cloth a bit more.

Appliqué the letters - you could use a blanket stitch or zig zag stitch on your machine but since bunting is decorative I outlined the letters with a straight stitch using Aurifil 40 wt. thread.
For an extra touch I stitched around the edges of the felt with variegated thread, using my sewing machine's 1/4" foot. I used Aurifil Lana thread in colour #8009 with 50 wt. white thread in the bobbin. This is easy to do and quick if you chain piece (continuously sew without cutting threads). To follow the curved edge, look at the front right edge of the 1/4" foot and guide the felt round to meet that point as you sew.

For the floral appliqué, print out the flower templates and trace onto fusible web. Position the flowers on the felt shapes and fuse into place (again follow manufacturers directions and use a damp cloth).
You can use some play with your sewing machine's stitches to appliqué the flowers, have fun and be creative! I used a darning foot to mimic the shape of the appliqué and also tried out different machine stitches with a regular foot.

Once all the appliqué and stitching is done it's time to put the bunting together.
Take one length of binding and find the centre, open the binding and position the middle letter (or two) centrally:

Pin into place and then repeat with the rest of the letters / flowers either side:

Neaten the short ends of the binding by opening it out, fold the edge over 1/4" and stitch in place.
If you are using ribbon pin the letters to the back of the ribbon.
Sew along the length of the binding / ribbon, top stitching along the edge.
Repeat for your second row of bunting and you are finished sewing!

Tie together to make double rows of bunting, interchange the words for birthdays or other celebrations and add a touch of sweetness to your decor!
You could use fabric rather than felt. You would need to cut the fabric using pinking shears to prevent fraying or top stitch the edges and have it fray slightly. Alternatively you could use 26 fabric bunting shapes - add 1/4" seam to the template - sew them right sides together using 1/4" seam and turn right side out to have double sided fabric bunting.
I hope you enjoy making this pattern your own and sewing the sweetest bunting!
This post is in collaboration with Brother Sewing - check out the website for events and free embroidery patterns.
linking up to finish it up friday at crazy mom quilts
This post is in collaboration with Brother Sewing - check out the website for events and free embroidery patterns.
linking up to finish it up friday at crazy mom quilts
Subscribe to:
Posts (Atom)