denim
Showing posts with label denim. Show all posts
dotti denim pouch

More making adventures with #justjudecollaborates! This past week we have been making Judith's pattern, the Dotti Denim Pouch. Of course from the name you can tell that the original design was made using denim, I do have some regular denim but I decided to use a fun mix of fabrics and some printed lightweight Japanese denim.

This pouch is for me so there were no worries about whether someone else would like the fabric and this is the result of my stash dive - the brown papercuts print and white text one I hadn't yet used so it was fun cutting into them. The pieces in the pattern are a good size so you could totally use bigger scale prints for this pouch.
I got carried away and didn't take many progress pictures, just enjoyed the process of making! The pattern is so well written, Judith gives plenty of tips throughout, which I really appreciate.
Pineapple Crush Quilt ~ Aura Blog Party 🌺

Mister Domestic invited me to his Aura Blog Party and I was like, "woaaaah.", and then saw the fabric and I was like, "woaaaah." and then it came to me that this would make the perfect pineapple quilt, "woaaahh..."

So this is my ode to Mr Crush Turtle, with turtles swimming through the denim water and geometric coral reef! A tropical blend of modern and traditional, this quilt is simultaneously structured and choatic. The clean lines of the pineapple blocks and the way I've placed the colours makes for a striking layout yet the prints themselves are scattered throughout in a random way.

I'm going to share some tips about making pineapple quilt blocks, why I used NO pins when piecing and (over)share the process of making my Pineapple Crush quilt!
denim + Pam Kitty apron 🌹

Today I finished this cute apron, a commission for a lady that loves gardening. I was given a couple of pairs of jeans to use and I decided to combine it with some gorgeous Pam Kitty Garden fabric.

I appliquéd her name to the front of the pocket using a simple zig zag stitch. Since the apron is going to be used in the garden it seemed a good idea to line the pocket with the same waterproof canvas I used for my Geeky Flying Geese Bag. To line both sides, I constructed the main panel of the apron like patchwork, I put the canvas in the centre and surrounded it with denim.

The apron is backed in the same fabric as the appliqué letters. I sewed the right sides together leaving a gap, turned it through and stitched around the outside, as well as stitching around the pocket so the lining wouldn't be baggy!

Originally I was going to use denim for the straps but it would have been a little too 'utility' and decided instead to use the same as the binding fabric.

It's nice to have that seam showing from the original jeans and I stitched vertical lines on the pocket to create three separate sections in the pocket (before sewing the lining on!).

I hope the recipient likes it! I certainly enjoyed making it.

This is a check off my FAL list ✔
Now I've got a zillion things to sew before Christmas and very little time to do it so I better get back to sewing!
I hope everyone's week is off to a good start. Anyone else panic sewing?!
memory quilt
**If you're looking for my giveaway click here! (ends 1st March)**
I was given a box of adorable baby girl clothes and had a lot of fun cutting them up (though it felt a bit wrong). I enjoyed focusing on pretty details and tried to create lots of interesting elements, like keeping this ruffle:

Little popper detail of the baby grow (I hand stitched it closed) and cute pockets:

More fun ruffles and a peek of my hand stitching in the top corner:

I couldn't resist this sweet bib top:

You can see it was a total mix of fabrics; denim, cotton, jersey, knit. The bits of the clothes I wanted to use were cut out using pinking shears and I fused everything except the denim with lightweight interfacing. I then rotary cut the pieces to the size I wanted and used a superior topstitch 90/12 needle to piece them. I hand quilted some of the plainer panels and around the poem (printed on photo fabric), added a little embroidery and then hand tied the quilt with perle thread.
Although that is a quick summary, it was a lot of work and I struggled with the layout but got there eventually and I am so thrilled with it. It is such a rewarding job to be able to save these memories and create a pretty quilt in the process! It was very well received by the lady that commissioned it and I know it will be treasured.

This is my second finish from my FAL list - I'm glad I kept it realistic, it feels good to only have one project left to finish (despite my actual mountain of WIPS!!).
Linking up:

binding shorts
My son recently got a huge hole in his jeans, as kids do, and I took the obvious decision to cut them into shorts.
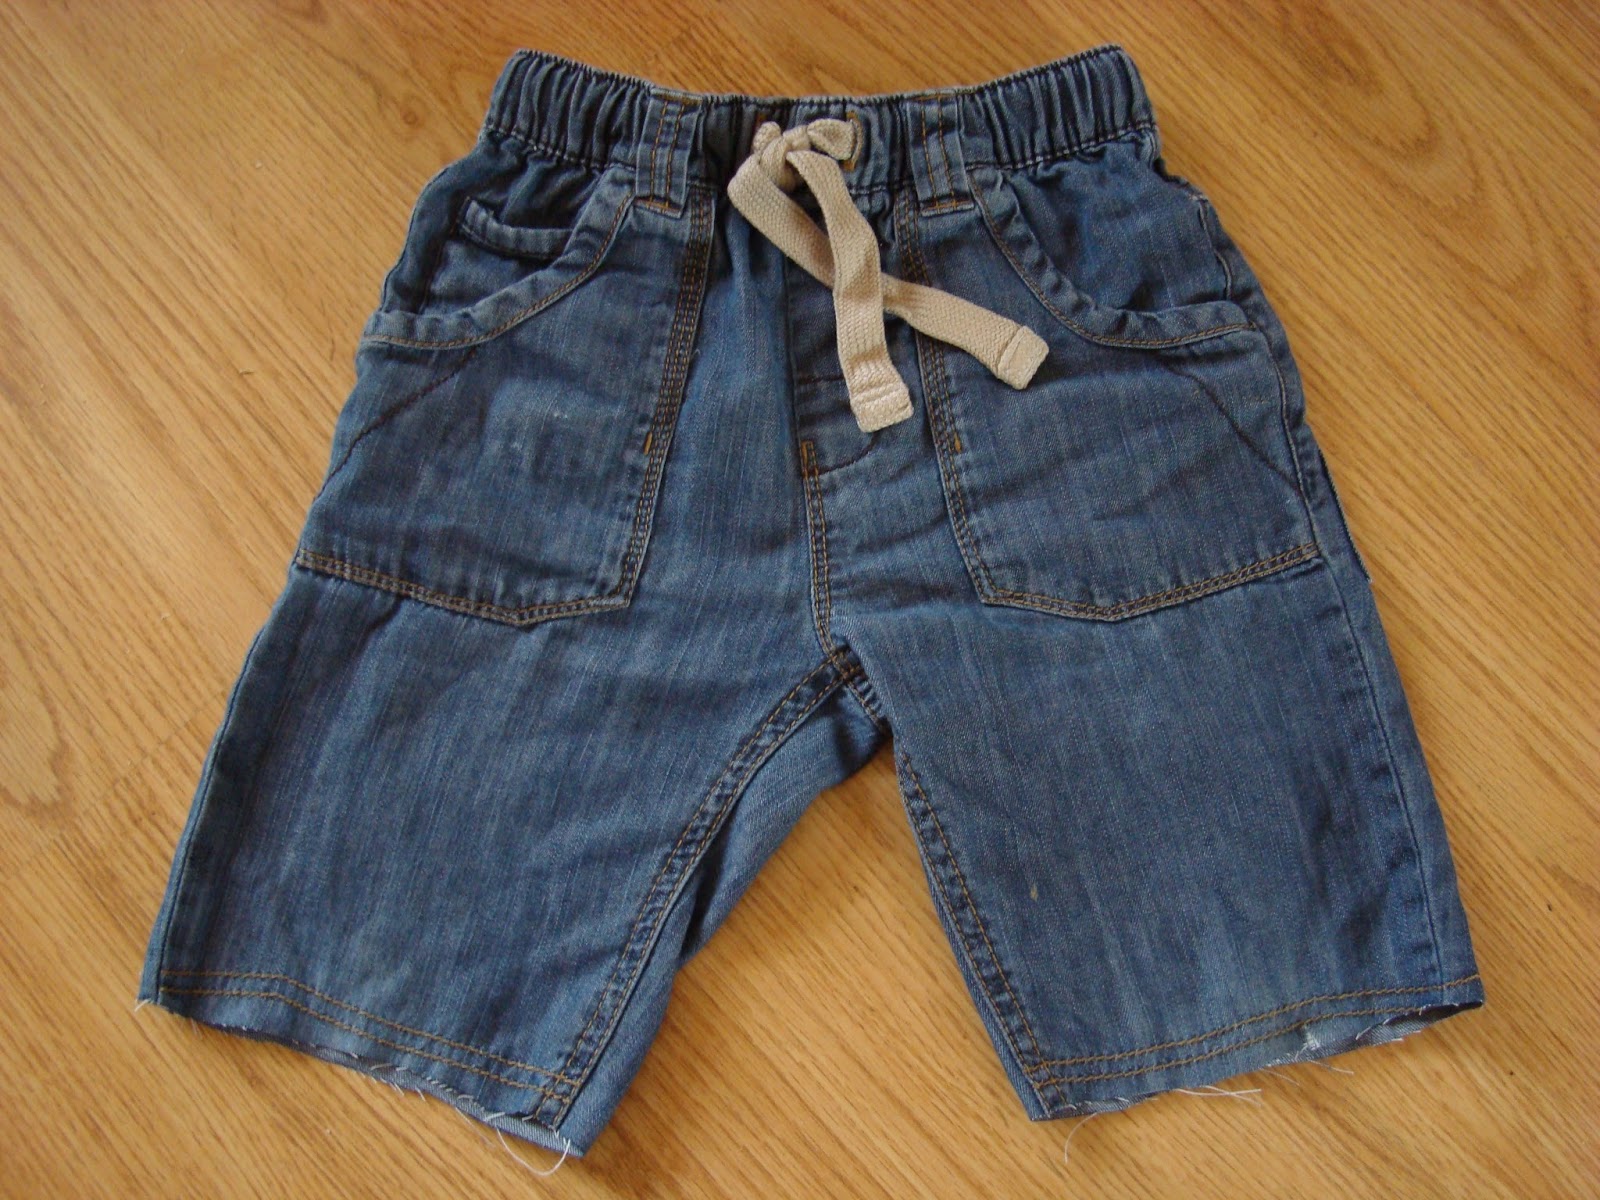
I didn't want to just hem them though, boring! So I took out my scraps of binding and let him chose which one he wanted on his shorts. He picked the orange gingham bias binding - clever boy!
I'm sure this has been done many times but here's my tutorial on how I did it.
Cut the strips of binding (this happened to be all I had left!). I didn't properly measure just ran it round the leg and added a bit extra.

Turn the shorts inside out. Leave a tail of binding (don't start at the short edge because you need to sew the edges of the binding together). Since this was ready made binding I just opened it out and sewed along the crease.

When you get close to where you started sewing stop with enough room to match the ends. I do this by folding back the edges so they butt up against each other and trimming off any extra to leave a rough 1/4" seam.

Sew the ends right sides together along the crease you made. Finger press the seams open.

Go back to where you stopped sewing and carry on sewing all the way around.

Turn the shorts the right way round, pull the binding through and fold over the front of the shorts.

I don't bother pressing or pinning but feel free if you want to. Topstitch along the top edge of the binding to finish. I move my needle over to the left and use my foot as a guide to get a neat line.


Then you have one cool looking kid!

*I am celebrating two years of blogging - enter my seriously incredible giveaway here (open until 4th Sept.)*
**The 'You've Lost That Loving Feeling' parties have started - so join us and enter the giveaways etc!! (open until 31st August)**
Linking up:


Donktober Denim and much, much more!
I'm so pleased to be part of Donktober! A fantastic blog hop from the creative (slightly bonkers) mind of Erin at Missy Mac Creations. Thanks for including me Erin :)
I'm going to share a couple of embroidery patterns, a tutorial and a short book review today, as well as a little giveaway... sheesh, it's going to be a long and picture heavy post.


I've created a tutorial for this book bag, which was made from a pair of my husband's VERY torn jeans! I wanted to make it from something hard wearing and with no money to indulge in some oilcloth I scoured the house to see what I could find! I love denim and realised it would work perfectly and allow me to do some stitching too.

I did a bit of sketching (you can see I changed my mind about the direction of the donkey's tail!) and then outlined them to create embroidery patterns.


I have no clever computer software so I took pictures and uploaded them to my computer. For the books I added some text on picmonkey, saved the images and have created a google document so I can share the patterns with you. If you aren't donkey mad the book pattern could be used for so many different things... just don't copy the lettering!
Bag Tutorial and Embroidery Details
If you'd like to make the bag please read the instructions all the way through first! You may want to make some adjustments according to your preferences.
1- Start by cutting off the legs of the jeans - I did this on the thigh, just at the point where they begin to be straight legs:

2- Cut out one of the back pockets - so I had two leg pieces and a pocket (keep the rest, we'll be using some more of the jeans later!):

3- Cut up the side of the leg pieces along the narrower seam (I wanted the thicker seam as a feature running down the centre panel of the bag):


4- Even up the panels and remove the bottom hems - my panel then measured approx 14" x 16". You can use whatever size suits your needs, larger or smaller will work just as well.
5- Transfer the embroidery designs and stitch the panel - I decided to use the reverse side of the denim so the embroidery would stand out more, it also gives a nice background texture. I used Anchor pearl cotton:


The books and pages were all backstitched.

The body of the Donkey was all split stitch, the eye and nostril were satin stitch, the hooves were chain stitch, the mane was rope stitch and the tail was Vandyke stitch.
 |
| notice the Donkey is reading our blogs :) |
I experimented with some of these stitches and I followed instructions from the brilliant book by Kate Hexell, 'The Stitch Bible'.
6- Once the stitching is finished, cut two pieces of lining fabric the same size as your denim panels:

7- Take the plain piece of denim and add the pocket to the middle. Cut carefully around the pocket, not too close to the seams. That way I kept the Levi's tag (for fun) and also meant I could just stitch around the pocket. This will fray over time but I really like that look! If you want to be neater you could use blanket/zigzag stitch to avoid fraying.


8- Next go back to the remaining cut up jeans and take a section off the top of the leg - it's doesn't matter that it's not straight, once it's cut you can even it up:

This time I trimmed off the thicker seam so I had a long strip - this measured approximately 3 1/2" x 18" but again just work with what you have or cut to a length you prefer:

9- Press the edges of the long side over a bit, then press the whole strip in half (feel free to press the short edges over too if you want a neater look):


10- Once folded in half, stitch along the whole length where the edges meet and then echo the straight lines along the strap:


Repeat steps 8-10 so you have two handles!
** I like the 'handmade' look of the handles sewn on the outside and the idea that they will fray nicely with time - If you want a more polished look you need to insert the handles in between the outside and lining fabric when you topstitch along the edge in the next step, so they are neatly tucked inside. **

so you end up with this:

12- Put them wrong sides together and press the top edge before top stitching:


Repeat steps 11 and 12 for the other denim panel and interior fabric.
13- Decide where you want to place the handles, pin and stitch in place on each denim panel:

Now you have a front and a back to the bag - complete with handles! So it's time to put them together...
14- Put the bag together, interior pieces facing - so it literally looks like the finished bag should - then pin around the side and bottom edges:

15- Sew a 1/4" seam around the three edges then clip the corners:

16- This bag has a French seam so turn the bag inside out, press or wiggle with your fingers so the edges are straight and then sew around the same three edges, this time with a 1/2" seam.

Turn the bag the right way round and you're all done (trust me it's taken me WAY longer to type this tutorial than it did to sew the bag together!!).


So what to put in it?? Well ours obviously has Donkey books in it!!
Erin was so kind as to send me and the kids some fabulous Donkey themed books. Huge thank you from me and the kiddies!
Here's a quick review:


First up is 'That's Not My Donkey' by Fiona Watts and Rachel Wells. I think most modern parents are familiar with the Usborne touchy-feely books and the 'That's Not My...' series. They are fabulous for little ones, great fun for toddlers and have good repetition for school aged little readers. This one is just as brilliant as the rest of them and my two loved seeing the different settings for the Donkey and shouting out about the various textures in the book.
Next is 'The Hungry Donkey' by Heather Amery and Stephen Cartwright. This is a fun story. They laughed a lot when... well I won't ruin it! This is a great one for anytime of day and it has lovely illustrations with plenty to look at.
Finally 'The Wonky Donkey' by Craig Smith. This was the clear 'winner' with the kids. They laughed and laughed! It has amazing and fun illustrations. We read this over and over and they show no sign of getting tired of it, thankfully I really enjoy it too.
So that's my contribution for Donktober! I had a lot of fun constructing the bag, designing the embroidery patterns and reading funny stories. I'm still new to writing tutorials so if you need any clarification or have any questions please let me know! I would love to know if you make one or use the embroidery for any of your projects.
If you managed to read this all the way through, thank you and well done!
As a bonus I'm having a little giveaway of 1/2 yard of this fab donkey print from the Jack and Jenny Collection by Laurie Wisburn for Robert Kaufman, which I bought at Fluffy Sheep Quilting. I couldn't resist sharing it with you and those wellies are very appropriate for the Manchester weather!

**GIVEAWAY NOW CLOSED**
Good Luck and Happy Donktober!!

Don't forget to visit the other bloggers taking part and there will be a linky party for all the Donkey creations so look out for that :)

Subscribe to:
Posts (Atom)