Creative Grids
Showing posts with label Creative Grids. Show all posts
shining blue quilt

I sneakily got the girls to find out her favourite colour... blue! I went through my stash and picked out loads of blue prints, many of which were leftover from previous projects. My fabric stash is not coordinated by colour, much of it is organised by designer or style of print instead - it just makes sense to my brain that way. So it's always interesting when I do go to shop my stash for a certain colour, I never quite know how much I'll have.
It was a bit of a tight deadline to get the quilt made so I decided to keep it simple, with mostly patchwork squares and some star/cross blocks using the blue fabrics I had more of.

spring steps
I do love surprises... and happy mail... and quilt making (especially for a good cause)!
For this months Aurifil Artisan challenge we were sent five fat quarters of Kaffe Fassett fabric to use in a project.


I knew I was going to make a quilt. I don't use red prints very often and spent a while auditioning fabrics to go with the bundle. Initially I pulled pinks and oranges, other warm tones because that's my vibe. It all looked too samey though and the Kaffe prints didn't stand out enough. So then I pulled a whole rainbow of solid fabrics, mixing them up with the prints to see what worked well.
Ultimately I went with a pale grey for the background and deep yellow, bright purple, olive and cerulean - sorry I don't have the exact shades, these fabrics were left over from other projects and I've failed to have any system for keeping track of the names/brands of solids. If you have a good system please let me know!
Traditional blocks are always a favourite and, as I haven't used any of my special quilting rulers for a while, I looked through them and decided to make Courthouse Steps blocks.


The olive was a considered choice, as it's the colour for the centre of the blocks. Inspired by the blooms on the prints, I wanted the blocks to look like large flowers and the green would be the stems.
geesey geesey >>

This Autumn I had the pleasure of joining Rachel of Stitched in Color for the Geesey Geesey Sew-Along. Her Geesey Quilt pattern is a brilliant exploration of colour and I spent quite a while debating what sort of look to create and what fabrics to use. Over time I have been collecting black and white prints and ultimately thought it would be an interesting choice for the pattern.

Thinking about what to pair it with, my inner 80's child was screaming PASTELS! Thankfully I had quite a few of those too. My first inclination was to use the pastel solid fabric for the 'geese' and the monochrome prints for the background. A comment on an instagram post made me reconsider, @ingesews kindly wrote about using "pastels for the seasonal colours of the skies". I made some test blocks - always a good idea! - and realised prints as geese would work so much better and the pastel colours could be used in such a way that I could create a sort of sunset effect.

◌ Washi Double Dresden Wreath ◌

It feels wonderful to have a new version of the Double Dresden Wreath, made using the free tutorial I created a couple of years ago. The original was demonstrated on Sewing Quarter, the samples that hung in the studio stayed there, and I am so happy to now have one for our house. I made this wreath for my December project as an Aurifil Artisan, our challenge was to create a holiday themed project. Perfect for brightening any door or bare looking wall space, the wreath pattern is a merry make!

My original plan was slightly different but this was one of those projects that naturally evolved and turned out even better than I hoped. The double sided wreath comes together quickly and I took a bit of extra time to stitch some hand embroidery as the added texture gives a fun touch. It's not at all necessary but you notice the extra detail up close.
The fabrics I chose are ones I've kept for something special, the green print is Christmas Wish by Lizzie Mackay for Dashwood Studio and the white print is Washi, Tinsel by Rashida Coleman-Hale. Originally I was going to make the wreath using the many blue Christmas prints I have but somehow it wasn't working and they didn't look good together. When I hit on this white and green combo, with pops of red it made me think of mints and was a winner!

You can use any dresden template or ruler with this pattern to create the dresden plates, I used the Creative Grids 18° Dresden Plate Ruler. Having an acrylic template makes it so simple and much quicker, as you can easily layer and cut the fabric with a rotary cutter. I stitched the plates using 50wt Aurifil - my go to for piecing - it definitely helps with accuracy and reduces the bulk in the seam when turning those points. Dresdens look like they are complicated or tricky but they are surprisingly easy and there are so many options for creating blocks with them. My favourite sewing is often traditional blocks made with modern fabric as it creates a different look.
✿ tooth fairy dresden

My youngest recently had her first wobbly tooth. I asked her if she wanted to help me pick fabrics out to make a tooth fairy cushion and she was very excited. Lois is very into pink and glitter and flowers. We thought about colour combinations and she said she liked the colours on her dress:

So we used that as a starting point, pulling out prints from my stash and she would give a yes or no. Once we had a few prints she got selective and basically chose every print that had a flower on it.

To let those prints shine, for the background I picked a plain canvas. Most often for cushions I use fusible fleece because of the slight structure it gives, it's so easy to use and you don't have to baste! The front and the back panels of the cushion were machine quilted with a cross hatch pattern using Aurifil Forty3, which gives a great texture.

catch up and 🐝 giveaway!
*GIVEAWAY NOW CLOSED*
to save you some time, scroll down to the bottom if you're only interested in the giveaway 😶...
Everyone else, get comfy, grab a brew and I'll show you what I've been making recently!

First up was another lever arch file cover with some no drama llama EPP appliqué! I spent some time designing a pattern for the pieces that worked well with the fabric, the Llama Llama fat quarter bundle, for a demo on Sewing Quarter. I also decided to fussy cut the pieces making up the focal llama. Yes I could have used one big hexagon but I like to challenge myself a bit and it was for a small make, not sure I would do this if it was for a quilt because it's obviously more time consuming.

The great thing about using small pieces of epp like this is that you can use them for decoration and the apppliqué is really easy because the edges are already folded under. You can simple top stitch it in place or use any decorative stitch you like, I went for a small zig zag. The file covers are so fun to make and are great gifts. I also like anything that lets me combine my love of stationery and sewing!

I also made my Tree of Life quilt block into a cushion, using the Purple Mist fat quarter bundle. The finished 14" block is set on point with side setting triangles. I tend to always cut these larger and then trim them back. It might waste a tiny bit of fabric but it's easier to be more accurate that way and you don't have to worry about the bias edges too much.

There are lots of half square triangles (hsts) in this block but the cutting is much quicker with the Creative Grids Multi Size 45°/90° Triangle ruler. It also means you can sew them together quickly and with more accuracy. I use the ruler whenever I have to make lots of hsts, I definitely recommend it. For the quilting I used a fun wavy decorative stitch on my Elna 680 machine (mode 2 #1).

This week Pantone announced the colour of the year for 2019, Living Coral. I absolutely love it, it's such a warm and lighthearted colour. My favourite colours are pink and orange and in the past couple of years I've found myself buying lots of peach and coral fabric, it's a lovely mix of the two. I am hoping this means they'll be even more coral fabric available and coral everything because the colour makes me very happy!

Our local library reopened recently, after some renovations, and I am delighted to be getting back into reading. Books have always been a great way for me to escape, immersing myself in a story and also as a way to learn more or think about things differently. I admit to being a fan of business and self help books, I go through phases of reading them (not all of them, I'm kind of picky) and I have to be in the right mood. This is one of the books I borrowed, We: A Manifesto for Women Everywhere by Gillian Anderson and Jennifer Nadel, so far I'm enjoying it (and yes it is that Gillian Anderson). It has a gentle, conversational approach with anecdotes and exercises.

I also borrowed a fiction book, Clock Dance by Anne Tyler. A few years ago I read a couple of her books and enjoyed them so I'm looking forward to this one. If you have a favourite title of hers please let me know, I like recommendations!
The staff at Patchfinders had a get together this week and we learnt to make fabric lanterns. Our teacher Lil was great - she will be teaching a class at the shop in the new year - and we had such a fun time. A huge thank you to Claire for organising such a wonderful evening!
I chose two of my favourite prints, Social Climber from Floral Retrospective by Anna Maria Horner and the Viewfinders by Melody Miller. There is no point keeping fabric treasures tucked away and I love that I'm going to be able to see these beautiful prints in my living room. Judith very kindly let me use some of her pom pom trim to embellish my floral lantern. I think it's so kitsch and granny looking but still modern - so my taste!

And lit up with battery fairy lights inside, they are so pretty! Very hard to capture but you get a sense of it here. The one on the right isn't quite finished, I still need to tuck the seam on the inside.

On to the giveaway...
I began using beeswax when I started doing English Paper Piecing, I was given a small piece to run thread through. It helps prevent knots, allows for smooth sewing and strengthens the thread. After I started using Aurifil for EPP, I found I didn't need the beeswax and subsequently lost that small piece somewhere. At a local market I discovered Foz-Bees, a Manchester bee keeper who has the most amazing products and delicious honey. The beeswax blocks called out to me and I thought it would be fun to try it with other threads, I have heard it works well for those sometimes pesky metallics! I'm wondering if I can use it on embroidery thread (if any one has please let me know your experience!) and fine thread like the Aurifil 80wt that I use for appliqué. I'm always keen to try new and old techniques, especially when it's with natural resources - even better when you can shop small.
I picked up some extra and am giving away this 100% natural beeswax block and bee.

The clouding you see on it is because I've been keeping it in the fridge! Due to the fact that it's fairly delicate, could possibly melt if it was near a heater, postage costs are crazy, and I'm not certain of international restrictions on this sort of thing: I am only offering the giveaway to UK readers.
*GIVEAWAY NOW CLOSED* Congratulations to the winner, Kay!
TO ENTER THE GIVEAWAY
Just leave a comment below - if you're stuck for something to write, tell me your favourite way to eat honey! Mine would be in porridge or to just eat a teaspoon of it!
If you don't want to sign in to a profile please leave your email in the comment, e.g. ilovebees (at) honeycomb dot com so that I can contact you.
UK entries only, the winner will be chosen on Monday 10th December. Good luck!

Pineapples and Paris Star quilt
It's been sew sew sew at my house! These projects each have a lot of seams and used up a lot of thread. Completely worth it though because they turned out really nicely.
My first project used the new Bird Pond collection in Blue and Teal by Tilda. I made two sizes of pineapple blocks for a 20" cushion front (which I did make into a cushion but I don't have a picture of the finish!). I chose to fussy cut the gorgeous Anemone print for the centre of the largest block and for the corner squares.

Surrounded by smaller blocks like this, it looks like ripples on a pond. The blocks were made using the Creative Grids Pineapple Trim Tool, both the larger (for the 10" centre block) and mini version (for the eight 5" blocks). It makes it so easy to create really accurate, straight seams for what is otherwise a fiddly block. Someone messaged the show to ask if you could foundation paper piece these blocks, of course you can and a quick google search showed up plenty of free patterns you can use. Personally I prefer using the tools, it really is so simple once you get in the swing of it - just be sure to follow the instructions! I have made errors myself though those blocks still turned out nicely, they just weren't pineapples! I also think this is a brilliant way to use up scraps and like that you can create so many different layouts playing with fabric placement. You can see my 'mistake' blocks and another version of the block I made during the demo, video at the end of this post.

My other project is a quilt top made using the fabulous Paris Star pattern by Lynne Goldsworthy. This is such a stunning design and Lynne's instructions are excellent as always. I really like those half stars and the way they disappear into the border. It's a fairly big quilt finishing at 70" but the piecing isn't complicated.

Here is lovely Vicki (and her beautiful princess hair) with a ta da moment after director Tim did a great job of hanging the quilt top in the studio. Not as easy when it's a flimsy that's larger than the angled wall!

There are lots of points to match while making these stars but I showed a couple of tips during the demo that should help. The four blocks that make up the quilt come together fairly quickly and the borders are simple, perfect for some fancy quilting if you wanted to. This is definitely one of those designs that looks slightly terrifying but once you've made it you want to make another!

If you'd like to see the demos click below - the Pineapple cushion starts at 1:05:00 and the Paris Star starts at 3:04:00 - you could watch the whole show and see Becky Alexander Frost demo bag making!
◊ Modern Scot Patchwork and diamond quilts ◊

Being married to a Scottish man I was happy to be given a project from the book 'Modern Scot Patchwork: Bold Quilts Inspired by Iconic Tartans' by Kathy Allen, to make for Sewing Quarter. The book features 8 different tartans and you can make various size quilt projects from each one. The colours chosen for this quilt work really nicely with the theme, as they remind me of thistles and that beautiful Highlands palette. The also make me think of Wimbledon and the Suffragettes.

The pattern was very thorough and detailed. Written out almost like a science experiment with a few tables for the different steps. The piecing is labelled throughout, with fabrics A, B, C etc. and then sewn into lettered triplet sets and then relabelled set 1, 2, 3. Are you still with me?!
+ quilts + makes

Three quilts, three cushions and a table runner are the makes I'm showcasing today, that I've demoed recently on Sewing Quarter. All finished, despite the fact I didn't always photograph them once I was done. I did manage to take pictures of the interesting aspects or features I wanted to share though so that's good!
This Big Plus quilt is deceptive, the pieces are big and the quilt is a single bed size. The pattern comes together really quickly but you have to keep the columns organised so the pluses fit together correctly.
curvy log cabin & bebé quilts

Log cabin blocks have to be one of the greatest classics. Not only are they beautiful in their most basic form but there is so much you can do with them when you play with fabric placement and layout. This quilt is made of wide and narrow strips to create "curves", I used the Creative Grids Curvy Log Cabin Trim Tool to make 8" blocks. Honestly this makes it so easy and the result is perfectly precise blocks. A beautiful selection of Liberty prints and a variety of greens makes for a quilt with a gentle spring vibe.

While sewing the blocks I went for a completely random look, choosing fabric strips as I went. I love this scrappy style even when cutting from metres of fabric. It also makes sewing easier as I didn't have to concentrate on fabric placement, beyond whether it was a narrow or wide strip. I arranged the blocks into groups of four to make the illusion of six circles. After all that piecing, pressing and trimming I kept the quilting very simple, letting the pattern of the blocks remain the focus, by just stitching in the ditch.
friday night quilt and cathedral cushion


Liberty is one of my favourites and I use quite a bit of tana lawn in my own projects. I also have some of the lifestyle cotton prints they did a few years ago for quilters. The new Cottage Garden Collection prints from Liberty are quilting weight cotton and lovely to sew with. I cut them up into lots of pieces to make the Friday Night Quilt from Three Patterns by Pam & Nicky Lintott.

The book has patterns to use with the Creative Grids Double-Strip Kaleidoscope Ruler, which makes cutting much quicker! It's a pretty design, with a nice sized scrappy border. I went back to basics for quilting, using a plate and my hera marker to mark a curve across the corner.

After stitching a few lines, with my walking foot and guide, I realised it needed something more, so I went back and marked another curve on the corner diagonally opposite. It gives lovely movement to the quilt and I like seeing the lines intersect.

Thanks to my little helper for holding the quilt - she had the most horrible allergic reaction that day and was covered in hives :( We still don't know what she reacted to!

There was also fabric folding fun, making up a Cathedral Windows cushion using a pattern by Jo Avery. Despite there being a fair bit of preparation in making up these squares, which seems daunting, I actually enjoy it because it's meditative and can be done while watching tv.

The windows feature Bees, All Stars by Tula Pink and Blackbird, Hello Love by Heather Bailey. Rather than place the squares in an alternating pattern I played about and settled on this arrangement:

Then the pinning begins!! My least favourite part, and probably why I would prefer to hand sew (I would just fold the edges over as I went), it is important to pin if sewing the edges down by machine and helps keep them more even.


The past week has been a bit of a blur, I have had big deadlines so non stop making as I get ahead with projects. You will see them here soon! I knew that I would be pushed and would need to force myself to take a day off. I actually scheduled it in my planner!! So today I've done nothing, no sewing (so far, I might end up doing some epp tonight) and just been lazy really. I wore the most appropriate t-shirt too! haha!

I'm off to binge on that :) Happy weekend everyone!
linking up to finish it up friday at crazy mom quilts
forest mountain quilt & more...
Time for a catch up... I have been busy making and it would be wrong not to document everything here. This is a round up of some of the recent projects I've demonstrated on Sewing Quarter, I'm starting small and working up to the big quilts!
This block was made using Jo Avery's fabulous Compass Spin pattern, a combination of foundation paper piecing and sewing curves. It's a great project for playing with fabric value.


Happy hump day everyone! I hope you're having a great week and your projects are going well!
This block was made using Jo Avery's fabulous Compass Spin pattern, a combination of foundation paper piecing and sewing curves. It's a great project for playing with fabric value.

Spider Web blocks are quickly becoming a favourite of mine and I created this simple cushion using the Creative Grids Spider Web & Kaleidoscope Ruler - which makes it so easy and accurate. The pink and red combination is lovely for spring!

Another cushion, this one from the book Quilt Petite by Sedef Imer. This is such a sweet design and I really loved making this, with so many different techniques in one cushion it was a fun sew.

All the little details are so cute and it was nice to do a bit of hand stitching. I did forget to trace the text before backing with fusible fleece though, so had to freehand 'Bonjour!' but it turned out ok!


I used a couple of strands of different coloured threads for the bow, I've never thought to embellish a project with bows like this but it looks adorable. I used a surgeon's knot to keep it secure. Now I want to add bows to everything! Click below to watch me demonstrate making the cushion:
Then I had some fun making a block keeper from quilt as you go pre-printed wadding. This is am easy project and would make a lovely quilters gift. I loved cutting the Anna Maria Horner fabric, it looked especially cool on the 'spine'. Totally forgot to take photos of the finished project though, so you'll have to make do with some stills of it on the show!


On to the quilts...
First I made a smaller version of the Seventh Heaven pattern from the book Dessert Roll Quilts by Pam and Nicky Lintott. A lovely one to sit and chain piece, then rearrange the blocks to create that random look!

A reminder to be mindful when adding borders, I was so 'in the zone' I completely missed noticing my upside border until I was already half way through quilting it! Thankfully it still sort of worked so I decided not to unpick.

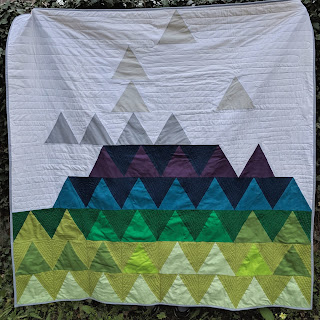
Finally my Forest Mountain quilt, I designed this one to make with the Creative Grids 60° ruler. It's pretty large at 74" and it was fun to just use solids and one simple shape. It was a fairly dull day when we took these pictures, right before all that hot weather, the colours are far more vibrant in real life and the greys at the top are actually a little more subtle. I think this has a nice whimsical feel, a sense of the great outdoors in a modern quilt interpretation!

I wanted to do some free motion quilting but kept it fairly simple (in part due to the size but also deadlines!). I quilted a rough tree / branch shape on the background triangles to give some texture and organic lines and curves in the sky to represent clouds. The back gives off a sort of Blair Witch vibe, glad I used yellow or it would be creepy.

From the front I think the texture looks good and my son was completely in love with this design. He wants it for his room, which is a huge compliment. I still have a work in progress bee quilt for him that I know he'll love too and that's also a tree / triangle theme so he knows what he likes!

Happy hump day everyone! I hope you're having a great week and your projects are going well!
Subscribe to:
Comments (Atom)