Le Challenge
Showing posts with label Le Challenge. Show all posts
fine ~ le challenge ~ bee basket

The pattern is from the project booklet designed by Fiona Calvert that came with issue 29 of Love Patchwork & Quilting, you can download the 2.5" and 3.5" clamshell templates here!

The bees are fussy cut from a 'Flying High' panel by Skinny Malinky Quilts, it's printed on Kona Highlight - which is hard to photograph and much brighter than it appears here! I'm looking forward to more of her collections, the panel is fabulous quality.
I like that it looks like the bees are trying to fly out of the basket!
I like that it looks like the bees are trying to fly out of the basket!


I added some hand quilting to echo the clamshells and picked colours that worked with the Japanese denim.
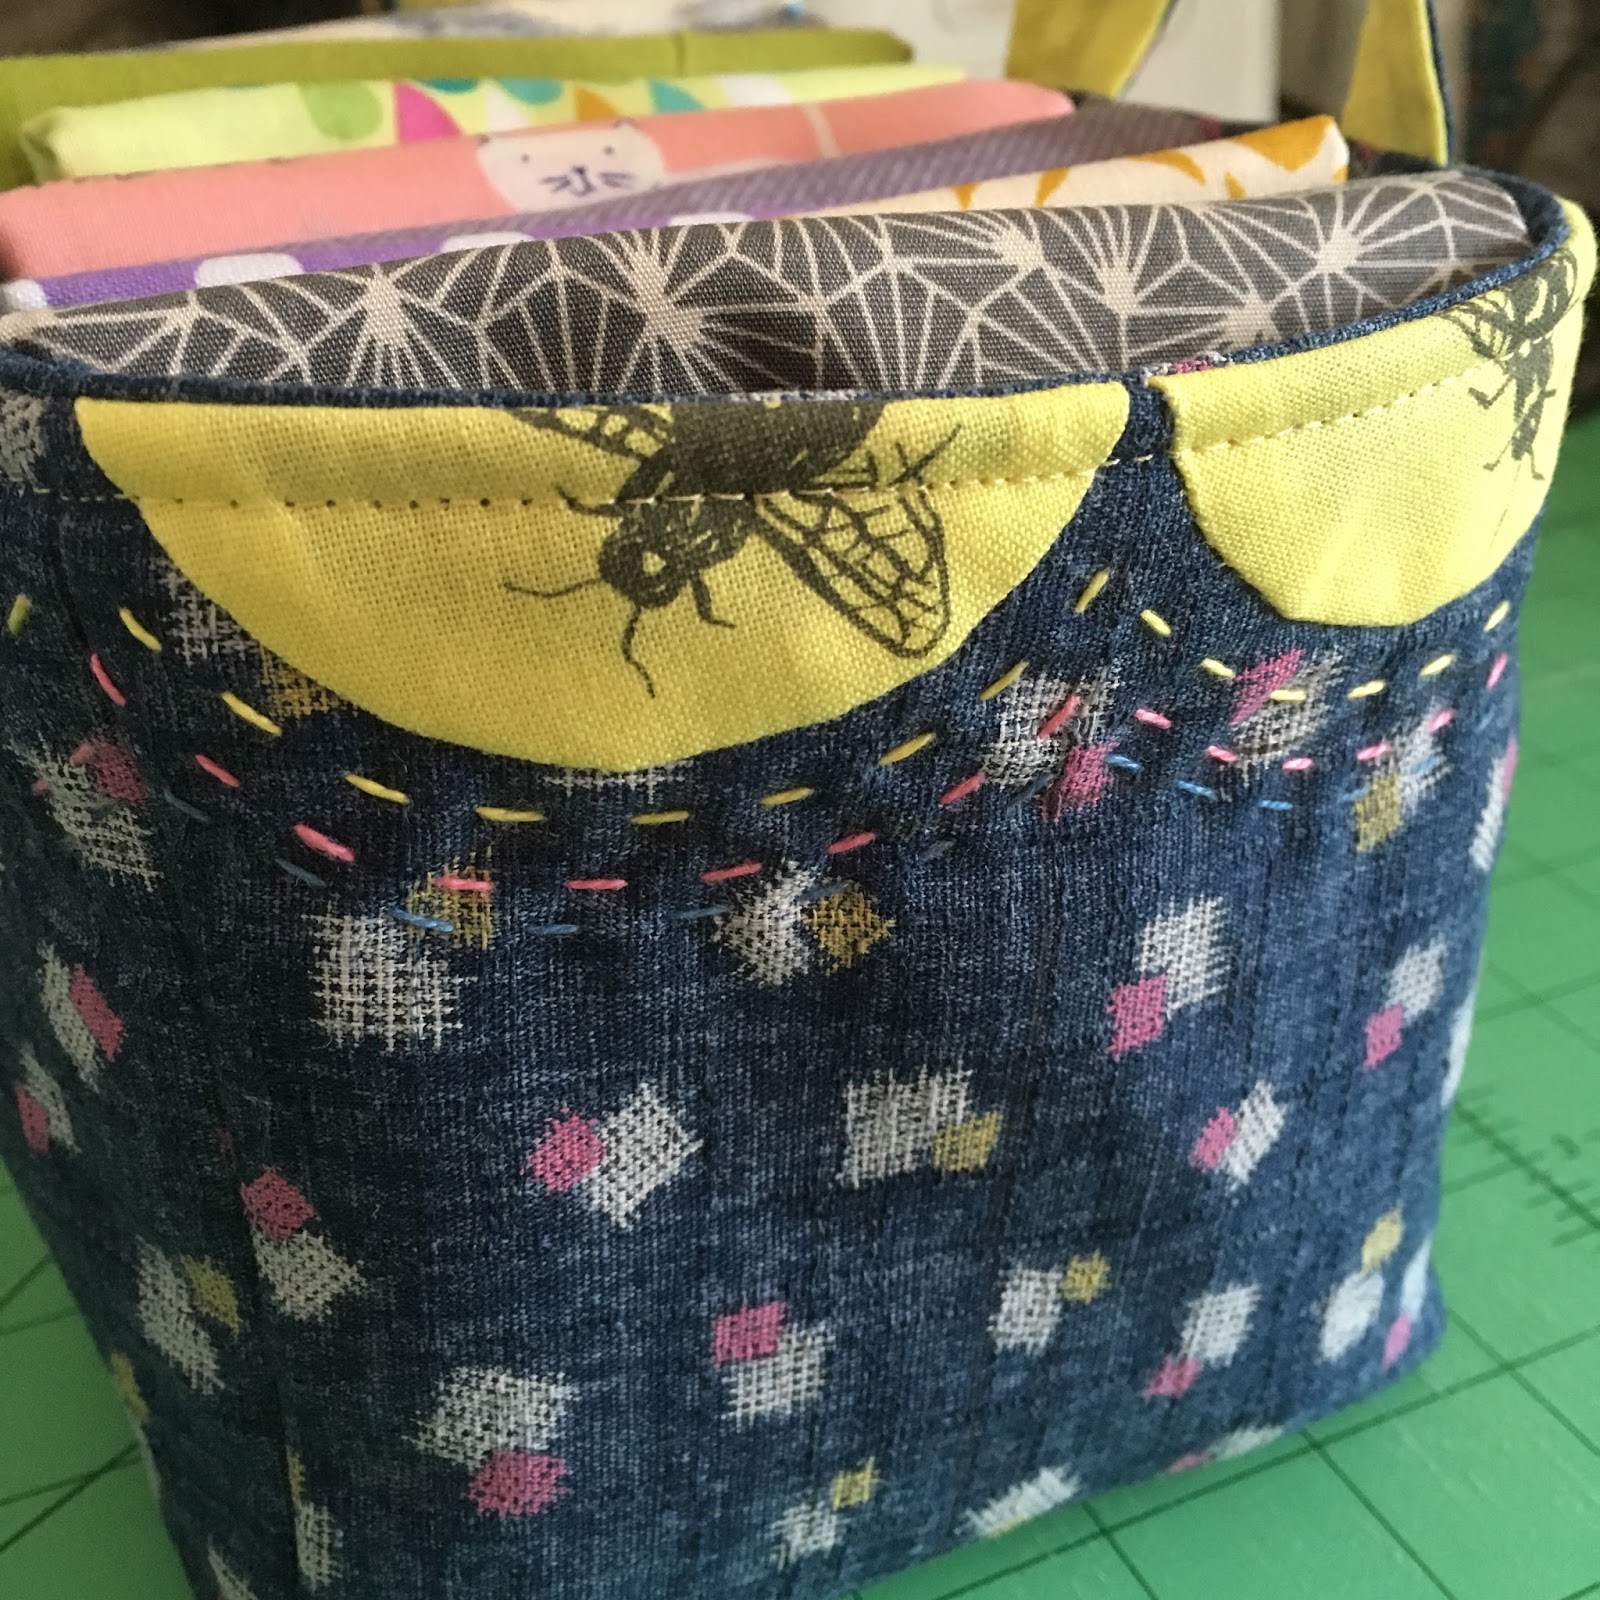
For the top stitching on the basket and the handles I went with a soft buttery yellow, 50 wt. Aurifil #2130 and it stands out without fighting the brighter Highlight yellow.
The basket fits a fair bit of fabric and is a lovely size to sit on my desk and hold charm packs, scraps or fabrics for my next project! This is the first finish off my Q2 FAL list ✓

I just wanted to make it, it doesn't really fit the Le Challenge theme of 'fine' specifically but I'm going to go with the fact it's a fine way to store fabric!
If you have any 'fine' projects made in the last month, head over and link up - there is a giveaway :)
I'm also linking up with:
fabric bookmark tutorial

The theme over at Le Challenge this month is 'reading'. I decided to make a bookmark and I wanted something that would feel sturdy but still look cute! Here's how I made my laminated fabric bookmark...

Supplies:
505 Craft Adhesive
(2) 2" x 7" pieces of fabric
1.75" x 6.5" piece of Aida or thin cardboard
small fabric scraps
Sewline glue pen
paper to cover your work surface
a laminating machine and laminating pouch (optional)
If you would like to create a frayed edge, use a woven fabric and gently pull the threads from the bottom. Repeat on the other piece of fabric and put them together to make sure you have the same amount of fraying.

Spray one side of Aida lightly with the adhesive and stick to the wrong side of one of the pieces of fabric. Spray again and place the other fabric piece on top, right side facing up.

Now for the fun bit, decorate your bookmark using fabric scraps!
Originally I tried to use up some teeny bits of Liberty and make a confetti pattern but it just didn't work as I envisioned.

I opted instead to fussy cut some Liberty print flowers and create a collage...

Which was much prettier! I used embroidery scissors, layered the flowers and stuck them down with the glue pen.

At this point you could quilt over your design, just a few straight stitches will hold it in place, then top stitch around the edges (and above the fraying). You could also zig zag the edges.
Another simple way to finish, that will give structure and make your bookmark more hard wearing is to laminate it. I do like a glossy finish!

Since putting one small bookmark through the laminator felt wasteful I also made myself a little inspiration card to keep in my planner. I used a Project Life card, some washi and stickers.

A little tip - if you are laminating and want rounded corners, use nail clippers to take the points off the corners!
Check out the other finishes at Le Challenge and link up your 'reading' projects for a chance to win great prizes :)
round ~ le challenge ~ hot water bottle cover
The theme for le challenge this month was round, I thought about making something round but I couldn't think of anything I really fancied making! What I did need was a new hot water bottle cover. After seeing Mary's versions I used Adrianne's tutorial to whip one up.

I needed to make it fit the theme - usually I use the theme as a starting point but sometimes you have to just figure out how to make it work! So I raided my scraps and picked out everything that had a dot or circle, because obviously they are round. I threw that little tape measure scrap in there too because I love it!

I made up two panels (the tutorial uses one but this works) with Amanda Jean's scrap vortex tutorial. Most of my scraps were more like strips but I didn't want to bother cutting them all up smaller and I like how it worked out. I quilted the panels with my favourite cross hatching using Aurifil 12 wt thread.

All these fabrics have memories of other projects and I like seeing them all together! It's slightly mad and there was no coordinating of fabrics, other than the round shapes.

Once I had finished I decided to add a little hand quilting to the top rather than top stitching. I love the shape of the hot water bottle, it's easy to turn down the opening to fill it up. I folded the hot water bottle into thirds vertically to get it in and there was a little jiggling to get it into place. I'm not sure how easy it would be to get it back out though, mine's pretty snug! It's been cold so I'm using it every night and love it!

Wishing you all a warm, love filled Valentine's Day!
Head over to le challenge to see other round makes and link up your 'round' themed makes for a chance to win!
There will be a new theme announced tomorrow and I think it's a brilliant one so make sure you check it out!
I'm also linking up to Scraptastic Tuesday because scraps!

space ~ le challenge ~ Levi's 2.0
It's time for the le challenge link again and this month's theme was space.
I have to admit to just not being able to make any of the things I had thought about for this month. Winter illness has swept through the household and it's been exhausting.
There were things that needed to be made though and I have a stack of WIPs that I want to get to, so I decided to literally make space. Instead of starting something new I pulled a project from the pile that's amassed on my desk!
I made this cushion for my sister to give to my brother in law. She gave me his old Levi's t-shirt that had a great monochrome pattern on, which happened to match beautifully with Doe by Carolyn Friedlander (you can still find some here and here).

I cut out the panel from the front of the t-shirt (I use pinking shears) then ironed some fusible interfacing on the back.

I kept it really simple, just adding some pieces either side of the t-shirt and then strips above and below.

I used a piece of wadding and a plain piece of cotton for the backing then quilted the strips using quilt as you go so it came together really quickly. The fabric is fairly busy so I didn't want to add too much with the quilting. I sort of echoed the curved shape of the Levi's logo in the strip of fabric underneath the t-shirt panel and did the same on the top strip . I used grey/white variegated perle thread.
For the backing I used a grey/mustard Intersections, Doe print and made a covered zip closure.

I hope he likes it!
Now it's your turn to link up - head over to le challenge for a chance to win some fabulous prizes! The link is open until 8pm GMT on 16th December.

method ~ le challenge ~ pencil case
Always last minute last night I created a present for my middle daughter to give as a birthday present to her friend.

I decided to use a simple method of appliqué. Quick and easy.

I used my favourite method of straight line quilting using my hera marker to mark some guidelines and the edge of the walking foot to fill in the lines - I have a tutorial for cross hatch quilting here.

I made a pencil case using the Noodlehead tutorial - I've used this many times but still need to check the position of the zip each time (especially when I'm sewing late at night!).

The edges don't look quite as wrinkly in real life and I like the effect of just quilting over the letters.
I'm hoping he will like the pencil case as I don't think there would be many things in the UK with his name printed on them. Zip cases are always a fun and useful make and this method of appliqué was super fast!
If you'd like to see more makes around the theme 'method' or to link up for a chance to win $25 gift certificate to Fat Quarter Shop and $10 to spend at Eco Fabric Store or Fibers To Fabric head over to Le Challenge!
gold ~ le challenge ~ vintage christmas ball
I am always so last minute with my le challenge makes, next month I need to get started earlier!
The theme this month is gold and I knew I wanted to use one of my metallic fabrics because they are so pretty. I had this tutorial bookmarked for a while and decided now was the time to try it.

I had some issues, not the fault of the tutorial, more my own silliness. I made mistakes along the way but the biggest was towards the end.
It started ok, you need to cut circles from fusible fleece and I had the brilliant idea to stamp them using the bottom of a plastic cup and an ink pad. That worked well!

When it came to sewing the circles though I kept messing up. Getting the fabric the wrong way round and then my circles not being circular! I decided not to worry too much though and just got it done. The diameter of the circles is 5cm, next time I will go a bit bigger.

At the final stage I thought you had to make them all into the shapes shown in the tutorial, when actually you make one and keep adding rows to make it a circle. Now I know. So instead of one ornament I will have two. I only managed to finish one in time for this post but that's fine! It still needs a press but you get the idea - though it's one of those things that looks so much better in real life. I used a bit of ribbon that also had some gold. The blue isn't really the best colour option but it still looks cute and I'm not matchy matchy with my tree decorations anyway!
I would love to try this again. There are so many fabrics that would suit this pretty bauble! I also want to get it right ;)

Have you made a gold project? Link up with le challenge for a chance to win a $25 gift certificate for Fat Quarter Shop and check out the other projects.
wilderness ~ le challenge ~ pyjama leggings?!
Funny how I've had longer to work on this project and yet I produced something so simple! I had a few ideas for the theme Wilderness but I've had this fabric in my stash for a while and wanted to use it. I came across this simple tutorial and thought I'd give it a go for my middle daughter. Well 15 minutes later I had these:

So I didn't really think about it and used a pair of tighter jersey pyjama bottoms as a template. Yeah, doesn't translate so well in not stretchy cotton!! They look more like skinny jeans or leggings but she was certainly happy with them (and wore them all afternoon!).

I would definitely make these again (and actually have more of this fabric) and I will remember I'm going for roomy pjs rather than leggings!!

The cute woodland animals fit the WILDERNESS theme. If you have any makes that fit the theme come and link up at le challenge (and there's a giveaway)!
direction ~ le challenge ~ tissue holders
ok so I have to be honest and say this was plan B. I usually like to tie my le challenge project in with something else I'm doing (my limited sewing time means this is kind of a must) so I had to rethink when plan A failed. Actually it didn't fail but I was hoping to have my English Paper Pieced mini finished by now. The 14th has snuck up on me and I realised there was no way I could get it done (even if I pulled a couple of all nighters). EPP is not for rushing!
So yesterday I looked at what needed to get done and handily I just wrote my Finish-Along list. Obviously I had to do a quick sew and Kelly's tissue holder tutorial was the perfect thing! She posted a clever and simple tutorial on instagram and I thought they would be perfect to add into end of year gift bags for my kids teachers.

This is such a fast sew, I encourage you to look at the tutorial and make a few! They'd be perfect to have on hand as extra gifts / stocking fillers. Cute to carry in your handbag and nice for kids school bags too. Thanks for sharing your tutorial Kelly! Six tissue holders complete and the first check off my FAL list.

I chose to make this for the le challenge theme because of the wonderful teachers my children have. Under their direction my kids have had really good school reports this year! Clever hey?!
We always have amazing, creative people linking up so come and take a peek and join in if you have a finish that ties in with the theme 'direction' at le challenge
single ~ le challenge ~ cuff bracelet
I will begin by saying this month's challenge is a slight cop out. I had so many great ideas and I love the theme 'single' - it made me think of music and records, being alone, the idea of 'one' - maybe one block or pattern. Ultimately life took over though, I've been so busy and since having my operation I hadn't sewn one single thing until my day out. So I took the easy route and used a little kit I got in my last subscription box from My Little Box.

This summery cuff was an easy little project that let me do a bit of stitching without having to work too hard! It came with two colours of cord, I chose not to use the turquoise because it's not my favourite and just used the deep blue. I made cross stitches and was going to do backstitch on the top and bottom rows but I actually like it with the holes so I left it.

Now I have a bit of bling, using a single colour of cord and a single stitch :)
If you have a creation that ties in with the theme 'single' come and link up at le challenge, one random entry will win a $25 gift certificate to the Fat Quarter Shop! A new theme will be announced tomorrow and it's a good 'un!
wood ~ le challenge ~ drawstring tote bag
This one was cutting it fine, but I made it... here's my finish for the le challenge theme 'wood':

Since I don't have loads of time to sew I like to try and check a couple of things of my 'to do' list when I can. My eldest daughter has an upcoming birthday party to go to so I thought I would make a bag for the birthday girl.
I used Svetlana's Drawstring Tote Bag pattern and some bird/tree fabric I have had in my stash for a while - the recipient's name begins with a 'S' so I thought it would be perfect - and the trees are my link to the theme 'wood'.

I picked out the lime and pink from the feature fabric and it works well, the pink is a cotton canvas that was given to me and it adds a nice weight to the bottom and I used it for the handles and lining too. I only quilted it every 2 inches but the canvas gives it added strength and I was pushed for time!
The pattern is fantastic, so quick to make and nice details like the casing for the ties and the outer corners sewn in to the seam:

I used ribbon rather than making fabric ties and happened to have two colours of ribbon that matched nicely. I would love to buy something I could use for ties like this, something studier than ribbon that would work for a drawstring - does anyone in the UK have any recommendations? I would happily stock up on neutral ties because I am definitely making more of these bags and I don't really like making my own ties from fabric. I have ordered some twill ribbon from The Village Haberdashery because I think that will work nicely but please leave a comment if you have any suggestions or let me know what you use!

This bag is easy to make but looks fancy and I will be making one for Fred and one for myself! I might make some for teachers gifts too.
See how other crafters interpreted the theme 'wood' and if you have a finish that fits the theme come and link up, one random winner will get a $25 gift certificate to the Fat Quarter Shop!
Subscribe to:
Posts (Atom)