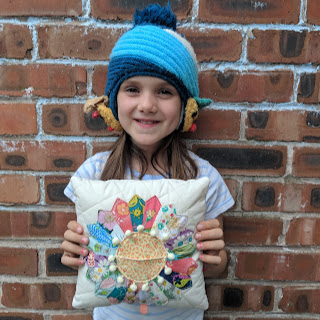
My youngest recently had her first wobbly tooth. I asked her if she wanted to help me pick fabrics out to make a tooth fairy cushion and she was very excited. Lois is very into pink and glitter and flowers. We thought about colour combinations and she said she liked the colours on her dress:
So we used that as a starting point, pulling out prints from my stash and she would give a yes or no. Once we had a few prints she got selective and basically chose every print that had a flower on it.
To let those prints shine, for the background I picked a plain canvas. Most often for cushions I use fusible fleece because of the slight structure it gives, it's so easy to use and you don't have to baste! The front and the back panels of the cushion were machine quilted with a cross hatch pattern using Aurifil Forty3, which gives a great texture.
The dresden came together very quickly using the Creative Grids Dresden Plate Ruler for cutting, makes piecing the plates together very simple. I pinned it to the centre of the quilted front and top stitched it in place.
It needed a pocket, which I did think of appliqueing but then the thought of pom poms popped into my head and had to be used! I cut three circles using the acrylic circle that comes as part of the Creative Grids Dresden Plate Ruler. To make the pocket I fused interfacing to the back of one of the circles and then trimmed down (so it was a half circle + a 1/4" seam). I folded the seam under and top stitched along to make a neat edge for the pocket. I basted the pocket to one of the circles.
Then the fiddly bit, I glue basted the pom poms (facing inwards) to the third circle and then sewed around the outside, then I carefully made a cut in the centre of the back and turned it through. Ok not that fiddly really and the pom poms are fairly small so that made it easy.
With the circle centred I top stitched it to the dresden, moving pom poms out of the way as I went.
I really do like the effect they give, pom poms are so happy and it adds to the flowery look of the cushion.
I didn't line the cushion, it's more of a keepsake treasure to be used when teeth fall out rather than for everyday. So I kept it simple by putting the front and back right sides together, stitching around the edges and leaving a gap for turning.
Filled it full of the best stuffing from a great big bag of the stuff that I ordered from Amazon ages ago and hand stitched it closed.
Ta-dah! A pretty, floral cushion fit for a tooth fairy. I was happy to have made it in time for when the wobbly tooth came out and now there's already another wobbly tooth!
Lois loves it and that's all that matters.
(Why she was wearing a winter hat when it's summer I do not know.)
I am a little sad that this is the last tooth fairy cushion for my lot but I loved making it and the gappy smile from Lois is pure joy.


6 comments
Post a Comment
Pompoms are so full of joy. It's such a cute cushion too. I think I need more pompom trim in my life!
What size are the blades of the dresden Lucy. Love her choice of fabrics.
An adorable tooth fairy cushion!
This is sweet. All of my children still have their tooth fairy cushions into adult hood. x
Oh that is so sweet! She picked great fabrics and I love her hat 😊
Aww this is beautiful x