alphabet
Showing posts with label alphabet. Show all posts
S is for Stitch quilt and an easy border tutorial
This is my first quilt finish of the year and I'm hoping to set a precedent of making quilts that I'm really proud of and love. I made this quilt for my dear friend's new baby boy.

It features cute embroidered panels from the book S is for Stitch, though the tree is from Doodle Stitching: The Motif Collection and the jelly and pineapple were my own little doodles.


The embroidery was stitched on the absolutely gorgeous Lakehouse dots in white on white, such a great fabric to have in your stash. I made the embroidery into blocks using a Summer Kona Roll Up, I had enough from one roll to make all the blocks, borders and binding and I still have the yellows, oranges and pinks left over. That little roll goes a long way!
The backing fabric is Taffy in Indigo, Prince Charming by Tula Pink and it ties in perfectly with the Kona shades.
All pieced with my trusty Aurifil and straight line machine quilted with Aurifil 50 wt 1128 - a perfect medium shade of blue. I also hand quilted each block in white perle thread:


I embroidered a label (the photo is cropped to protect the identity of the baby in case anyone wants to steal the quilt) and used a simple running stitch to attach it to the back:

This completes another project from my FAL list.
Here's a quick border tutorial...
Once I had the blocks arranged I realised I would need to make the quilt wider and the left over roll up strips were the perfect answer. I pieced them into long enough strips and was about to sew them to the quilt top when it occurred to me that it would be much quicker to 'quilt as you go'.
You need to baste the quilt with the backing and wadding wider than the quilt top, and also pin the area that doesn't have the top on it - basically just pin the backing to the wadding so it stays put when adding the borders. This picture was taken after I'd sewn the right hand border but you can see how I made extra space on the left:
 |
| these pictures were taken as I was sewing, please obviously make sure your quilt is nice and flat when basting! |
Then pin the first strip to the quilt top, right sides together:

and sew it using a 1/4" seam allowance:

Then flip the border over and press (I finger pressed but go ahead and use an iron if you want to). Pin the next strip to the first border strip, right sides together:

Sew it down, flip and press again and then repeat with the final strip:

And there you have it, a simple way to add a border. You can quilt on top of it if you chose to. I left it as it was but if the strips were wider than 2.5" (the width of roll ups and jelly rolls) then I would have quilted the border to give the fabric on top more stability.
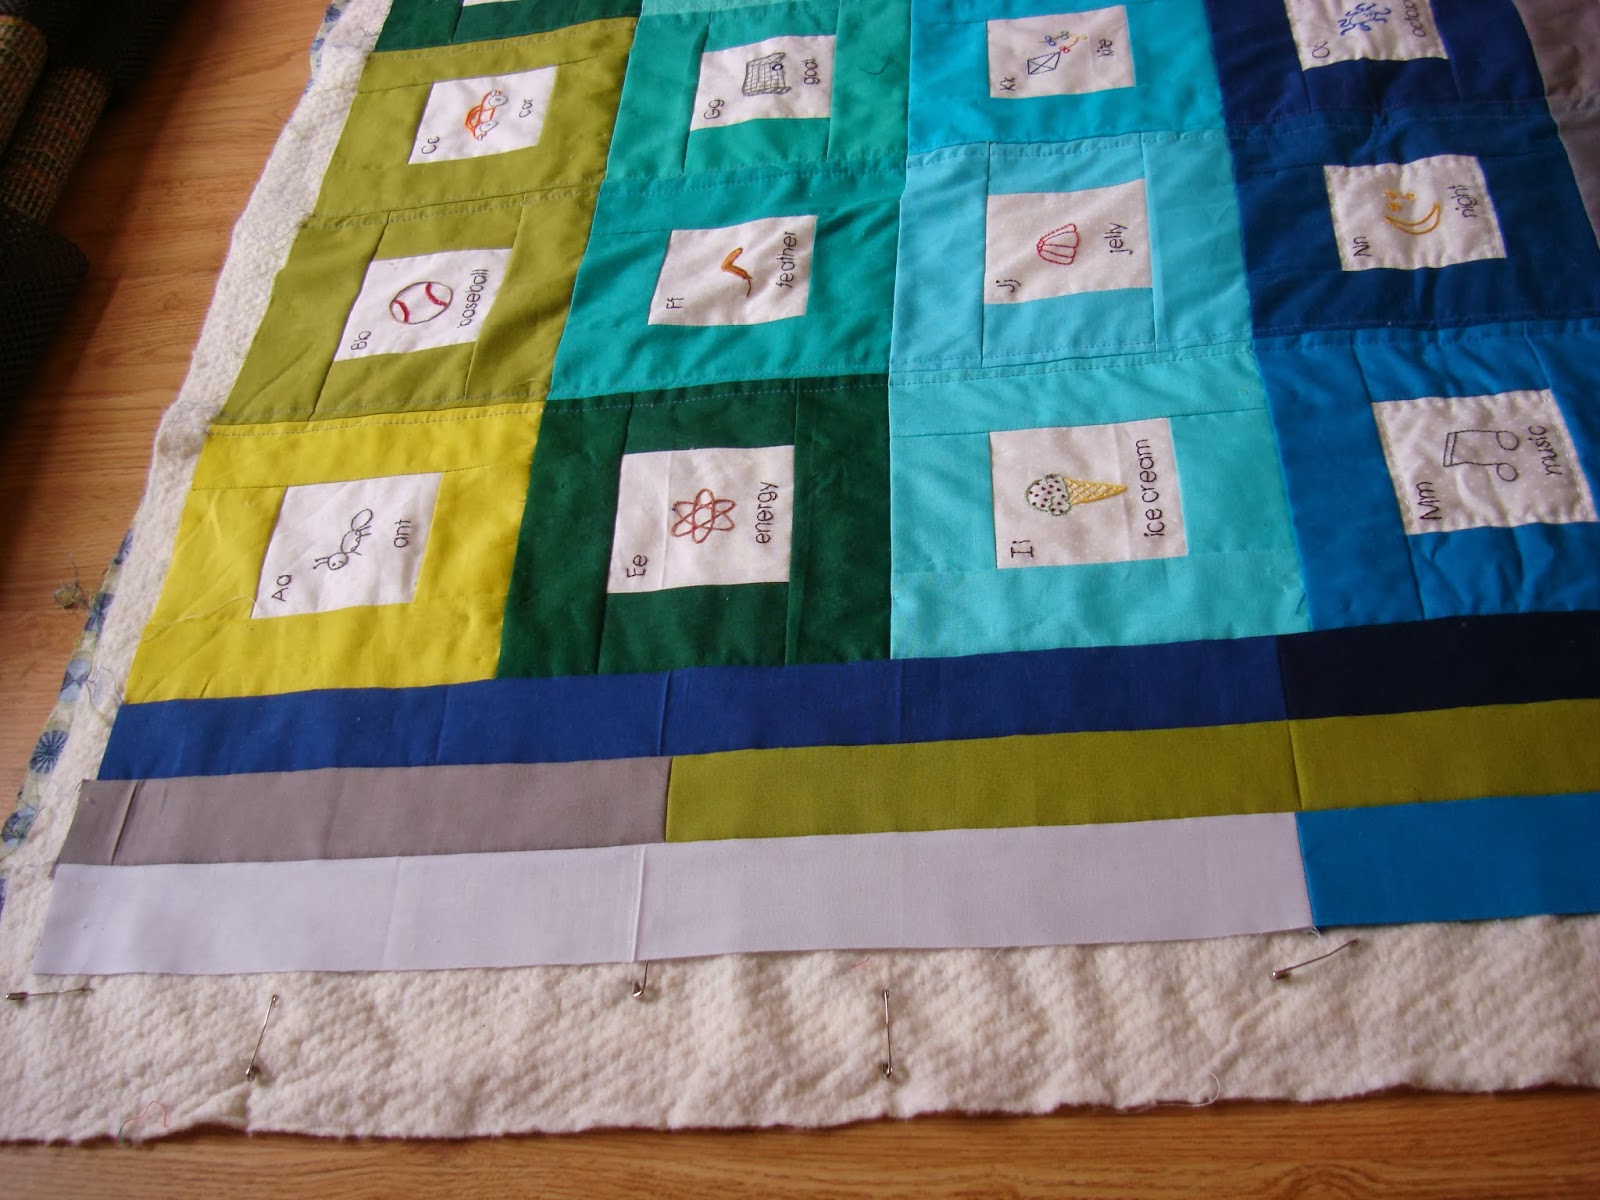

The quilt measures approx 40" x 56" so there's plenty of growing room for the little one and hopefully as he gets bigger he will enjoy all the little pictures. Thankfully his mum and dad love it!

I.just.can't.help.myself.
How is it that I always feel like I never have enough time to sew all the things I want to and then, rather than finish the things I've started, I go ahead and start something new?! bonkers. Even more bonkers is that fact I'm sure I've said that before ;) The quilter's curse of beginning projects!
So here's what I'm up to...
I loved making the last rainbow log cabin quilt, so I'm at it again:

I finished embroidering the alphabet panel and got it all cut up and sewn into blocks - I think it's going to look so pretty! Just need to press and trim these:


And I've nearly finished my latest rose star block:

I intended to do a full on WIP report this week but it's half term so I'm impressed with what sewing I've done and I want to get on with it not talk about it!
Today we spent the day with friends carving our pumpkins. She wanted happy and he wanted scary:


We even all managed to have lunch and do the pumpkins while Lois napped. Baby and pumpkins might not have worked so well!
We moved Lois into her own room yesterday (I say we but actually my husband was the one building the cot bed, clearing, putting up a new curtain rail, etc.). And she slept right through from 8pm until 6am this morning! I couldn't believe it. I also cried last night knowing I wouldn't be sleeping next to her (as I have for the past 9 months) but that was probably the exhaustion taking over ;) It is a little sad but I will accept that phase is over if I get more sleep as a result... although as many of you mums may know, she slept through the night but I didn't. Getting back into a good sleep routine will take time for me.
Just in case you missed it...
Be sure to go and enter my GIVEAWAY to win yourself some haberdashery (sewing notions if you're American!), open until Monday 4th November and international entries welcome!
Also check out Le Challenge and join us on November 15th to link up any project with the theme STRIPES for your chance to win $25 gift certificate to the Fat Quarter Shop :)

lateness
Having not done a lot of sewing in September I failed to get my bee blocks done too but they are now in the post just a little late...
Karen's blocks for Bee A Brit Stingy:


Although when it does I already have my next cross stitch project ready to go thanks to winning a giveaway at live.love.sew. I love Keera's pretty pattern and you can download it here. Thank you so much Keera!


Karen's blocks for Bee A Brit Stingy:


and Amy's block for the Simply Solids bee:
I have also caught up on my Woodland Sampler - I actually thought I'd finished August but I missed a mushroom.


Every month I look forward to these cuties coming into my inbox and I thought September might be my favourite but then I saw October! I really don't want it to end!
Although when it does I already have my next cross stitch project ready to go thanks to winning a giveaway at live.love.sew. I love Keera's pretty pattern and you can download it here. Thank you so much Keera!


I also had these goodies drop through my door. I love stationary and really needed to have some birthday cards handy for the kids birthday parties that mine are invited to because I'm never organised. I got this lovely lot at asking for trouble - quite honestly I'd buy it all if I could, gotta love those cute kawaii characters!

Speaking of characters I've been stuffing this little dog, which was a free gift with Mollie Makes, with all my hst trimmings. It gives it a nice weight and Joan is smitten!

Subscribe to:
Posts (Atom)