Robert Kaufman
Showing posts with label Robert Kaufman. Show all posts
breaking symmetry: Earth Day x Karen Nyberg

Creativity is a curious thing. It ebbs and flows. I have to be in the right mood. At times I want to follow a pattern, create my own patterns, stitch mindlessly, stitch with focus, colour inside the lines, scribble like nothing matters. It happens in the moment, in the mood. Recently I have realised how much I like having structure and routine in my life but without being confined or limited. This applies to my creativity too. One of the things that keeps me making and motivated is the Aurifil Artisan challenges. We are given a starting point, a theme, supplies or just a word and let loose to create whatever we feel inspired to. This month we were sent fat quarters of the amazing Earth Views by Karen Nyberg and I received a spool of 50 weight Aurifil thread, which is featured in Karen’s Aurifil collection.

The pattern I chose is Minnie Stars, Quiltfolk Patterns 007. It's one I wanted to make for a while and I thought it would showcase the prints well. I was going to chose a solid blue background fabric but none of the blues I had worked at all. In the end I went for a pale grey - I have no idea what fabric this is - note to self, label your solids!
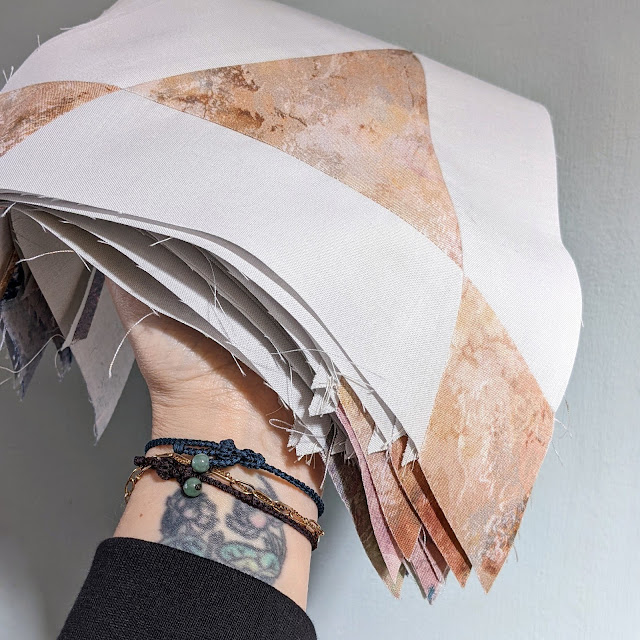
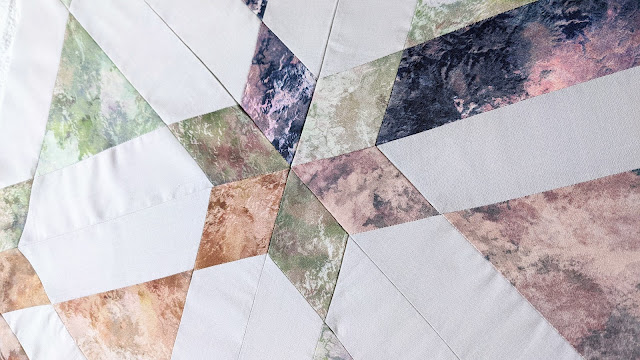
Had I labelled it, I might have been able to get more because I did run out. Thankfully I had just enough from the fat quarters to make up for it. You might spot the areas where I had to swap the solid for prints in the photos below. I was determined to use what I had and it just added to the quirkiness of the quilt.
Nature is so fascinating and the amount of symmetry found in patterns, creatures, trees, oceans, time and space is incredible. Repeating patterns, shapes, mirrored symmetry; it's all so beautiful. And then there's distortion, broken symmetry, changes; all of which can also be really beautiful. As I laid out the blocks it was clear they weren't going to fit together in a neat pattern, without me cutting quite a bit away or losing some blocks. I could have added more using other fabric but I decided not too. Instead I pieced the blocks like a puzzle, so they would all get used. The result is the most oddly shaped quilt I have ever made. It's weird and I like it.


Once the quilt top was done, next was the quilting...
a (somewhat) needed sunday stash

I bought fabric at Festival of Quilts and the Stitch Gathering - supporting those artists and shops I love - but there's not been much fabric shopping going on and that's mostly down to the fact that I want to be using what I have. There are plenty of times I do 'fake shopping', adding beautiful fabric to online baskets but I don't hit 'checkout' because I know that it will ultimately end up in the piles and piles of fabric I already have. The decision to buy fabric now has to be because I need it for a project I am actually working on. For my Manx log cabin blocks I am using woven fabric for the back of each block. I thought I had quite a selection but turns out no where near enough, so I picked up this gorgeous selection of fabrics from Patchfinders. It's a mix of shot cottons, Robert Kaufman Fabrics - yarn dyed, herringbone and gingham.

As the blocks are similar to quilt as you go, it's going to be so cool seeing a patchwork back of the woven fabrics. I've realised (thanks to comments on instagram) that this will be a coverlet rather than a quilt because there's no wadding in it. We have so many quilts in our house I am excited to create something slightly less structured and more blanket like. My Manx coverlet started with a peachy/pink and navy combo but I decided to add some mint to the mix too. I pulled all the mints from my stash but it was still lacking so I added these three from Patchfinders.
pretty and novel stash
This week I got a squishy fabric parcel from Fabricworm and I had stuffed that envelope full of sale goodies!
I'm trying to shop smart and after assessing what I already have in my stash I knew I needed some more good blender prints and I'm lacking fun prints for fussy cutting so I was on the hunt for those too.
First I couldn't resist this sweet fortune teller print, which is lawn and so beautiful to the touch. The Aneela Hoey print was one I had seen someone use and fell in love with it and Blueberry Park is always fabulous as it plays so nicely with other fabrics.

left to right: Fortune Teller in Light Pink, Sleeping Porch by Heather Ross; Jenny's Plaid in Smoke, Stay Gold by Aneela Hoey; Flowerbed in Glacier, Blueberry Park by Karen Lewis and Trellis in Coal, Blueberry Park by Karen Lewis.
And I picked out some random prints that just drew me in with their cuteness! Like this playful cat border print and prints with hot pink in them:


Finally how great are these funky sewing themed prints?! I think these will make cute pouches and pincushions. Actually I'm sure that both these fabrics will find there way into lots of my projects, I can't resist those charming illustrations!

Notions in pink and Machines in blue, Thimbles and Threads by Robert Kaufman
I may have done a little black friday shopping too so there will be more to come! Did anyone else succumb to the sales?

Speaking of... quickly pop over to my Etsy shop because there is a discount on my patterns through Cyber Monday, click here for the sale! (no code required, discount has already been applied). A great excuse to pick up patterns and use up some of that fabric ;)
linking up to Sunday Stash with Molli Sparkles
✜ Buffalo Check Gingham ~ Fat Quarter Shop Giveaway! ✜
**Giveaway now closed**

Fat Quarter Shop are kindly giving away this stunning bundle of Buffalo Check Carolina Gingham to one of you!

That is 15 fat quarters in a beautiful array of colours. This 1" wide gingham by Robert Kaufman is a brilliant stash staple.

**Giveaway now closed**
⟡ Open internationally, a winner will be chosen on Monday 12th September 2016.
⟡ Please make sure you leave your email in the comments so I have a way to contact you if you win! No reply blogger, no chance.
Good Luck!
whitworth {and a FQS discount!}
We had a 'family time' weekend and yesterday went to the Whitworth Art Gallery. It's been awarded the Art Fund Museum of the Year 2015 and rightly so. I love it, we had our wedding there, and I've been going with my family for as long as I can remember.
I went to see the Cornelia Parker exhibition 'Magna Carta (An Embroidery)', here is the blurb from the website:

It was so incredible on every level and I was overwhelmingly inspired - definitely see it if you can. It's on from 8 August – 1 November 2015.
There was a really interesting documentary about the embroidery running too and Cornelia was fascinating, I enjoyed learning more about the whole process and the people involved. This was an epic project and the skill (or not) to produce such work is immense.
I chuckled that Jarvis Cocker actually embroidered two words, common and people!
I chuckled that Jarvis Cocker actually embroidered two words, common and people!
Outside I discovered these fabulous stitchy benches:

and the adjoining park provided enjoyment too:


It was the kind of day that life is all about.
Today was the opposite, I was a mardy so and so. Hormones blazing, too many annoying jobs, missed calls, kids not listening to me, etc. It really does seem like I'm having a summer of good days followed by bad! Hopefully that means I'm due a good one tomorrow ;)
And in the spirit of goodness Fat Quarter Shop currently have 15% off all Robert Kaufman fabrics, use code RK2015 at the checkout. Valid until 16th August:

Stock up on lovely solids (I vote pickle, creamsicle and goldfish - is it weird that those are all also snacks?!) or whatever fabulous RK prints take your fancy! I will just point out that includes Architextures :)
I'm going to do a little bit of stitching before zonking out. Hope your Monday was better than mine?!
winner and discount code
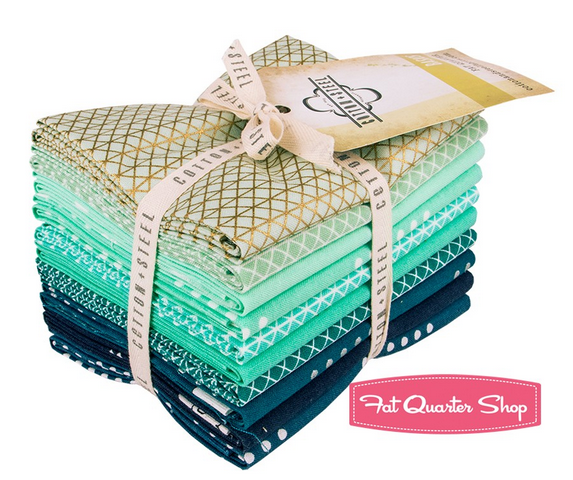
Thanks to everyone who entered the Splash Cotton + Steel Basics Fat Quarter Bundle from the Fat Quarter Shop. You all have set yourself some great challenges!
The number picked is:

who is:

Congratulations Hadley! One of my longest followers and one of the nicest bloggers I know :) I have sent you an email.
For those that didn't win don't despair, there is going to be a couple more exciting giveaways very soon!
And this week there's a sale on all Robert Kaufman Fabrics at the Fat Quarter Shop with the code RK2014. This includes Kona, Ann Kelle, Carolyn Friedlander, Darlene Zimmerman, and many more!

I hope your week is off to a great start :)
Donktober Denim and much, much more!
I'm so pleased to be part of Donktober! A fantastic blog hop from the creative (slightly bonkers) mind of Erin at Missy Mac Creations. Thanks for including me Erin :)
I'm going to share a couple of embroidery patterns, a tutorial and a short book review today, as well as a little giveaway... sheesh, it's going to be a long and picture heavy post.


I've created a tutorial for this book bag, which was made from a pair of my husband's VERY torn jeans! I wanted to make it from something hard wearing and with no money to indulge in some oilcloth I scoured the house to see what I could find! I love denim and realised it would work perfectly and allow me to do some stitching too.

I did a bit of sketching (you can see I changed my mind about the direction of the donkey's tail!) and then outlined them to create embroidery patterns.


I have no clever computer software so I took pictures and uploaded them to my computer. For the books I added some text on picmonkey, saved the images and have created a google document so I can share the patterns with you. If you aren't donkey mad the book pattern could be used for so many different things... just don't copy the lettering!
Bag Tutorial and Embroidery Details
If you'd like to make the bag please read the instructions all the way through first! You may want to make some adjustments according to your preferences.
1- Start by cutting off the legs of the jeans - I did this on the thigh, just at the point where they begin to be straight legs:

2- Cut out one of the back pockets - so I had two leg pieces and a pocket (keep the rest, we'll be using some more of the jeans later!):

3- Cut up the side of the leg pieces along the narrower seam (I wanted the thicker seam as a feature running down the centre panel of the bag):


4- Even up the panels and remove the bottom hems - my panel then measured approx 14" x 16". You can use whatever size suits your needs, larger or smaller will work just as well.
5- Transfer the embroidery designs and stitch the panel - I decided to use the reverse side of the denim so the embroidery would stand out more, it also gives a nice background texture. I used Anchor pearl cotton:


The books and pages were all backstitched.

The body of the Donkey was all split stitch, the eye and nostril were satin stitch, the hooves were chain stitch, the mane was rope stitch and the tail was Vandyke stitch.
 |
| notice the Donkey is reading our blogs :) |
I experimented with some of these stitches and I followed instructions from the brilliant book by Kate Hexell, 'The Stitch Bible'.
6- Once the stitching is finished, cut two pieces of lining fabric the same size as your denim panels:

7- Take the plain piece of denim and add the pocket to the middle. Cut carefully around the pocket, not too close to the seams. That way I kept the Levi's tag (for fun) and also meant I could just stitch around the pocket. This will fray over time but I really like that look! If you want to be neater you could use blanket/zigzag stitch to avoid fraying.


8- Next go back to the remaining cut up jeans and take a section off the top of the leg - it's doesn't matter that it's not straight, once it's cut you can even it up:

This time I trimmed off the thicker seam so I had a long strip - this measured approximately 3 1/2" x 18" but again just work with what you have or cut to a length you prefer:

9- Press the edges of the long side over a bit, then press the whole strip in half (feel free to press the short edges over too if you want a neater look):


10- Once folded in half, stitch along the whole length where the edges meet and then echo the straight lines along the strap:


Repeat steps 8-10 so you have two handles!
** I like the 'handmade' look of the handles sewn on the outside and the idea that they will fray nicely with time - If you want a more polished look you need to insert the handles in between the outside and lining fabric when you topstitch along the edge in the next step, so they are neatly tucked inside. **

so you end up with this:

12- Put them wrong sides together and press the top edge before top stitching:


Repeat steps 11 and 12 for the other denim panel and interior fabric.
13- Decide where you want to place the handles, pin and stitch in place on each denim panel:

Now you have a front and a back to the bag - complete with handles! So it's time to put them together...
14- Put the bag together, interior pieces facing - so it literally looks like the finished bag should - then pin around the side and bottom edges:

15- Sew a 1/4" seam around the three edges then clip the corners:

16- This bag has a French seam so turn the bag inside out, press or wiggle with your fingers so the edges are straight and then sew around the same three edges, this time with a 1/2" seam.

Turn the bag the right way round and you're all done (trust me it's taken me WAY longer to type this tutorial than it did to sew the bag together!!).


So what to put in it?? Well ours obviously has Donkey books in it!!
Erin was so kind as to send me and the kids some fabulous Donkey themed books. Huge thank you from me and the kiddies!
Here's a quick review:


First up is 'That's Not My Donkey' by Fiona Watts and Rachel Wells. I think most modern parents are familiar with the Usborne touchy-feely books and the 'That's Not My...' series. They are fabulous for little ones, great fun for toddlers and have good repetition for school aged little readers. This one is just as brilliant as the rest of them and my two loved seeing the different settings for the Donkey and shouting out about the various textures in the book.
Next is 'The Hungry Donkey' by Heather Amery and Stephen Cartwright. This is a fun story. They laughed a lot when... well I won't ruin it! This is a great one for anytime of day and it has lovely illustrations with plenty to look at.
Finally 'The Wonky Donkey' by Craig Smith. This was the clear 'winner' with the kids. They laughed and laughed! It has amazing and fun illustrations. We read this over and over and they show no sign of getting tired of it, thankfully I really enjoy it too.
So that's my contribution for Donktober! I had a lot of fun constructing the bag, designing the embroidery patterns and reading funny stories. I'm still new to writing tutorials so if you need any clarification or have any questions please let me know! I would love to know if you make one or use the embroidery for any of your projects.
If you managed to read this all the way through, thank you and well done!
As a bonus I'm having a little giveaway of 1/2 yard of this fab donkey print from the Jack and Jenny Collection by Laurie Wisburn for Robert Kaufman, which I bought at Fluffy Sheep Quilting. I couldn't resist sharing it with you and those wellies are very appropriate for the Manchester weather!

**GIVEAWAY NOW CLOSED**
Good Luck and Happy Donktober!!

Don't forget to visit the other bloggers taking part and there will be a linky party for all the Donkey creations so look out for that :)

Subscribe to:
Posts (Atom)