collage
Showing posts with label collage. Show all posts
stockings + top trend
You don't need me to tell you that the year so far has been crazy! I'm ready to settle down for a cosy, quiet winter. I still have a few projects to sew and if you're anything like me, you might have a few projects to sew this season too!

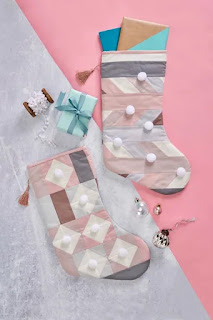
Last year I created a tutorial for these simple patchwork stockings. A calm colour palette was called for by my girls (who are the users of these stockings!) but you could make them festive with Christmas prints or whatever colours fit your home.
The fun addition of pom poms and tassels add whimsy and hopefully these pretty stockings will grow with them, as they are not too kiddish and nicely neutral.
You can get the free pattern for the stockings HERE at gathered - with not much fabric you can create two different modern patchwork stockings! One uses a cool bias stripe effect and the other is made up of easy half square triangles and rectangles.
fabric bookmark tutorial

The theme over at Le Challenge this month is 'reading'. I decided to make a bookmark and I wanted something that would feel sturdy but still look cute! Here's how I made my laminated fabric bookmark...

Supplies:
505 Craft Adhesive
(2) 2" x 7" pieces of fabric
1.75" x 6.5" piece of Aida or thin cardboard
small fabric scraps
Sewline glue pen
paper to cover your work surface
a laminating machine and laminating pouch (optional)
If you would like to create a frayed edge, use a woven fabric and gently pull the threads from the bottom. Repeat on the other piece of fabric and put them together to make sure you have the same amount of fraying.

Spray one side of Aida lightly with the adhesive and stick to the wrong side of one of the pieces of fabric. Spray again and place the other fabric piece on top, right side facing up.

Now for the fun bit, decorate your bookmark using fabric scraps!
Originally I tried to use up some teeny bits of Liberty and make a confetti pattern but it just didn't work as I envisioned.

I opted instead to fussy cut some Liberty print flowers and create a collage...

Which was much prettier! I used embroidery scissors, layered the flowers and stuck them down with the glue pen.

At this point you could quilt over your design, just a few straight stitches will hold it in place, then top stitch around the edges (and above the fraying). You could also zig zag the edges.
Another simple way to finish, that will give structure and make your bookmark more hard wearing is to laminate it. I do like a glossy finish!

Since putting one small bookmark through the laminator felt wasteful I also made myself a little inspiration card to keep in my planner. I used a Project Life card, some washi and stickers.

A little tip - if you are laminating and want rounded corners, use nail clippers to take the points off the corners!
Check out the other finishes at Le Challenge and link up your 'reading' projects for a chance to win great prizes :)
Fresh Sewing Day (and finally some Christmas goodies!)
I'm linking up to the wonderful Lynne @ Lily's Quilts and the Fresh Sewing Day:

I realised while making this collage that I haven't made half as much as I wanted and really, if I plan on making all the things from my winter sewing list I had better get a blinkin' move on!!

I did make three quilts, one quilt top and some more blocks for other quilts, fmq practice and a gift for my step-dad so it's not all bad. This month I have to get cracking, so much to do for Christmas!
With that in mind I'm also linking up to the lovely Rainbow Hare Quilts for Making Christmas:

I have managed to do some sewing in the past couple of days and even made some pressies! Hurrah!

The one on the left is all mine though!!

I made this one first, from the lovely fabric kindly sent to me by the lovely Sheila at Blue Patch Quilter. It is now storing all my sewing bits and pieces neatly and prettily!
The next two are Christmas gifts for family (who don't know about this blog!). I'm really pleased as this is the first time I've ever made zip pouches and the first time I've ever actually sewn a zip! I used the scrappy make up pouch tutorial by noodlehead (although I didn't go scrappy). I love the fabrics and used some pretty cool lining fabrics too:

I like them so much I'm already prepped to make two more for my friends! But in the honest way that I do, I'm going to admit that it did not all go well. On my first try I wasn't really concentrating and got confused with the right side, wrong side, up, down scenario...

Not sure if you can see it clearly but the lining fabric on the right is the wrong way, I mean it's the back of the fabric that's showing (see how confused I am?!!) . I really couldn't be bothered to unpick and so I've left it as a nice reminder to myself to pay attention when following instructions :)
Next on the list is the backing for my Dead Simple Quilt top, I've made a bit of a start:

Going to check out some more Fresh Sewing days then get this back done!

Subscribe to:
Posts (Atom)